Fitted them. Had to polish the head a bit as the pushrods rubbed it.
Spent all afternoon trying to get it to run under 2000rpm, fluffy misfire, having tried 46-47-48-50-52-53 idle jets and a range of idle holders it was present on all, so I gave up.
Its mechanical happening, I think gas speed is non existance due to the increased lift, during lower rpm, it comes on cam @ 2500 properly when if feels life the intake gets into cycle. Anyway, the timing on this standard engines cam is 18-58 58-18, way to early for use on sidedraughts anyway, they like 33-45 or so to get some suck in the chamber me thinks, hense modified engines have far more pronouced pulse in the intake...This cams suits constant draw I think, 1 carb into 4 cylinders, so the other cylinders keep some gas speed in the inlet, with sidedraughts each cylinder becomes a lone operative...Hense needs a different cam type without air box use.... Without the use of atleast a Mk3 cam or something with 275degrees the sidedraughts are just mute.
I'd think on the proper engine the rockers would work well all over...
Anyway, a bit more mid range kind of 3500 up feels like...Also the idle is clocklike! Loads better, smooth, no noise or ticking if the exhaust was quiet and carbs not so barky you'd be hard pressed to know it was running....Roller Rockers are worth the dollars for that alone, also the idle mixture seems easier to set with a wider band of adjustment...odd...idle is a pleasure! it purrs. Shame from there to 2K is untuneable...every jet stumbled, lean and rich and the correct one, plus all holder combo's and ones that I know work perfectly on both engines ,so you what can you do!! nothing with fuelling, will play with ignition curve and few things tomorrow.
So wont be using them anymore on this spare motor after this, think it needs more advance and recurving and most important a suitable cam to get anywhere....its also lost all torque off idle and at idle, you could just let the clutch out slowly in reverse without revs before on both engines and get rolling ok...it'll be going back to mini lift to suit the mini power cam!
You can see the extra lift visually, its all of the 2mm odd, that it should be.
The rollers should really come into their own in the high rev band 5000 up says Bowlers software, which is ideal...as 7K is useable in a daily sense. My proper engine is smootherand more balanced at 7250-7500 than this one is at 5000....
Anyway hoping for big things with Megajolt 3D ignition, RRockers, new engine...I think based on the old engine which I happy with at the end, that production car driveability and flexibilty can be maintained, with a shed load more power and 1500rpm more revs, like two engines in one without ANY downsides at all.....rather like a preppy standard engine with wicked torque to 5000 then a rocketship afterwards.
Sunday, October 23, 2005
Roller Rockers
Friday, October 21, 2005
Roller Rockers, Weight Saving, Suspension.

Few images. Top is my new polycarbonate hardtop window. Pretty easy to make, apart from buying acrylic and breaking the first one as its brittle even when heated...I though it would be more glass like, anyway polycarb was super flexy and did the job perfectly..Incidently the side windows are acrylic as its stiffer. The window is rock solid and under tension all over no bows or warps bar a little by the hex bolts holding it on, fits perfect and was siliconed into place. I sprayed the a 1cm black rim round the edge of the entire window from the inside. This means the silicone cant be seen squishing about behind the window in an ugly fashion. Took 22 bolts to fix it, tapped into the hardtop no nuts needed...Seal, trim, and glass was 7.6kilos...I thought it was more, but the new setup is 1.5kilos complete using 3mm polycarb sheeting.
Next down was bargain roller rockers, how successful or durable will be found out on my crap engine. They are 1.75 ratio, ie loads'a'lift. You can see how much further the pin is towards rockers main axis on the shaft. You couldnt run tubular pushrods on these, atleast not without removing 3-5mm from the chamber in the head that the rods pass down through and into the followers, as they rub the head on a standard skinny pushrod, so minor dremeling needed or a wad removed for tubular pushrods.
Incidently I had one of those fall apart and cause a rockers to blow as it increased the tappet gap when the base that sits in the follower became loose in the main rod, so it span and jumped up and down the distance of the tappet clearance, no bother till it got more worn. This causes the gap to increase at the valve end which I didnt notice and then of course the rocker arm hammers down on the valve tip (as evident via minor squishing of it compared to the other tips) and overloads the rocker, it broke at 7K rpm in 2nd taking 3 more with it.
Anyway, modification was needed to the end main pedestals, as the rocker fouled them, 5 second job with a bench grinder.
I will add them to the standard engine and test them, they would give an extra 0.090" valve lift over 1.45, in theory, on the 89 cam, which is an extra 2.2mm of lift.
Valve Lift =0.424"@ 1.45 @ 0.293" (camlift)
0.454"@ 1.55 @ 0.293"
0.484"@ 1.65 @ 0.293"
0.514" @ 1.75 @ 0.293"
Or something like that over the rest of the ratios. Anyway I have access to a rolling road I could rent, so may back to back them on the new engine and see when retuned if they do anything worthwhile...
Bottom pic, wishbones. Just need some slowbies to send my rod-ends and then weld em up.
Got two new flanges for a new prop as the flanges on the others have spun caps now -even though appearing good and being built professionally onto a new prop of smaller diameter and weight. Protech in Hartlebury Trd Est, Kiddiminster do me a good job normally and fit decent joints for OE spec modern cars for me as an option. I have no complaints about these on the driveshafts, mated to new flanges every time they will last ages. So hopefully the prop will hold together now it has nice new flanges and decent on the joint caps.
MOT time, added a washer bottle in the space to the left of the passengers feet in the footwell, speaker hole?, speedo and few other legal items.
Have some nice new Bridgestone RE720's in 185/55/14 for the back going on next week, perfect winter tyre and summer tyre, scores the best rating of any road tyre on the market in German tests, wet and dry grip are meant to be superb as they are very soft! A wolf in sheeps clothing I read, so why not..I may leave 175/60/14 on the front, as understeer is something the chassis rarely does usually straight to oversteer, which slows you down and means getting out the power, a tiny bit of understeer is ALWAYS quicker if using wide tyres, cambered suspension and modern setup where long duration oversteer isnt really the shit. But will leave a decision on that till further revisions to the suspension are complete, and the car gets aligned, cambered, corner weighted etc.
Thats about it! Phew!
Tuesday, October 11, 2005
Latest Developments
Hmm. Moved the cut off switch to the boot, now cable operated on the dash. Rewired a few bits, you see I rewired the car a while back and hadn't finalised it. The main fuses, relays, EWP controller are housed in a box behind the passenger seat. Neat job.
Added an adjustable clevis to the brake master cylinder, so I could adjust the brake pedal up to get a decent heel and toe position...adjusted the layout of the pedals with a lump hammer.
Next job is new rear shocks I hate spax - get the pooped prop sorted out, UJ's have spun in the caps..new flange time.
Retuned the DHLA for this standard engine:
48idle
7850.1 holder
7 tube
110main
170 corrector
28chokes (needs 26 really its that shite, 30 baggy, 28 still a bit flat)
33pumps
1 vent
Engine has no merits over the old one, twas better at every rpm....odd having 2K revs less to play with! doesnt like my gearing either.....
Added a new indicator flasher....added an electric motor to run the washers and replumbed the system with boy racer blue vacuum hose.
Got some rod ends coming to make my adjustable top wishbones..
The AVO have yet to hit the bump stops, amazing how awful the Gaz were. They have 1inch of travel before the stop, ample...rides nicely, but needs more camber, went from 1 deg or so to virtually positive camber after raising the nose 15mm...! Hense the modified wishbones...As I would need 1inch of packers on the bottom wishbone brackets to find 2.5degrees! Also this would make the front track wider than the rear again...
Saturday, October 08, 2005
Few more pics.

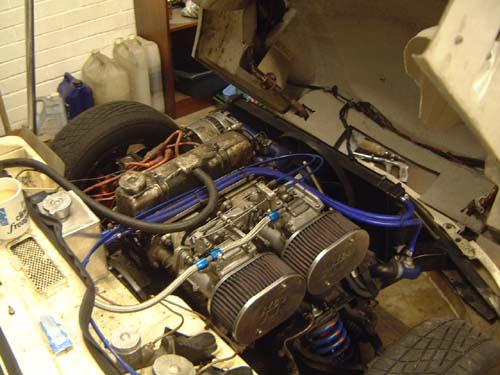

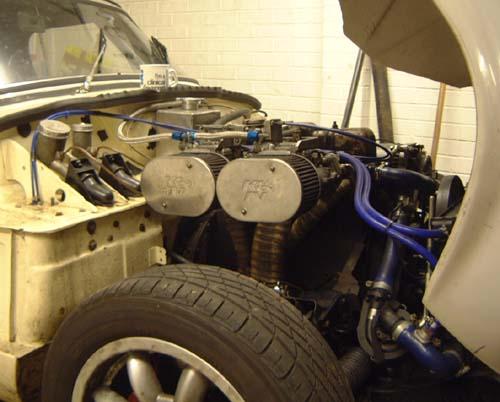

Best ignore the engine, its a spare I ripped from a rusting Dolomite last week. The rest is the same as it was before, I found this water system robust and reliable without tendancy to blow out water or do anything untoward at any time. It can be made out by the blue pipes!
I had the header tank welded up, basically theres the Davis Pump thing and water going out the head to the rad, to the pump and round again, no heater or anything other water things. The header tank pipes run from the top of the rad and just before the Pump. So the pump pipe is under suction and scavages from the header tank, which in term sucks water from the top of the rad into the tank....so its a self feeding system quite like the heater system. As any air bubbles end up in the rad at the top, this system self bleeds air into the header tank, where it stays....I tried a few systems and this has been faultless the 1.9 GTi Pug rad isnt the biggest in the world but with my tiny grill hole gives super cooling.
Kept breaking alternator brackets etc....Solution was to drill out the heavy steel alternator mount to 1/2inch, then instead of using a few bolts and lots of complex stuff to hang the alternator like standard, you can simply hang it on one bolt and pack the alternator on with a few washers...anyway much better, also my car is built to come apart easy, this saves pissing about. Also the adjusting arm is rod'end'ed.
The interior, basic, the dash was removed as it served no purpose. A small alloy plate was made and added behind the wheel this gives perfect vision to the dials at all time, rev counter thanks to Bowler sits on the wheel. Need to get a decent seat.
The only seat that fits from measurements is the skinny version of FIA spec Corbeau Sprint Pro, all the rest are hopelessly wide, and those classic bucket things mean you are sitting in the car with your head pressed against the roof. I like the my bottom to be on the floorpan, the bucket gives facility for the lowest position possible, so thats all good. When I got the car the seat was jacked up on homemade mounts, it was way to high, the whole car felt horrid, like I was sat ontop of it!
The current seat is standard but I added some extensions to the front seat frame mount points, so raising the front by 1.5inches and cut off the rear of the frames a bit, so the seat falls lower, this gives a pretty effective bucket seat, with half the wadding removed from the seat base...Also I use a passenger side seat as the drivers seat, the rear is bent in such a way it is more supportive than the drivers?!?!
Friday, October 07, 2005

Well, its been a while.
Here are a few photos of the car, I was told there are none on my blog! doh!
You can see bigger image here http://home.clara.net/ppowell/sptty.jpg
Recent mods...Well, engine out for a +60 rebuild. Running a 70HP (at best) 1300 Dolomite motor atm...still goes ok!
Fitted the 1500 kipping (billet?) stronger shafts but have yet to dial in the suspension, hopefully UPS are bringing me some front AVO shocks today. Will test the 330lb springs at a slightly higher ride height with them being height adjustable...also get the corners weighted.
Its got great exit traction using 20psi in the rears but there is too much roll during turn in and the front is too low at static and drops too much. My Gaz shocks are both too long and constantly on the bump stops and also non adjustable without spacer things...
This roll means the rear goes light on fast entry and there is profound lack of rear grip during initial turn in, to slow tight bends mainly, as the whole chassis's aspect is wrong, it drops forwards or dives hense it needs raising/stiffening at the nose, as the front dropping really takes all the weight off the back inside which causes wheelspin and oversteer during initial exit, apex, power on, and also it doesn't make effective use of the loaded outside rear tyre so it kind of squirrels in on a wave of changing camber.... although grip is still better than any spit I have had before.
I will ditch the 330 springs and use 480 next, as I don't think even when raised up the dive will be cured. Also the new rear spring is very stiff and I will make another set of drilled uprights with the holes yet further down...(which means flat banjo style brake line fittings on the rear brake cylinders or the spring fouls them! be warned, I had to remove half the spring eye thing off a swing spring to clear the lines with a hole 1inch further down) hopefully another 1/2 inch here in the uprights and raising the nose 1/2 should give the car a very slightly raised nose in respect to the rear, aiming for 15mm higher. So should pull flat when you brake hard with harder springs and make use of the first part of the suspension as suspension, not wallow. I would think then that bar geometry and camber - tracking there will be little more I can do on the solid shafts, and the car should work well...At this time is corners well once settled is supple, a bit too supple, has great exit grip from slow corners but its a bit fussy on the way in.
You can tie the car up by making the dampers very stiff, which makes it plainly obvious your spring rates are too low.
Got rod'end'ed radius arms also I need to weld up!
It was ok before I lightened the rearend up and fitted a new spring! The bonnet weight saving of 30kilos certainly helped regain some balance.
Oh and a side mission, exhaust is currently straight through a micron motorbike race can, its VERY loud...so I will visit Jetex.co.uk who sell loads of 2" pipe sections and boxes.
I worked out if you use 2x 245mm 2" 30degree bend sections you can extend the main 2" pipe which passes under the prop, so dumping the classis Triumph Twin pipe system and Y piece, you add the 2x 30 bends in opposite ways so thus kinking around the diff and ending on the left of right of centre..about 100mm short of the bootfloor section, use 100mm 2" section to extend and meet a bigger silencer than sits under the boot floor and pokes out the back a bit, rather like my current setup but with a much bigger backbox, I was going to use a BIG51 silencer which is the biggest and should shut the car up and also sticks down the same dist as the smaller versions as they are all 100mm tall...you can select and add on a tailpipe which sticks out 25cm, all very boy racer! Hopefully a boy racer extension to my manhood will stop the back of my car getting black from soot.