I am really enjoying being able to strip my car of things and not have to rush anything as its no longer a daily car! very enjoyable 8-)) Hasn't turned a wheel for a month! doubt it will turn another till new year.
Friday, November 25, 2005
Getting Head
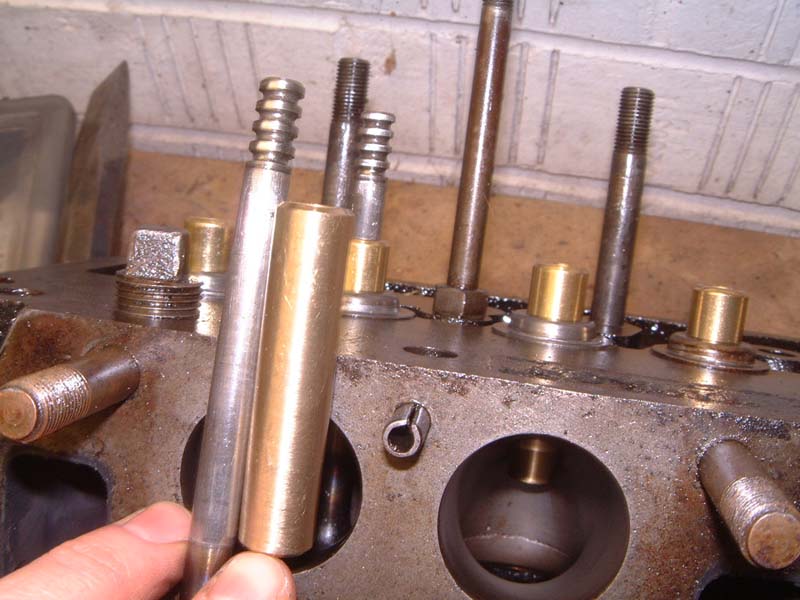


Few pics of how to use Ford Valves in the Triumph Head. 34322 Ex Valve, Ford Capri 1.6. As shown the guides need shortening by 6mm. One image show the standard versus one of the old ones, you can see the need to cut an extra collet slot lower down to house the Fiesta collets and caps.
These 34322 valves fit the triumph guides perfectly without reaming the guides etc, I mean perfect.
Still a bit lost on springs, will take one to my guy and hunt for ford ones the same and maybe replace the springs with doubles and different Ford caps...
Bit of pain working out what all this stuff is...as Oder did it.
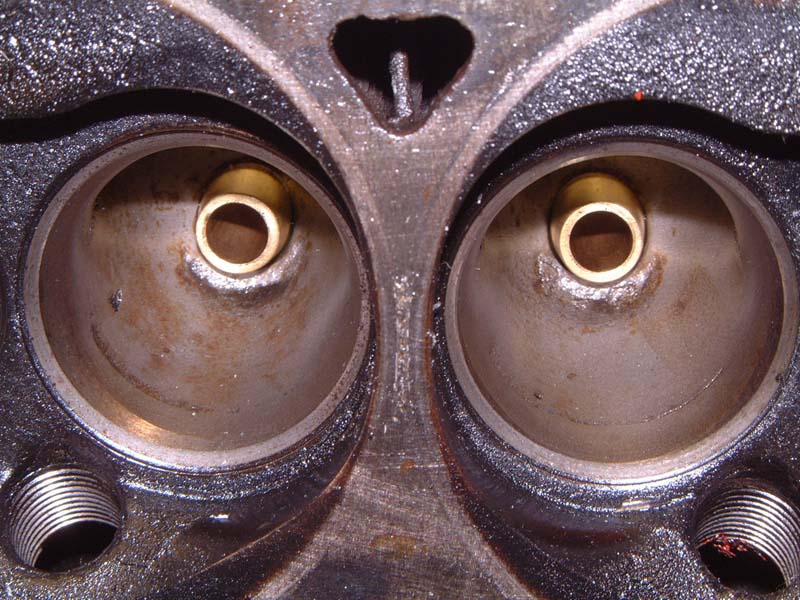
Just a few random images of my ports, I didn't do the work some bloke called Jan Oder did. Think he did a good job! The head is about to be cleaned and refitted, the seats are 3 angle but hard to see, basically there is no material on the inside of the port after the seat area, flows well.
I noticed some Triumph head in for guides and seat cut at my local engineers, someone had raped it with a dremel yet missed all the important porting and detailing just by the seats, therefor it looked like a lot of effort and money for nothing! Details Details! Also some horrible tin bearings sat by the crank.
Had I not stripped my engine down to do headgasket shortly after buying it (owner fitted std cam, tiny Su's and normal needles...) and found a gem, the car would probably be bog standard still or something!! It made me buy a cam and Webers and it all started!
I got some nice bronze coated thrusts today or OE ones the crank is STD here, but takes a STD Thrust at the front and a shaved +0.005" on the rear. Always best to fit the oversize at the rear me thinks. There was 0.008" with two standards (max book) and 0.003" with the oversized one....As minimum book is 4thou I glass plate and emeried the thrust backing, so we have 0.004" now.
Got another sump that I will baffle properly this time!
Wednesday, November 23, 2005
Modified Steering Column


Well I mentioned the PTFE bushes for the steering column.
Finally got them drilled out, they are an interference fit on the shaft, and needed some running in (sitting in the car working the wheel! keeps you warm at night), the bushes to the outer column were also a tight fit...these are tight enough not to need bolting or screwing in place.
PFTE is funny to work with. The lathe wasn't set too tight, and the pilot drill just grabbed in the PTFE and raced thought! SHIT, but was ok!
The feel is so nice, man, its so smooth, silk and feels really quality! Its like Rolls Royce steering, not flapping about on the play those bushes give. Once fully run in it'll be lovely!
Incidently found my column had 4 bushes in it as the previous person failed to get the old ones out and just rammed more in!
TIP! To remove these bushes needs no effort - you cannot budge them with a drift without buggering the soft alloy outer. So set fire to them and they fall out no effort at all, a little tap! Just watch the smoke that comes off its super toxic, best do it outside and be upwind of it.
Anyway, everything I wanted it feels superb. Just need to make the body mounts less flexy now.
Milled 4thou off my 2 tall pistons, all 0.006" under deck now, give or take a thou.
Saturday, November 19, 2005
Pistons Cock Up
So someone added standard sized or 20+ rings to my +60 piston set....pretty obvious as there's a 2.5mm ring gap on all the rings.....
Can't anyone get anything right? Everything I order from everywhere seems to come wrong thesedays...or simply just a pile of poo....Proper new old stock is the only way I think.
I may just use this excuse to investigate "total seal" rings.....be nice to reduce pressure weaps on the crankcase.
I was going to paint this engine lotus grey, quite like grey engines 8-) I was gonna acid prime the block first...as the lacquery thick paint never seems to stay on otherwise....and breaks off in chunks after a while....Might see if i can find a SAH rocker cover like Bowlers, nice item...Tall and wide.
I can't moan my pistons were £78 delivered with pins and rings, they were County, they are well made I think and even weight etc... about £50 cheaper than Canleys, Rimmers etc....
Nice to be able to get all parts at trade price, and of course next day, oddly no delays or backorders when you cut out the middle man!
Cam Cock Up
Well got my so called "specially made" Fast Road 89 cam from ToiletTune. No suprise its not what it is meant to be. Do people think you specifically ask for something for no reason? Do they think they can fob you off with any old thing in the knowledge that most are to ignorant to ask or know better?
Turns out all toilettune cams are just Kent TH5-TH6-TH7 and an unknown race cam with the same timing on the inlet as the SAH 578....The 89 is good as the inlet is longer than TH5 and its kind of an inbetween cam, not a TH5 or a TH6, but something in between, about the most pokey and daily useable cam...
Hense I was keen to have what i specifically asked for and have waited 4weeks for. Idoits...I could have gone to Kent and had them make me the right cam.....its in the right zone and probably just as good but I don't like being taken for a jerk. It was a new grind from a blank...obvious differencies to my reprofiled 89 from before, such as a larger shaft diameter, less aggressive ramp angles - seems as a consquence of the diameter being bigger on the main shaft...dunno they go round and round and stuff...they look different!
Was thinking about drilling some oil dumping holes in the lower end of the cam followers, just one hole about 3mm....saves all that oil sitting in them if it gets dumped each time they bottom out, as they do protrude out of their slots....this dumps oil in the cam lobe area....lightens the weight of the follower, hopefully stop the often present and hard to stop oil leak on the side of the head/block by where the followers go up and down....
Assembled my new bottomend and checked the deck heights...must be a small variation on the crank as 1-4 are 0.005" under and 2-3 are 0.0005" under...Not much but I will get the two higher pistons machined down, then I can drop the deck by 0.005" and end up flat topped. I just worked out my CR was 9.53 on +40 pistons, its would now be 9.65...decked to 0.000"....with +60's.
My chambers are only 33.2cc stamped this is quite big, I have yet to recheck them...The inlet valves are dished and the chambers been opened out round the 1.5inch inlets, so its probably more than made up for the skim of 0.065" on the head in terms of the chamber work lowering CR.
I will measure the chamber then make a decision on finding 10:1 CR it likes high grade fuel as it was before, so why not use 10:1 and make the most of it I say! Will be able to tune the ignition on the ECU.
Hate having to build up a few times with lovely VP and VP2 bearings....but everything was laboritory clean nothing more than a speck of dust anywhere!
Most engines I take apart to nick stuff from have clearly had the contents of the workshop floor crushed into the bearings on assembly and 50% of the engines wear and scoring came from this shit in the engine from the start---- from some dirty urchin.
I am banking on this motor giving me a few years reliable service with trackdays and few weekends in Germany...fingers crossed! It wont be worn out driving daily this time.
I was also thinking of making a Kastner crank feed thing...instead of the oil going from the cooler back into the block after cooling and filtering or back into the main oil gallery, you have this oil going back from the cooler straight into
an alloy cylinder that runs the length of the block...off this cylinder you take 4 high pressure lines and screw them into the main gallery plug holes...This way you get 4 pipes feeding the main gallery from 4 locations so theres even feeding throughout....i.e not being feed from 1 location.
Sure looks cool 8-)
I need to get my oil pump pickup welded as I hacked it up to make it feed from the middle of the sump and forward from the stupid angled position in the back corner...this awful design gives HUGE braking oil surge which will haunt you all through a downhill left hander, I once counted about 6 seconds with no pressure at all, *gently* cornering, I backed off 8-) scarey. Need baffles also!
Tuesday, November 15, 2005
Automotive Anorexia
Few more pics...
The wiring loom goes to a lunchbox, everything relay wise, fuse box wise and also EWP controller is in here, warm and dry and dust free.
The battery sits in the best location, over the rear axle and far lower than the original position! I am sure I could feel an improvement in balance mid corner when I went out to my favoured testing corners....The standard spit when fitted with fat tyres is very on the nose anyway, a bit too much... theres a cut off switch with cable to the dash as on the pics...
-----------------------------------------------------------------------------------
If you have ever driven a decent mid engined car, or driven simulators such as Grand Prix Legends you will be steering the car with a combination of 3 things, steering, polar mass movement of the engine and rear end, throttle...... Also rapidly aware how well balanced they are - these cars have 50/50 weight or a front/rear bias such as 45/55 the car is so awesome mid corner and you can use the rearward bias to steer you round with correct throttle angle, driving that true 4wheel drift ---once turned in and settled you rotate the car past the apex using only the mid engined cars lower polar moment of interia.....
Spits never gonna be a mid engined car but we can certainly improve matters!
The spitifres too nosey -great responce at the nose to turn in but the ass is too light to follow often and floats about....leaving you countersteering at the point of greatest loading, usually mid corner.... to be great here needs a fundemental chance in weight dist......my reduction of mass at the nose (from windscreen frame forwards) must easily into 75kilos mark without even straining to remember what was removed!... Bonnet 27kilos, water pump and housing 6kilos, radiator and surround 2.5kilos, bellhousing 7kilos, engine side screens 3kilos, battery moved to boot 15kilo saving, bumpers 6kilos.....pipework, heater & valve 5kilos theres 65kilos...
I have removed from the boot end, bumpers + internal bracing 7kilos, bootlid 7kilo saving, perspex hardtop window 6kilos.....trim and boot carpet 2kilos, boot prop and frame 1.5kilos, + small savings, spare wheel must add up to 35kilos....
These sums are just quick jottings but you will see a change in my weight dist....
So I have placed the battery in the boot adding 15kilos....so say we are now only looking at a 20kilo saving over the stock rear end.... with the battery moved front to rear....
Standard car say 725kilos Dry
So if the car is 630kilos now....
We started with 60/40 Front - Rear Split and 725kilos.
...I'll not add anthing or worry about the mass removed the central floor pan area (carpets, seat, frames, dash, clocks, sound deadening, doors alone 25kilos!!! I havent accounted for....)
So assuming I have a 95 kilo loss in total mass from only the front and rear of the car (75 front, 20rear) remember the 15kilo shift in mass (the battery)....
So, 435kilos were on the front wheels and 290 on the back! @ 725kilos.
Remove the 75 kilos and we have 360 on the nose now....the back was 290 we add 15kilos for the battery, so 305...and subtract 35kilos for the savings in weight...rear is now 270....add the two together we have 630kilos....
The old split was F:435 R:290 60/40 145kilo difference
The estimated change is now F:360 R: 270 57/43 90kilo difference.....
But I don't account for any inner cockpit weight reduction and also I would think my roll cage is about 35kilos....which is mostly sat at the back half of the car....2/3rds of it atleast as a mass.... lets work it out!
Lets keep the weight at 635 as once my super light doors are taken into account the weight of the rollcage is barely anything additional...and there were atleast 20kilos of carpet and dash etc.
Lets call the cage 33kilos....of the overall mass....If we split it up into 11 kilos for the front and 22 for the back....
So it was 16.5 kilos on each end, now changed to -5.5kilos at the front now 353.5, rear is now 275.5 having gained 6.5kilos. 56/44 78 kilo difference.
Lets add 20litres of fuel the new mass is 650kilos the front is 353.5 the rear is 295.5 54.5/45.5 58kilo difference.....
Of course this very unscientific! but it gives an idea.......thats a big predicted shift. I'd need to move 58kilos rearward to get even weight on each axle...don't think thats gonna happen! maybe another 10! without adding ballast....
I was thinking of moving the engine back 6inches!


Hurray!
It posted and better than ever!
Be picking up my crank and block tomorrow...Need to drop the crank, rods and my prop off near bir*ming*ham....
New engine not far away now!
I got a new daily driver...An Alfa 33 1.5 I.E....quite quick for 1500cc...warm and dry, 1 owner for all but 1 year of its life...on H plate, genuine 27,000miles....its minter! £500! nice! typical italian gearbox, with a weakish 2nd from an old bloke grating the gears, but no issue with double clutching and a blip. Bar that minor fault its faultless!
I do miss the spitfire having not driven it for two weeks - miss the 4th gear pickup and the torque or lack weight, the Alfa's all over the road, torquesteer, remind me to never pay more than £500 for any FWD car, I really dislike them thesedays....yuck and wallow...Its may do 60 in 10s and 112mph...but its no match for the Spitty!
Makes me think about making and refitting a heater for the spit 8-)....I was thinking oil radiator or something with two beefy PC cooling fans on the back and two pipes coming off the radiator to the screen....just enough to warm the screen a bit...
Bah these pooftastic thoughts!
Friday, November 11, 2005
For the 3rd time!
I am typing this for the 3rd time! Damn PC crashes when i attach images and blogger is no good on Opera browser!! Damn blogspot is asking for my password everytime I click something!
Few pics if this ever works...
Some rods.
Megajolt ignition ready pulley...Alloy and has been modified with a stainless steel band on the stub, so it doesnt wear a ring every 8-10K miles and start leaking as with all alloy pullies...The trigger disc fits on with two bolts, the pulley was cut on the back so the trigger wheel has a concentric and interference fit onto the pulley.
My latest area of improvement is going to be the steering column and bushes. Ditching those god awful rubber bushes in the column - they that are great for 10minutes or so when new...I have some 30mm diameter PTFE rod, I will use 80mm lengths or this, 1 at the top and one at the bottom of the column outer - I will drill a hole through these bushes, just under 3/4inch to match the column...I will bolt them to the column outer, by drilling through this into the bolt in 4 placed and tapping the holes to take some M4 hex bolts.
I will then have a virtually wearproof bush, which gives ZERO play and can be fitted tight on the column as PTFE is one of the most slippy and self lubricating materials on this earth!


If this crashes again now I am gonna go outside and beat something with a lump hammer.
*click*
Tuesday, November 08, 2005
Engine
Well, thought it best to make a start.
So ordered a new cam FastRoad89 again as its quite revy and torquey, fitted cam bearings in my old block, to save the block as No4 had bored some rings in the block on the bearingless cam...anyway the cam bearing is solid fit and would be just fine.
Found some lighter con-rods, my old ones were late small crank Herald 13/60...turns out the early Spitfire and Herald small crank motors had a lighter rod, having now checked this on a few engines its true. The later rod is slightly wider in the beam and more excess material on the cap. The late type are 595 stock with little end bush and my lightened versions of these that came in the engine were 576 with a little end bush.
The earlier type are 568 with a little end bush fitted! over an ounce lighter item for item!...After polishing the main and ends, removing 30% of the cap beams, and equalising the caps they ended up at 533 each with a little end bush or 517 without. Thats pretty damn light...I could take the rods further but the fact they are 43grams lighter than my old ones will do me i think.
They say remove the little end oiling conical when lightening, but I don't see how a flat surface with a hole is going to feed anything into them....so I left these alone....its about 2grams you save....I understand that the windage will blow oily air into the little end on the upstroke via hole and X feed recesses inside the bush, but it has to be better with a conical V giving greater surface area, rather like adding a trumpet to a carburetor, suddenely you have an ability to get more air into the same size hole via increasing the potential surface area that feeds the hole...anyway...
I have actually done two sets of rods, both the same.
The rods i will be using had only done a few miles since being reconditioned, I checked the bearing distances on an opring machine and these were the best rods the others werent as good, the best set were just fine under thou variation in throw, so no piston milling should be needed to get a near perfect deck height. I was going to replace the little end bushes but its pointless as when heated to 80C with the pins inserted they are interferance fit and tight, showing only a tiny clearance cold...so thats a few quid saved! and my OE little bushes remain spares for another day.
I check the big end openings for ovalality on a machine, this showed about half a thou which is mircoscopic, but I reamed then out anyway as they were very slightly undersized by around 1/3rd of a thou.
Incidently whoever did the rods before was handicapped I think...as the caps were all off centre and no cap seemed to be perfect on any rod, even the right ones! probably why it was it tight when I built it, but not tight enough to worry about, and as the big ends were so nice clearly no ill effects!
This set of rods should prove much improved for running in and build up and longevity or bearings as there were a number of issues on the others, all within "book" figures, but that means nothing in the world of doing it properly.
Incidently they were of course sonic cleaned before any of this, nice when you can screw in the bolts and there is no resistance at all, no gritty bits etc, again amazing where all this crap comes from that ends up on the bottom of the sonic bath.
I tried rigging up and end-to-end balancer but couldn't get reliable results....so they go to Midland Balancing with the crank etc, dropped the crank off for grinding also....which to be fair is a waste of time...the big ends were really good having only done maybe 9000-11000miles. The mains have been maybe 50000miles on their 3rd set of bearings, the surfaced bar mild tramlines on the middle bearing were hardly marked! thats not hardeneded either! Amazing really....hense I hope with everything right this next engine should truck on for ages, especially not doing 300miles a week in it as a daily driver, as bar a few annoying problems it was in great shape, for a used and abused trashed from cold motor...used as a base for many experiments and subjected to all manner of horrors!
They will get ground anyway as I cannot get any VP-VP2 in either size of current grind for less than the combined price of other sized shells and a grind! .....bearings were steal @ £12.95 a set and grinding costs me about £35 for 4 journals...up to + 30 mains and + 40 big ends so the life of this crank is limited! be swapping bearings next time before they munch the crank up.
So thats about all you can do to the rods......I was going to mill out a bit of material from the ends of the gudgeon pins, maybe 10grams per pin and investigate any material inside the piston skirts that looks excessive...I'd like to save an extra 50grams over the old setup....
Also the old rods were only balanced in weight, not end to end...as that motor was pretty smooth up over 7K this once can only be better!
The flywheel I had lightened was never balanced with the crank so I would imagine that was a bit out as well....
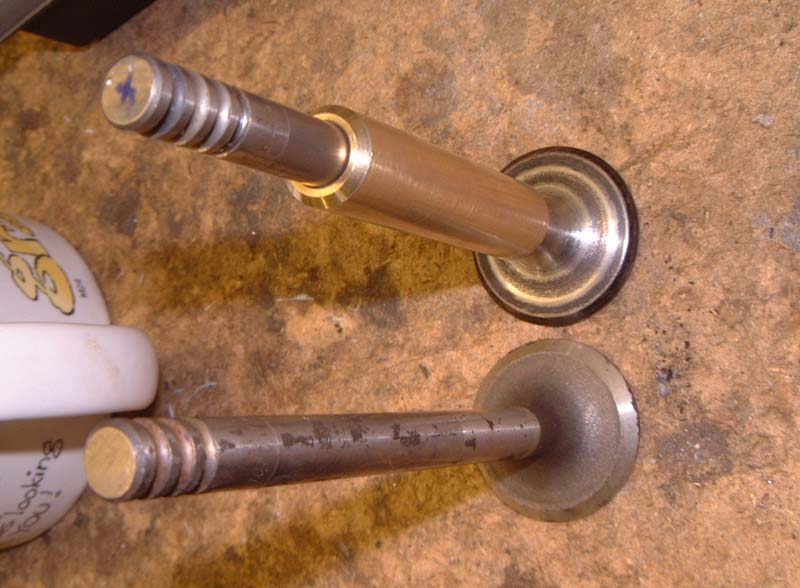
I will be replacing the 4 exhaust guides and valves with new ones....same as before Ford Capri, Cortina 1600 valves....Part Number 34322. cheap and quality 1.25" valves.....to use these ford valves the guides for triumphs need shortening by 5mm or so...
The old exhaust valves had been 50000-60000miles and are rather good still! but ebay turns up valves at £4 OE spec you can't turn em down! The backs of course will be reshaped, by grinding them in them removing any material on the valve back that hasnt got a silver mark on it showing it is seating on the head...here is were most of the extra torque and power is made I think, especially at low rpm (my modified engine has shit loads more idle power and 1000-2500 power than a standard motor... to match my flow at 2mm of lift the standard valve with a 4mm! seat has to be twice as open....that cains flowat small lift so badly...once the cut valve is off seat it can flow immediately and out over the raduis of the entire valve back...standard valve it has to creep out over the valve back, do a quick 45degree turn and come through the gap for the first few mm....
She will be 0.060" overbored also.
Subscribe to:
Posts (Atom)