Owner just picked up his Ferrari. The car is "transformed" he said "like a new car". Always good to do the best job you can. Went for a test run after completing the work and the car drives like a baby, so clean and crisp, 1000rpm in 5th gear where before is a was a pulsing, juddering mess and bogged under hard acceleration, spat and misses and had horrendous cornering fuel surge.
Pleasing! Took me about 2hrs to synchronise the carbs to near pefection. Started on each carb and set the airflow between barrells, then set the airflow between each carb in the front and rear pairs. Then set the balance between all 4 on the idle stops. Then used bricks to prop the throttle open so it ran at 1500rpm and set the all important off idle sync on the balance rods.
Final stage was to bolt the trumpets, airbox and feed pipe back on and set the idle mixture screws for a comphremise between idle and off idle, to cut out some very small spitbacks that were happening on two carbs...
Jobs a gooden. I guess he will now have his 10mpg loss back and the car has about twice the low end power.
Must say the DCNF is a very easy carb to work with.
Friday, July 28, 2006
Ciao Ferrari
Ferrari Fun!
A Proper Car! Ferrari 308 GTB. Note cricket fans number plate. E-By-Eck.
 Magnum style.
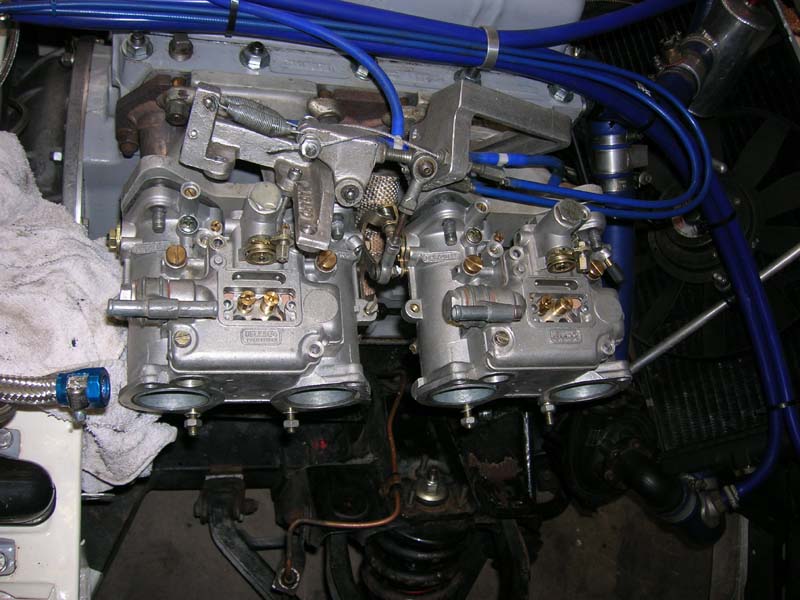
Bit I like. V8 quad cam -revs to 7750 and makes a truely wicked noise. Its a mates Dads, the carbs need a quick in-situ rekit and then synchronisation. I'd take them off and completely overhaul them but would be looking at a weeks work I guess! Its a pretty complex rig. Lots of linkages and levers etc. Quad DCNF 42's on 32mm chokes. Its got some low end fluffy cause they are not balanced and float levels have slipped. I got the carbs done today just need balance them at idle and then at 1500rpm, two different states of balance, idles nicely now, but the off idle lever synchronisation is a bit off...I can't use the manometer on these carbs as there are no takeoffs without modifying them, so tomorrow will arrive an SK-1 airflow meter and I can finish the job. Engine shakes and pops a bit off idle the economy has slipped as a result. I moved the float levels from 48mm to 50mm on recommendation from Ferrari experts as Weber actually stopped advising 48mm a few years after it was made. The car has some natural idle bog on steep slops as a result and also some cornering fluff, atleast when his son drives it 8-)
I have been driven at great speed in it a couple times, what an awesome machine, the ride poise, mid engined balance and overall package are superb, one of the best all round Ferrari's...I seem to remember it being on a full turn of opposite lock in one corner after some excess throttle use!...Gille Villeneuve rated is as his favourite company car!
Last model of Ferrari on carbs too, the later 308 quad cams has nasty injection!
This is a used Ferrari, no polishing, done 80,000kms and gets used daily in summer.
Wednesday, July 26, 2006
Brand New Carbs, further tweaks!
Got my mtyres.co.uk tyres. Bridgestone RE720 185/55/14. £96 to the door...My local place quoted £140 a pair so after fitting i'm saving dollar.
 They came from Germany!
The carbs brand new old stock, DHLA40-C non-emission. They are identical to my last set but they have a more advanced progression setup. More progression holes, larger sooner and run on later. I call these C models miracle workers the DHLA40-45-48C is a very very good carburetor. I had no issues at all on my previous engine with 30-32chokes using 3 holes DHLa40. This engine is a bit fussy and I want perfection from it, don't get me wrong it very very good before but just a few points it was hard to tune on the race-cam and 33 chokes.
James C has some DHLA40 with 4 progression holes, kind of middle road.
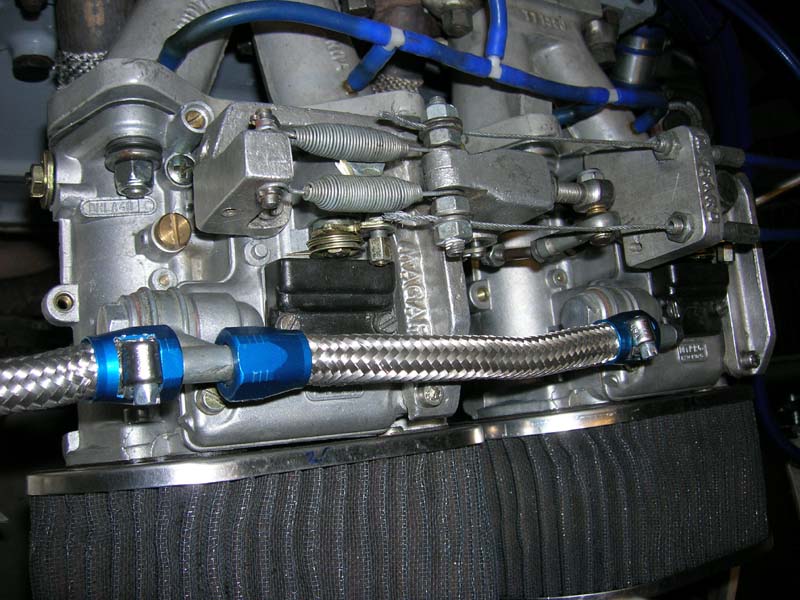
Pic shows new carbs ready for test run and setup. I set the float levels, or levels in the bowl to my favoured 26mm, removed the lighter 7 gram floats fitted in favour of my favourite spansil 10grams versions from E models and some F models. Fitted the viton valves from my last set. Set the pumps up. These have a different lever to my last ones, the last development of lever, this operates the same at low TP but can give a squirt much higher into the TP (throttle position)...Not sure if thats of any use -I can cut it out by fitting harder springs under the diaphragms if needed.
I always find you balance them once after fitment, do about 15miles and they go out of balance and you need to reset them again later on..I did that on the roadside testing them earlier.
 I was hoping to not use these as they are worth a fair few quid and I wanted the cash! I have an odd carb that is a perfect factory match for my other two I removed, so making a perfect triple set.
That set is for sale, ideal for 6 pot engine.
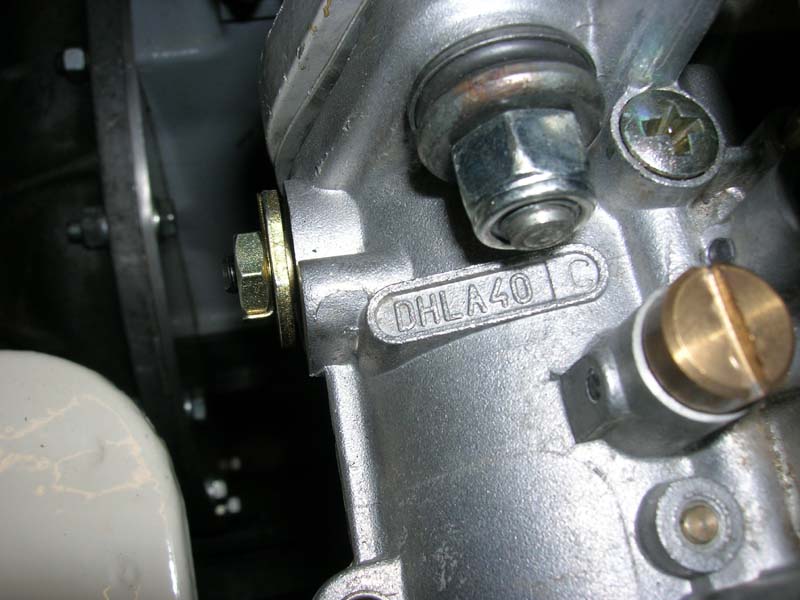 DHLA40-C
 All ready to go.
After the test run they are truely superb. I had adjust my jetting a bit but after two road side stops they were far better than the old ones. Almost as good as my old smaller choke setup on the 3 hole versions which was faultless.
They balance to perfection, they idle like a clock, even better than before! near perfect. There is a shed load more torque at lower throttle positions and off idle for some reason, the car leads itself on much easier with virtually no throttle use at all...It drives itself even more than before, following traffic on flat road or slightly downhill you almost have to brake to avoid running into the car infront when using no throttle!
Mid range cruise is more lively and active and I am much less into the throttle to make progress, much more like my last engine, carbs and cam was.
I expect to find some things to improve on but after only 1hr playing the improvement is pretty impressive. Also the cooler air tonite helps only 25c!
Much more crisp and smooth in low ranges as to be expected...I am happy with them, very much so!
These are the very last carbs Dell'Orto made with over 30years of development they didn't really change much on the carbs till the earlier 80's.
Then fuel injection killed off carbs on Alfa-Romeos and Lancias and Dell'Orto stopped production as market for racing versions was small, tiny around 2% of all production.
These carbs were only born as a result of production cars use. The ammount of carbs Dell'Orto made for the italian cars was simply vast, Weber and Solex couldn't hack the pace. All 3 companies were making carbs for the same models of car in the late 60's and early 70's, them Dell'Orto took over the whole shabang.
Friday, July 21, 2006
Cv driveshafts - Uprights, Stuff.
Finally got James's uprights done. Sorry James!
I can now offer a service on these for the CV drivehaft conversion, also I will have some excess spacer plates for the drivehafts. You supply me with uprights -£80 for each upright and £70 for the spacers...You then just need 2x 340 volvo lobro joints, 1 driveshaft has two of the same joints on the volvo add to this two short side Rover 100 Drivehafts with outer CV joints, job done you have CV joints.
Email davidpowell@clara.co.uk to discuss.
I was meant to be letting the machine shop do the upright machining but due to some unforseen problems I ended up doing them myself today as James was getting a little pissed, and I was getting a little pissed off being hassled!!! I had to quickly get used to the flavour of the 1950's lathe and minor backlash in the movement, but I got the job done.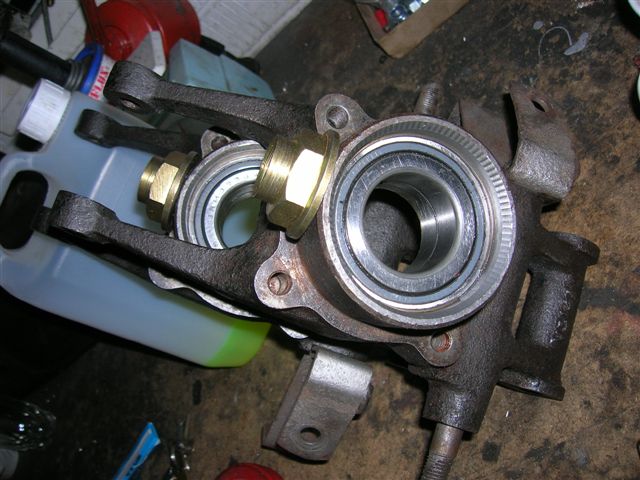 Slightly different to Josh's as James didn't want to use a spacer between the hub and drum, so I moved the bearing out a few mm and set them to require no spacer, its a bolt together job with the MGF hub. I would advise using the spacer with the alloy versions but the steel should be fine like this.
 The only part of my air fuel ratio meter to arrive so far...A Lambda sensor...
Went for a spin in the spit this evening as its running rather well, it seems to have loosed up fully...its using a tiny bit of oil now but still no leaks.
Loads of TR's about due to the Malvern thing I did pass by there, they don't wave at modified Spits though.
I was forced to overtake a TR6 driven by a youngish bloke -he booted it when he saw me arrive behind him just before a big hill, the one in my steephill video....
I knew he booted it as the PI system blew out black smoke and I could hear the exhaust note change . Lucky I had it pegged at 5000 in 2nd ! I soared past it 2nd exiting a corner before the hill starts, hehe, 7800 rpm then into 3rd, not long after I was at 7600 in 3rd and he was about 70metres behind, we had only covered about 200metres. Then we came to the first corner in my video, I wacked it into 2nd and drifted round, 7700 in 2nd, then into 3rd and I reached about 7000 in 3rd before the top corner (3years ago my car would only pull 5500 on a 4.11 up here...), up this hill, its VERY steep - before the corner where I met the red renault in my video...At this point the TR6 was nowhere to be seen hehe.....Cars ALOT faster up there than it used to be, pulls like a train on the 3.89! Love me tracked and setup alignment!! its a joy!
Fiddled with a couple of jets and ended up back where i was...nice evening for a point and squirt.
Thursday, July 20, 2006
Most Funky Alignment!!!
Got it aligned today and camber set.
Forget those laser things this machine was the dogs nads!
http://www.alignmycar.co.uk/ check out your local centre with one of these machines.
I kept expecting it to say something like "take me to your leader" "I am a darlik" etc.
You attach 4 giant things with loads of reflectors on to each wheel, like satalite dishes, the machine sits infront of the car, all computer operated and takes a centre line then works out each wheels location, castor (by moving the wheels round at the front), camber and toe.
I started with my wheels in all sorts of directions according to the centreline - those laser things that are abpout £2000 don't do centrelining. At the front I had 3.3deg of negative camber on the one side and 2.2 on the other....I worked with the guy doing it and set the camber to 2.5deg negative on both front wheels. The rear camber is 6degrees of negative! Seems to work though it corners brilliantly with my new low setup. Rear tracking was toeing in too much at 1.5mm per wheel and we adjusted it to 0.5mm of shared toe or 0.25mm on each wheel. This will make it understeer less and the rear less inclined to just follow the front, it'll be sharp mid corner.
The castor is different on both front wheels but thats a job for another day, 2.8 on one and 3.5 on the other I think...
Cost £45 and the cars feels better for it, corners with more poise and balance I think, very unfussed, drives in a perfectly straight line and is less fussy over bumps in terms of it steering itself.
It cost me £40 for some crappy laser thing before.
The machine is ace, it fires a flashing laser from the frontal unit at the 4 dishes and constantly updates every second...
So I have barely any toe in at the rear (0.25mm per wheel) and I got them to set the front with no toe in or out. Need some new front tyres now, 185/55/14 RE720 Bridgestones, they are VERY good tyres and I haven't got anywhere near the 2nd super soft compound yet.
Was funny looking at the image of my chassis the rear wheels looked like they had collapsed, the bloke said it had been squashed!
Machine was £25,000 or something, took about 40minutes on and off.
Wednesday, July 19, 2006
Cheap Co2 Air Fuel ratio meter
Decided I need an air/fuel ratio meter, rather than buying one for £200 or making my own, which cost near this figure anyway I guess - this little microprocessor thing looks good. Those cheap 52mm dial things you get on ebay are crap and aren't actually the right thing!
The system consists of 3 things. A weld on adaptor which you add in the exhaust after the 2-1 bit on a sports manifold....You can remove and refit the Lambda sensor. £5.50
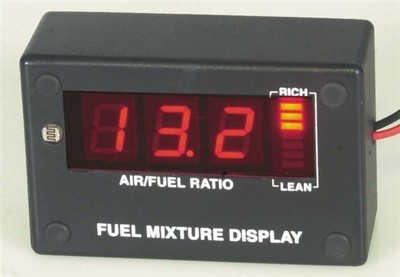
This neat little box with two readouts- numbers(440ms - 1/2second) and a faster reacting bar read out (220ms), this is £39.99 incluing post from http://www.ct-tuning.co.uk/product_info.php?products_id=51 he seem to sell some good stuff, techie kinda guy.
The 3rd item is of course the Lambda sensor, £15-17 on ebay. You can use 3 wire one or 4 wire, 4 wire has a heating element so doesn't need the exhaust/gas to heat to 300c before giving a good reading. I'll probably get a 4 wire one as they cost no more really.
Good tuning tool....I hope to be able to tune my pump jets and low end running even further with it...I can then not waste money on a rolling road with someone else doing any jetting...I can get the jetting bang on 100% on the road and go rent this rolling road I know off and just tune the ignition myself with back to back and pegged tests as fuelling tuning on the rollers isn't a reaslistic display of road driving in many cases.
Water system, carbs, bloody hot!
Added an expansion tank today. Oddly its never ever released any water from the system through the header tank...so I never bothered with one ...
The expansion tank sits next to the washer bottle in the side of the passenger footwell...Basically if any water ends up in this tank I have issues and its a warning to me, I can see it easily. Security...
The hoses are usually under supreme pressure when it gets hot in traffic or you park it and grab a hose after a good gunning...I run a 15psi cap on my header but I not 100% sure if the cap is suited to the header tank cap boss, as with a 13psi cap the same thing happens....I wonder if I am getting massive pressure as its not releasing ever...
The only thing I can do to test it is to drill a hole in a sump plug, bond in a pipe then place this sump bolt into the top of the head at the back, where the heater outlet goes...I run a sump plug in this anyway....I can then whip the oil pressure line off the back of the gauge and run some pipe from the modified sump plug to the gauge and test what the pressure is doing....I will do that soon...If its simply getting to just below 15psi I am ok, if its over 20psi and not releasing I will need to find a different cap and do more experiments...
There is no problem but I just got to know!
Car was running very nicely in the heat today, no worries, constant 74-76c on the road when it was 35C this afternoon - never over 79-80C in traffic with the fan on...Very nice! No real downsides to the heat, my current jetting is well trailored to all atmospherics and VERY economical with clean and responsive mid rang, pickup and good power, not 100% perfect but very nice.
50idle-7850.1 holder, 125 main - 7 tube - 160 corrector, 35pumps, 33mm chokes....BPR7ES plugs on 1.2mm gaps.
I found max advance on the low end running on the megajolt unit a few days ago, had to turn back home and remap..knocked it off 2 deg and all was well...went poo-ey.
Tuesday, July 18, 2006
Waffle
Bloody hot! 34C here today...I spent the day stripping the rear subframe and axle assembly for the E-type, it'll go off for powder coating and be stuck back together, its all in superb order actually, someone liked the grease gun...
Sweated my tits off...Have to strip the suspension from the front subframe tomorrow and that will go for powercoating too. Its such an easy car to work on bar the welded castle nuts! I will take the front and rear subframes to the paintshop and bolt them on so the body is rolling with the bonnet properly fitted before its trailored back here or it'll be buggered bouncing on a trailor with no wheels on!
Beast is being a good boy atm, nice in this weather, nothing to report bar I like my lowered suspension alot, the car is welded to the road and moves about far less than before....I had to increase the rear tyre pressures from 15psi to 18 as the excessive camber tends to mean the tyre is being deformed more as it runs on the inside edge more I think...dialled out that transitional wiggle a bit....Brakes are good, but slack isnt as good as Mr Wolfe's, its in the rear cylinders and maybe the fluid...I will have to take a crow bar over there and pry some more info from him if we meet again 8-)
Looking forward to getting my hands dirty in this engine....I will do a pop-up piston job for sure...Remember pop-up pistons give a far greater ratio increase per 0.001" than skimming the head as there is no squish area....I will need to do the maths, around 0.010"? Dunno yet. I'll need to lathe edges of the piston crowns a bit to clear the headgasket...I read pop-ups have more benefits in head distribution as well as compression and keep the heat in the head etc...Its a commitment move as the block face will need a good skim, but then you could skim the top of any pistons used in the future down to the block if its no good...Not sure what to start on, suppose getting the block clean but not dipped and cleaning the crank and rods is the first step, then a rebore and pickup some pistons I can then start to see where the crank throws and pistons are in relation to the block face...and get this started...I'll lighten the rods and sort those and my current set can be retained as balanced spares...The rods look to me like light ones that I found before they are different to the late ones?! I'll save the pistons in it for a rainy day...
The bearings that came out where washed and stuffed in a margerine container and then the container was filled with oil...You can still see the original bearing face machining marks so looks to me like the bearings have been no miles at all and assembly was clean, you can still see some very tiny marks from assembly on them too, so they will be going right back in they are mint. Thats saved me a few quid! no grind needed either the cranks mint, just a little dirty...I'll stick it in the crank machine at the shop and polish the journals before nitriding thats all thats needed.
Core plugs are all newish, won't bother removing the water ones...I will increase the size of the water holes in the block face, or port them if you like easy work, you can get 30% more area as the entry is a horrible casting on most feeds.
Well pleased with the engine! Can't bite the expense of fiddling with it atm, so I might do some cost free jobs like lighten the rods and powerwash the block, sonic wash various stuff with aggressive cleaner and ermmmmm....not much else!
Sunday, July 16, 2006
BMW harrassment
My car will hold onto a BMW E36 325i all the way to 5700 in 5th gear from 50mph without maxing out the revs or throttle position fully, ran out of clear road at this point....
It might have gained a bit had I not changed to 5th at 6500 in 4th and gone to 7K instead then slotted 5th. Kind of useless stats but must have annoyed the BMW driver to see a car on an 67 E plate suck at a sensible distance from his bumper all the way on a road without any corners...Problem driving a car like mine on the road, everyone wants to harrass you. I was potting along and he had to ovetake me!
I was pottering about yesterday and some Mercedes had to try it on but he couldn't hold me at all, corner or straight bits. Was funny watching the thing leaning onto the wheelarches round a few roundabouts....my cars just going round without a wimper!
Saturday, July 15, 2006
New engine! A real find!
Picked this sucker up from Birmingham today, its an FD-HE, Mk3 Spit Engine. I wasn't expecting much but I scored a result as first glance. The crank is in superb condition and never been ground, its been running lead copper VP bearings which are in superb condition and re-useable I think, not marked. A true find, its been rebored for some reason, odd as the crank has clearly done little mileage. I haven't fullt inspected it yet but it looks like it doesn't need a regrind as there is no wear. Thats double bonus cause there are loads of standard sized bearings about in good grades...So if I nitride it I can throw bearings at it obsessively and it'll last me for a good year years!
Its been bored to +20 and runs on stanpart pistons... The previous work was clearly done well and looking at the bearings the rods are in superb order and not oval etc. It has a funny pulley, never seen one like it? its got a fat bit with timing marks on it, after and before 20 each way...
 Doesn't look much atm, it needs an acid session and i'll build it up over many months. Might do a pop-up piston job on it to get more compression again without skimming my lovely head even more! Thats about it. Made my day I was expecting an abused and nasty old heap but sometimes things come good! I don't expect my current bearings to last forever anyways and its used hard and the crank is toast when its scored this time. I will bore it to +40 I think and do a proper job on it, run mine till it knocks or something breaks, change bearings if it gets that far and then swap my duplex kit and cam, if its ok into this one...
Forward planning pays, I was left without an engine for months after my last one gave in and I don't want that to happen again! there is a Mk3 head, if anyone wants it, its yours for free.
The engine came with some good rockers will be sonic washed in dishwasher cleaner and added to my engine before the ring trip, the ones on there aren't great.
Friday, July 14, 2006
Back on the road!
Had some issues with the brakes on my new master cylinder being a bigger bore seemed to operate the rears harder than before, brakes were completely useless on my first drive as the rears were locking out before the fronts came on, they were red hot, maybe to do with my small bore cylinder experiment! Stopped in a layby and backed the adjusters off to 4clicks off locked...Usually I ran two of locked or tight, is this some odd way of setting the bias?! I'll be glad to put discs on and an bias valve. Brakes now ok, one caliper still works better than the other, pass side locks first, always been that way....Have to ditch them too at some point.
The rod-end radius arms really tighened the back up- but they are a little noisey and clunky, not too bad however, acceptable, very smooth on flat good surface road. I gave it some boot round some corners and it feels a bit better, the rear is moving less bar in transition from coast to power mid corner where I got some serious opposite lock in slow corners... but I suspect its now toe-ing in too much as the lower you go the more inclinded the radius arms become, they were flat they are now inclined to the upright...so shorter, so inducing more toe-in...Needs tracking now...I might lower the front a touch but its VERY low!
The car is SERIOUSLY low at the back, the exhaust needs raising and sorting now cause it drags on the ground quite alot...its a pants setup anyway I cobbled it up for about £15.
I will be off to get it tuned next week I think I am bored of fiddling with it I'll buy 3hrs with Peter Baldwin provided he is confident with my ignition system, I can do no more! Needs some front tyres, tracking and a few small jobs... Wax that arse! After a weeks tickering and some wet drives it was all dirty and mucky so it got a wash and wax...I must be softening up in my old age! Its a GT now!
 Shiney!
Thursday, July 13, 2006
More Sprint and Continental preparations.
Decided to have a relaxing day fiddling. I cannot do anymore to ensure a reliable Ring trip than service everything! the suspension was rebuilt only 3000miles ago, but I like regular services thesedays, saves hassle!
I greased all my nipples, more than two of them! I have nice OE trackrod-ends with nips too. Greased the rack, wheel bearings, UJ's, oiled my trunnions. I will re-pack and check the front wheel bearings before the trip.
Fitted the rear trim strips to the wings, a weight adding vanity thing. Will add a 2o00 stick on TRIUMPH badge on the back, so people atleast know its a triumph! Also added an innocetti Mini GT badge I had...So my car is now a Triumph GT!
Bar rolling road session on the ignition and a tracking session there's not alot left to do, bar door seals and hardtop fitting and sorting any watery leaks.
No doubt something will break before we go 8-) The car is quite highly strung thesedays and indevelopment really, probably less durable than it was in the past, but then bar silly issues like the flywheel its been dead reliable bar fitting duff diffs.
Need to buy some good pads and some decent rear shoes, door seal and make a couple of brackets, one for EWP pump and 1 for the MJL unit I might do this later. Might make another front spolier but we will see about that.
Still pondering what spares to take...not alot to the car really...a front and rear wheel bearing, as Ring Racing is open weekends so pressing is no problem, UJ, flange, some wiring stuff, fuses, diff oil, engine oil, spare wheel! yuck heavy!! tyre weld is all I take atm. I will run Castrol RS 10-16 for the trip, also you can buy this at the Ed Station by the Ring for top-ups...Maximum security.
Then its back on with the Jag!
More fiddling, brake lines, ARP flywheel bolts!
Custom brake lines...Used an easibleed to bleed it up, what a pain the arse, turns a two man job into a single man mission of refilling the master cylinder arsing about etc. Still easier than waiting for a helper!
Just need my two 7/16th rod ends to arrive to ge the bonnet back on...7/16 is overkill but thats what I bodged up before...Over winter I will remake the tubes from alloy and downsize to M6 or M7 joints. Solution to my brake line problem. Two 45 deg -size3 3/8th banjo's, 4 copper washers which needing grinding a bit as they sent huge ones on the O/D measurement, 2 short 3/8th banjo bolts, 50cm of -3 tube and 2x 3/8 bulkhead fittings £25. Make my own lines these days its dead easy. You can clearly see the problem! I am not a fan of lines rubbing on stuff.
 Sorted, the bracket on the body needed bending. Handbrake needed letting off a bit, about 5 turns a side as when you lower it this much the cable is effectively shortened, alot!
FLYWHEEL BOLT INFO
I forgot to mention when I was getting my last flywheel done we found the problem. I had an email from Andy Vowell today suggesting exactly the same thing for my last failure. A mistake by me. Basically not studying the new bolts and assuming they were the same as stock. The ARP bolts have a fillet radius where the shank meets the head to reduce stress loads between the two planes, so you need to chamfer your flywheel holes or washers slightly, a bigger sized drill will do, about 1.5mm deep is more than enough, or the bolts beach on the fillet radius and doesn't sit on the head and clamp the fly, if you don't do this you will loose the flywheel.
So after a while the fillet compresses the sharp cut on the flywheel holes if they have been enlarged and the bolts loose torque. Mistake cost me about £120 in petrol, machining and scrap parts and 15hrs work time! Lucky I noticed later on before refitting the new fly that the fillets were polished and I chamfered this fly before fitting. Forgot to mention that! Touch wood it'll be bombproof now...Just the rest of it to worry about 8-) I wish I had this crank nitrided but being as its on its last grind it'll do for now! It wasn't meant to be a full race cam 33mm choked engine!
AndyV for your concern! Andy like me, has been there and done that I think. You lives and learns. Ta mate!
Tuesday, July 11, 2006
More little Jobs, good to get these done, needed a motivation boost!
A more relaxed day today and an early night! 0.750" 3/4" inch max fluid movement - Wilwood master cylinder. Jon Wolfe's brake slack was non existant this is why he said. Its not ideal cause its a small reserviour and its not angled, however unless you have a system that leaks fluid you have no need for a big master cylinder in my opinion.
You simply fill this 1 to the near the brim and you wont suffer any slosh as there is no room to slosh! Martin Stackpole uses this same item on his race car without any issues...What I will do oneday is get another bracket and cut it to bits, weld it back together and make the master cylinder sit flat(er)...easy!
However for me this thing is fine. The only time there is risk of the feed becoming full of air is if you have run out of fluid due to a leak, inwhich case your gonna crash a few miles later on a big one or your upside down on the roof, inwhich case the brakes aren't gonna help you or anyother design of cylinder. Feels less slack even dry!
My rear brake line parts didn't arrive today! Dang was hoping to do that job this evening...I am shagged anyway my feet hurt, my hands hurt and I have that tinglely worn out feeling!
Was hoping to pickup another 1300 FD engine tomorrow but looks like the weekend, the head will be given away (free to collector) and was gonna build up the bottomend ASAP as a spare for this one, nitrided crank this time and few more mods on the main bearing cap fixings...Like Josh suggested on the forum earlier! Fitted some wipers and washer jets, more weight! Poo! Even a passenger wiper for JC so if it rains at the Ring he can still see, kind aren't I! Need some tube for string up my modern washer bottle, electric! Super cleaning power no push push thing....Need to get some door seal, more cash! Fit the hardtop as aerodynamics are simply useless without a roof, I recon the hardtop is worth over 10mph top end. Might make a boot spoiler too, or go to scrappies and find something suitable, less hassle, just a "gurney flap" sized item, about 2inches tall and hardly noticeable...thats something I got from josh, the science is right, should give a good top-end increase - maybe 3-4mph! Also cleans up the airflow and vacuum behind the car, that vacuum and swirl down the boot curve drags you backwards!
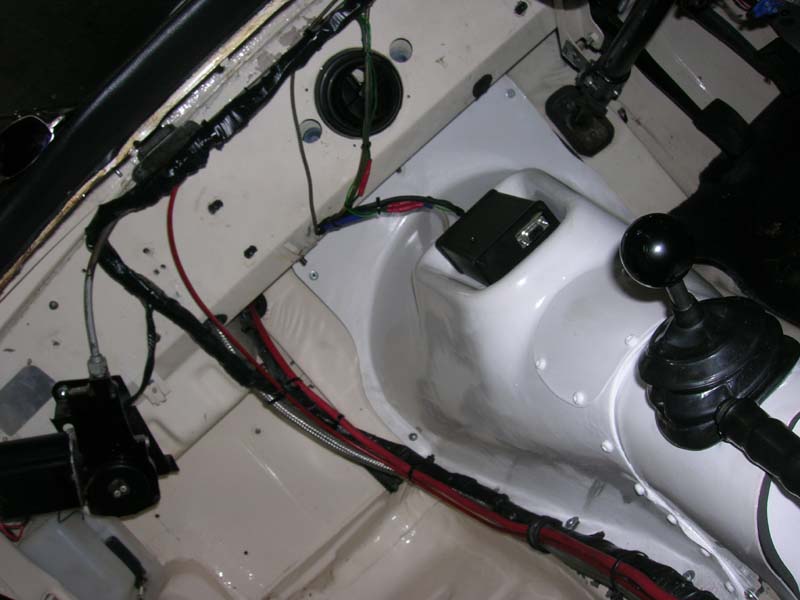 Finalised the wiring inside this evening, about time but I had been holding off until all the ignition stuff was fitted. Tidy! The brain unit will live by the wiper motor but I need to make a bracket. My 1950's XK120 Jaguar temp gauge is not reading properly, quite pissed off cause it was a great classic gauge! Its lost pressure I think, won't go over 68C....Need to fix that with another one, I only use piped and capillary gauges for temps as the response is instant, by the time electric smiths type have responded your engine is cooked!
Note the Austin Mini buddle vent, this is glued into the heater hole, its a perfect fit and does give some cool air onto your legs and chest, mine anyway 8-)
 Have to get this end can mounted up soon, if I run the car in the garage and add this pipe by hand onto the end of the other it gies silent! Gone are the booms that come from mine that rattle my neighbours windows and set of car alarms on mass....
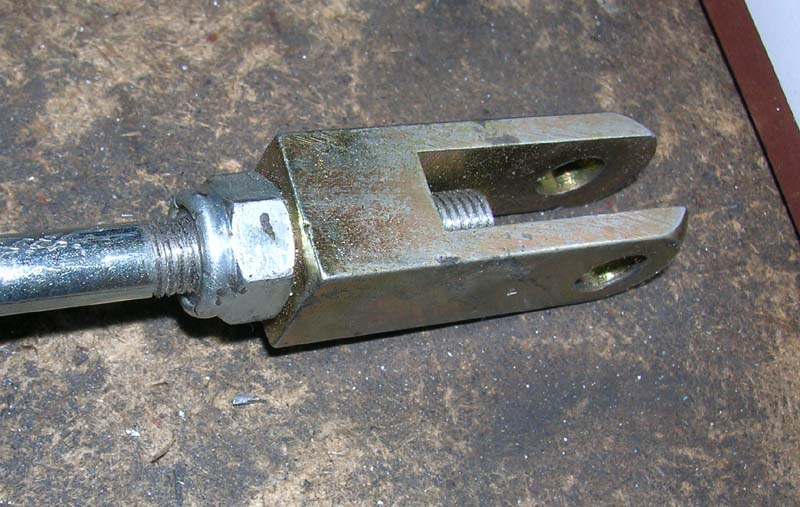 Adjustable Clevis on the brake master cylinder to give some pedal position adjustment, had this on the stock master cylinder before, easy to make yours like this, simply cut off the stock clevis, thread the rod to 5/16th and buy a clevis from Rally Design for £3.

Flywheel fun, the rather ill lightened flywheel that came loose, didnt help I drove it home and also rev'ed it hard a few times before it became obvious it was loose! 7500! opps ... I could have had this area skimmed out and refaced but the dowel hole was ovalled and by the time I drilled another dowel hole and sorted it, it wasnt worth the hassle.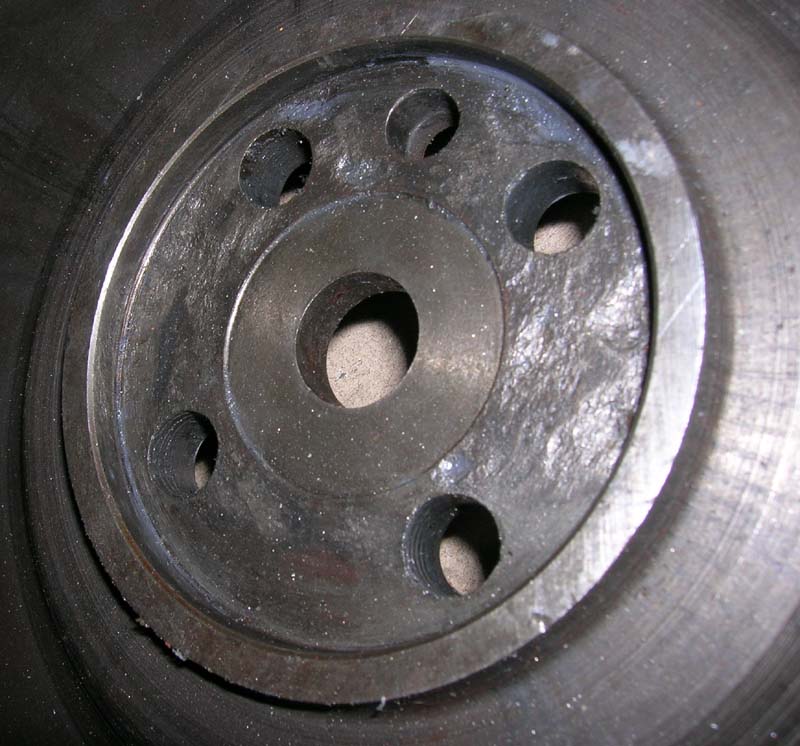 All the missing bits were spun welded onto the crank, blue from heat! Hardened and rather stuck on!
Need to make airbox too soon...
Further Track Prep - Tweaks, Suspension, Brakes
Made a few adjustments to various rear suspension parts!
Fitted a vitesse 1600 3.89 diff, on the presumption it would have had an easier life than a Spit or GT6 diff, feels good, no tickering and whining. Car is quicker on it, rev's hard, mad round the lanes, it screams. I added poly bushes to the diff all round it. I noticed right away alot more road noise entering my backside via the chassis. Also the rear felt a touch more positive, or less sloppy, should be cause the bushes were pretty hard.
Was a bastard getting the diff back into the rear housings...I had to round the end of the long bolt for the rear mounts and smack it through with a lump hammer, cause I was buggered if I could get it the 3mm further back without resorting to plain old violence! The bushes and the pin are on the chassis with these bushes, where the stock ones have the pin protruding somewhat eachside, no doubt giving 2-3mm of lateral play as the bush flexes, the old bushes are like jelly compared...Was a big effect on my first test ride - much more positive, as the diff basically fixes all the suspension to the chassis you'd expect such a change eh?!
Not sure if all this stuff works yet as the chassis needs cambering, weighting and tracking - but no point in getting it setup without all the bits on it...I like the swing axle setup when its working well!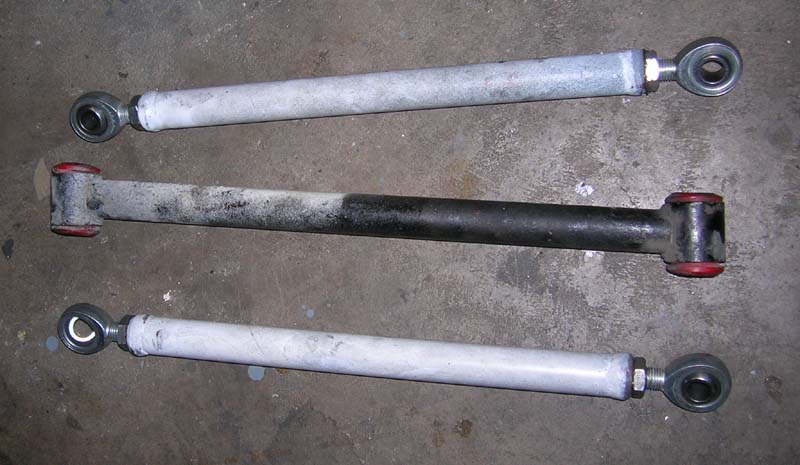
Lighter and easier to set the tracking, which is near impossible on the stock units....I will get it centrelined and 4 wheel tracked after the front camber is set. I had only a some crappy white paint, who cares it'll be shitted up in no time. You can't go lower than 2 1/4" down from the stock hole with new holes as the spring will hit the hub and bearng carrier...This is a monster mod, I am not sure anyone has gone quite this mad yet, can't see it causing any issues bar the need to improvise on the brake lines, ie make some more, no room for em! Next level is Wolfitt rod-end job.
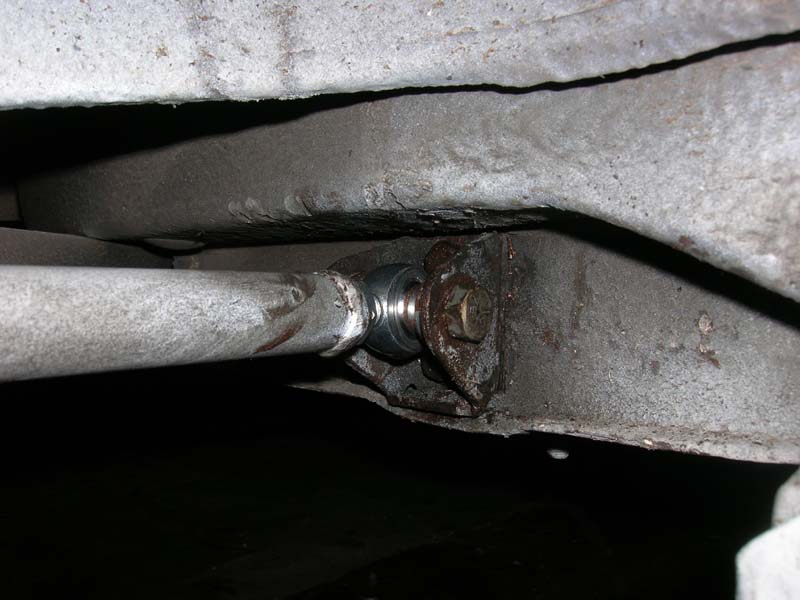 Rod - End radius arm fitted, loads of copper slip 8-) Not on the bearing though!
 Maximum droop is now somewhat less than normal! I see cars about with this much arch clearance, not even jacked up!
 Much more business like, either the nose needed raising (no way!) or the rear lowering! The car was too on the nose, even on the stiff springs I needed more rear negative for stability, it was yawing about too much on the brakes and downhill...
After this pic I spent two hours leveling the chassis to the perfectly flat garage floor, basically tweaking the springs on the shocks up and down, rolling the car backwards and forwarded lots to level it between adjustments...Measuring alot of points on the chassis each side with depth caliper and then making more adjustments! Not accurate but i found it worked as a starter technique before, to get you in the zone, it was a mile out after fitting the new springs at the front. About where I wanted it, on its arse! Tyres dont foul the arches, long shafts, 185's. I prepared for this before the tub was painted.
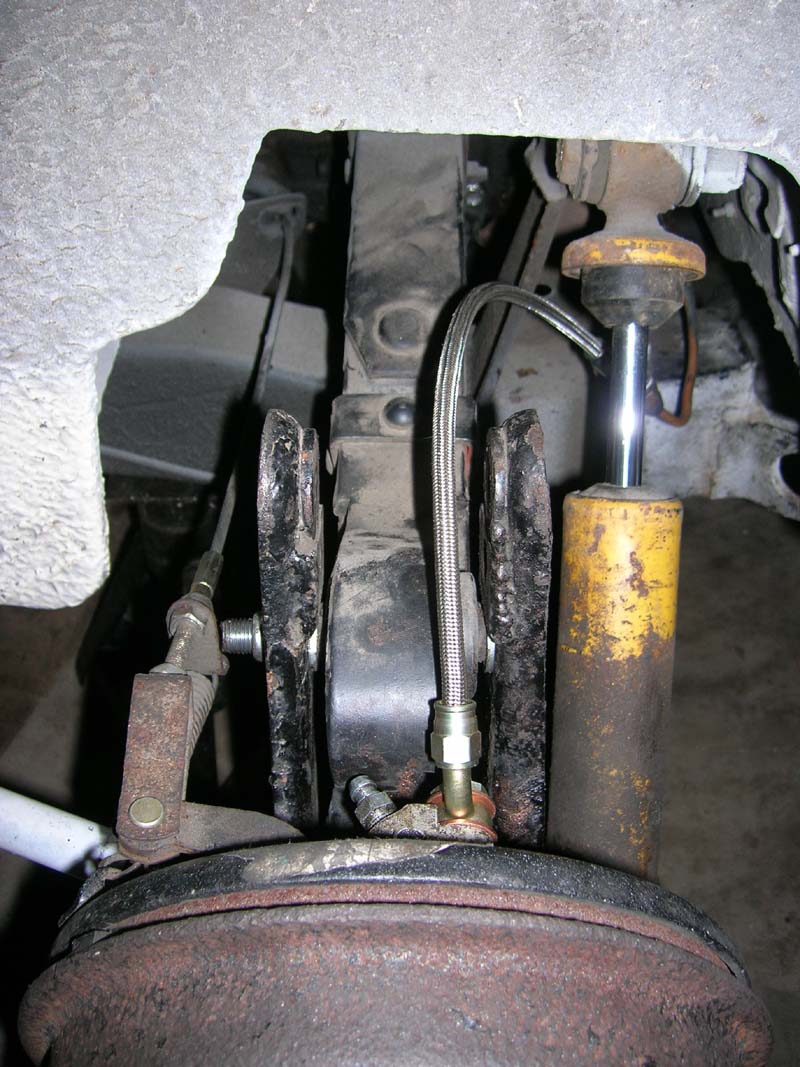
Tomorrow evening I will remake the rear brake lines, as with the spring so low in the upright there is no room for a brake line entering the cylinder - straight! I will add 45deg banjo fittings to the cylinders, the line will go over the top of the spring and down by the shocker, all planned out, just need make the lines, bend the hardline tag round and bleed em up! Wilwood master cylinder and adjustable clevis going on too.
Near 4am, I have been working like a bitch all day since 10am and on my car this evening, I haven't even finished now I have to book collections...Its been like this for months! I am gonna get an ulcur soon!
Thursday, July 06, 2006
Flywheel woes! 5 speed box - back on form (touch wood)
So I had more flywheel woes, it came off again and this time destroyed the flywheel face and spun welded bits of the flywheel on the end of the crank...
So out with the engine, crank was machined on the rear end, back to concentric, extra dowel added. Maybe some none visable damage from the first time?! Another flywheel was prepared and this time its 4.5-4.6kilos - 1kilo lighter than my old one.
I searched through some drills and did some test holes after measuring them and tried the ARP bolts in them, this was in order to ensure a tight fit between the flywheel and bolt flanges...I ended up having to work the bolts into the holes a little as the fit was very tight, just span them in the flywheel with an airpowered impact hammer without the impact bit, numbered the bolts and holes with a centre punch...
They should act like 4 dowels not just bolts, tolerance is much tighter than the stock bolts and holes..., remade the dowels from some spring steel bar and they are super tight on the flywheel too....I will never use ARP lube again, loctite all the way, lube only on the heads where they rest on the flywheel. Fingers crossed this will be the end of the my problems...the new flywheel grabs the crank very firmly and I cannot see it moving again.
Went to http://www.midlandbalancing.co.uk/ and saw the main man Bill, great guy - got the new fly balanced on the crank, it was a 3hr drive for a £5 job! 24grams out after some hardcore lathing/lightening...20 of those grams was actually the two holes from the previous balance!, so my main man Alan did a great job on the flywheel. Run out was checked also etc.
I have fitted the 5 speed box and like it alot, a great deal! Ratios are much improved but the car needs a 4.11 and it will be mental again.
My old SuperSpec close ratio spitfire box is for sale at £220, fitted with new gaskets, I have inspected it and its perfect ready to run, there has been no wear on the synchros in my 3years of use! Its the VERY good box!
I like my new flywheel, touch lumpy at idle, needs 1100rpm idle speed and 1000-2000rpm isnt as smooth but I can tune that out I think...Spins up really well, it feels very free at the top, fun on the wet lanes on a test run this afternoon, mad wheelspin in 2nd from 5K up!
Type 9 fitment was straight forward, I milled my own spigot bush, 15mm bore, the end of the my input shaft tip was 14.9mm, so a tight fit. No judder potential...
For the first time in 10years of spitfire ownership the rebuilt engine doesnt leak or drip a drop when parked up after a run, the gearbox doesnt leak or drip a drop....Miracle! the only thing dumping drips is the diff, next job...I cannot believe there are no leaks!
Brought another Mk3 engine on +20 rebore to build up as a spare bottomend, hopefully its not thrusted etc as I have to pick her up!
I am off to Nurburgring to see the Dutch guys in August 11-13 I think, aim is to take the spit and do a few trial laps! If all is well I'll get my toe down a bit, but will take it quite easy I wanted to thrash the knackers off it one afternoon at an airfield and try to break something first.... take it easy compared to full race speed anyway! guess the airfield shakedown has been replaced by one 800miles from home! Be a few late nights before this, have to take some spares too...need to think that one through. Some tunnel mods required. Like a sherman tank! Gear stick position is nice, backwards a bit...
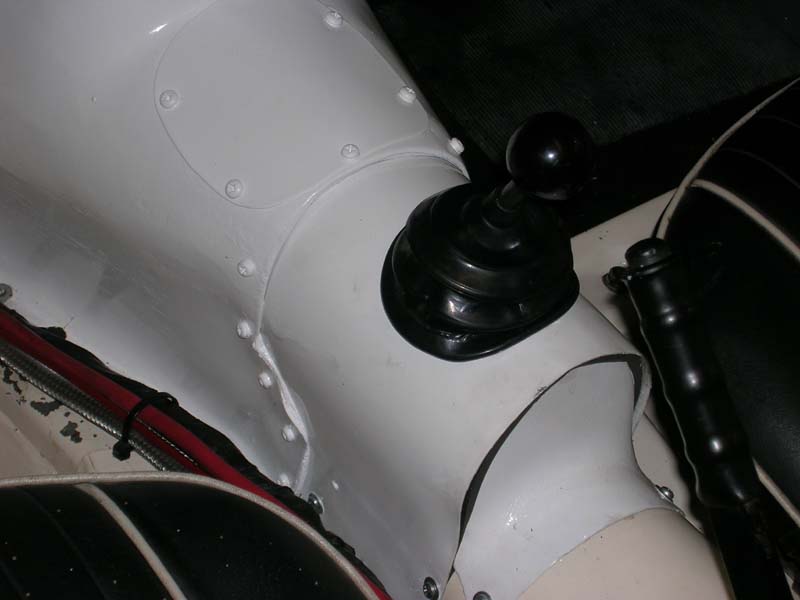 Copied Josh, short knob, ooooerrr. I melted off the top bit of the Ford one, I then bashed off the cups, leaving a bare stub. I drilled an 5.5mm hole down the stub, tapped it to M6...I then drilled out the triumph gearbox knobs metal sleeve to the size of the stub on the Ford lever, drilled out only 50% depth leaving th 50% remaining thread, I then JB welded an M6 stud into the old gearknobs threaded area, making a screw on and offable gearbox knob! Tidy.
The rear panel on the gearbox is actually the bit I cut from the stock gearbox cover...This tunnel seals 100%, far better than it did the way Canley's sold it to me, cause it wasnt big enough on the hump area and sat too high at the back. I curse the damned thing everytime I fit or remove it, I was about to smash it with a hammer half way through reshaping it...but it came good.

Its back in one bit an 11hr marathon from 5pm to 4am yesterday took care of the rebuilding!