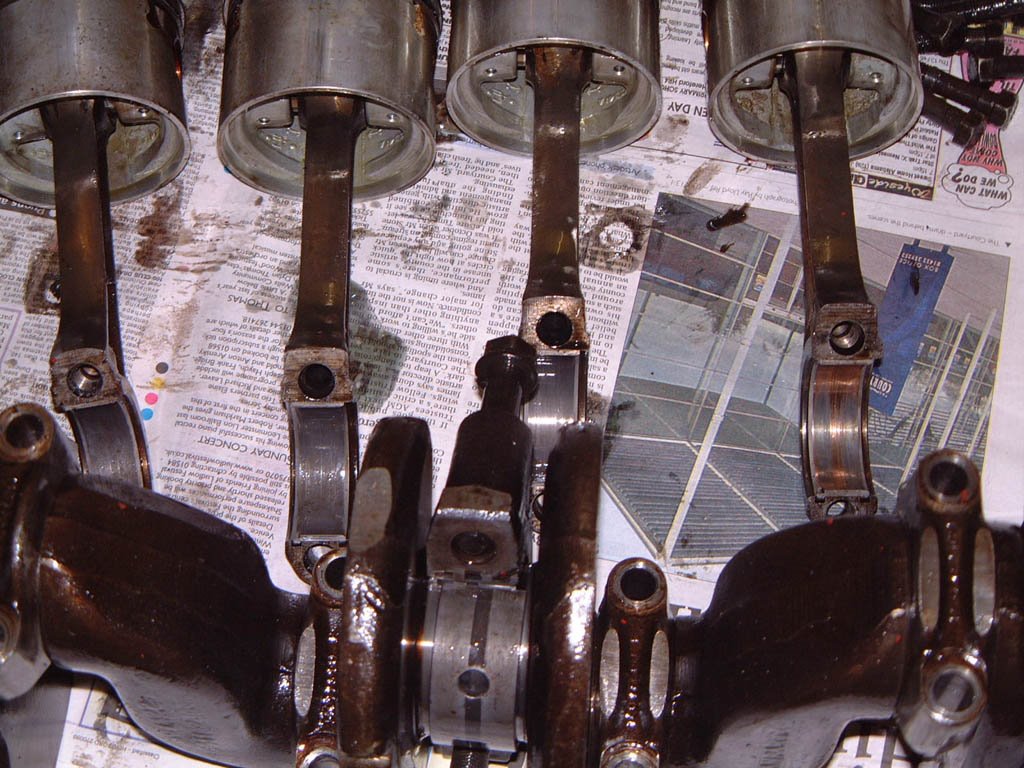
Didn't actually get anything major done today. Just went over the motor fiddling with things and finishing stuff off.
Rechecked my rocker geometry, bang on centre swipe as it was. Double checked my pushrods don't rub the head at all. Cleaned up the stock rockers I'll be running it in on and propably using for thousand miles, till its loosed up properly...I'll be using 1.75 roller rockers on the inlet, keeping the other 4 as spares and running a less aggressive ratio on the exhaust...As its pointless I think with my 1.25" ex valves running all that lift...
When its all together I might rent a rolling road I know of for day and tune it myself, the average rolling road is pants in my opinion, there's noone locally that are any cop... and 2hrs isn't long enough and it gets expensive. Test spark gaps, plug grades, different exhaust and inlet rocker combo's, setup the ignitions MJL unit or overall timing if on dissy still....be fascinating to see the effects...I know the carbs delivered and it was on song before, really nice it didnt need tuning, it needed fettling - just be good to squeeze power from the rest...the 1HP at a time things that you just cannot sense- even with a super sense for these things!
I modified my external rocker feed yet further, making the preminant restrictor I added removeable, basically the banjo bolt was drilled back after from being welded up and drilled to a smaller size... I cut a thread down the banjo bolts feed hole to M4 thread, then got an M4 Alley Key bolt and drilled down the middle of the threaded part and key slot ..this screws into the thread I cut in the end of the banjo bolt and works as a removable restrictor, loctited in place....the hole is 1.4mm....I can now downsize a bit at a time...When flow is reduced to just whats needed the system is FAR superior to the stock block oil feed as this is dependant on the tolerance of the rear cam journal...I have plugged the block riser in head and block...
So when the hole is restricted to the very maximum from the STUPID stock sized feed the pressure in the main gallery isnt effected by more than a couple of psi and the rockers get oiled at idle and all the time...even if the motor is completely worn out.
Span up some oil pressure to test for any silly things. Good to see it instantly hit 80psi and the knock off valve open, slowed down and gave the oil a pre-work through system at slow speed and lower pressure...
I know all the tolerances are right on the bottom of book figure and I blueprinted anything I could, so from previous experience it's gonna be a good 2000miles before it gives it best and will need gentle treatment for a while so not to tear it up.. I set a few things quite "tight" so they last better after initial wearing in. Nice cool evening drives needed on empty roads...
Gapped some BPR6ES's to 0.040"....On the road they are the best in the old engine...I find 7's ok if your belting it, but the 6 has more clarity in the lower range for road work and all over, holding idle constant without fluffing after sitting in traffic etc, feeling a bit fluffy when you exit a town etc......Trackdays would be 7's I think...
Regreased my dissy weights.
I was gonna use an alloy rocker cover, but it weights more than my steel one! So will be selling it...I hacked the breather pipe off and will move it to the other side so it meets my catch tank with only a 12inch hose.., needs pipe welding on and a baffle plate welding in...risking oil loss on this side due to the tappets firing it about, but I can adjust the baffling if needed.
I have to do some real work for a few days I think! its piling up!
Jobs: that NEED doing!
Valance needs paint and fitting
Prop needs a new flange.
Gearbox tunnel fitting < its substandard junk. needs a better seal as it doesnt make any effort to fit...work to do there.
Clutch pedal fitting < want to make a braided pipe for it- to the slave.
Fuel regulator fitting and plumbing.
Headlight fitting and wiring tidied up.
Various small tasks.
Sunday, April 30, 2006
Can't be far off
Saturday, April 29, 2006
Todays construction
Wired up the front end, EWP, Fan, Temp sensors etc. Found some hose! Fitted the fan and spent ages fiddling with it obviously had to bend the mouting stilts and brace the top of 1 stilt to stop waggle as its at an angle it'll just cut into the rad!
The little brace bar from the right slilt to the rad top took me a while to make... I spied the idea and started with a different bit of rod, bent it and it snapped! found some spring steel from a mountain/racing bike quick release wheel clip thing that will bend double and back without fracturing..cut it down and cut threads on it, then bent it etc...It also acts as a rear brace for the rad via the slilt....as its got a little pre-load in the alloy slilt when you fit the brace it makes a super rear support for both rad and fan! The rad is fixed in place very solidly! Also I could run the EWP wiring behind the rads lower lip now with 1 tiewrap - it hides some wire...

Have to make a rad shroud next, it'll be a work of art I assure you! just need to find some really thin alloy...It'll cover all the sides and top, left, right and it'll shape down to met the grill slot , ill need to work the opening sweep of the bonnet out and sort out a good seal from the grille via some means. Also make it a bit bigger than the current grille slot so i can enlarge the hole for more cooling if needed -without remaking the shroud!...
So....all the air from the front will be pressured through the rad...ALL the air...efficient? Also it'll only drag in cool air when the fans on...I was thinking completely sealed job. Need to get an oil cooler in first just need a rad and some hose's + fittings. That may effect the shroud design...the oil cooler will sit on the front member right behind the valance, the valance will have 3 holes drilled in it to get some air to it, also the holes can have some plates put over to adjust cooling etc...
Image one of those posh funnel like extractor fan shrouds that hang from the ceiling to a cooker and tapper out...
Want to ditch the kenlowe really, but it'll do for now... the stilts and mounting plates weight alot, so does its metal body...pacet lighter and better! When it breaks I'll get rid of it. Metro fans are good fit....and light...Atleast fit on this sized rad I think. Horn sits here, single one, wiper motor inside cockpit...on the road you need one, I had not fitted one before bar for MOT! remember on several occasions wanting to give someone a blast!
Jaguar E-type
Oh and I have an E-Type coming here in the next few weeks, mate and me are doing it up, or more like I am....Its gonna have a strip down rebuild, its a runner and a good car but it needs a refresher and its going to LHD and down to Italy, probably for use as a Mafia wagon 8-)
...I will deal with the engine, box, diff, subframes , suspension and anything mechanical and it'll go off for bodywork while i doing that, looks like I am re-looming it and building it up bar trimming...Gonna be late nights on soon!
Hense I am working like a madman to clear the garage and get some carbs sorted!
Yet more progress
Finished the carbs today, it took me a good 4hrs total to fit them properly, even dropped a drop of paint on the nuts inside the filters to lock down the excess thread and loctited everything, i can see why people find them hard to work with generally, cause if you attend to every required detail and know what makes a good job over a bad one, it takes ages, I wasted 2hrs on the linkage improving its action I think and pissing about with all manner of tiny things.
Angled the rad forwards...Need to box in the rad next as atm the air will just fly out the chassis and under the engine! should be good air movement with the bonnet vents... Hope he bonnet still fits, relying on measurements cause I was on me tod today with no bonnet lifters about...
I angled it forward for many reasons, cooling is better and boxing is more simple...I can get behind the rad now to work on the motor and time it etc... i can crane the motor out without removing the rad or water pump etc....making it faster job...Also added plain nuts on the bellhousing cause nylocks add 20minutes to the removal time...they annoy me everytime!!
Some good trumpets.
Looking damned sexy 8-)
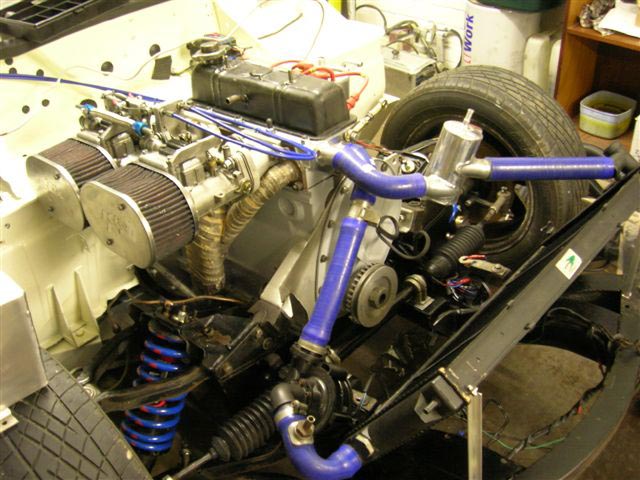
You need a good bank of carbs 8-) This is my main interest in the car, the bits that you can play with and make better!
Friday, April 28, 2006
Gearbox in, Carbs half on.
Dropped the box in today, actually a bind, cause cunningly I moved the engine back 10mm by fitting the mounts on the wrong side of the turrets....back not front! Hard to get the bellhousing past the body cause the input shaft engaged to soon...But alas I got it in...Had to oval the gearbox mounts, my prop was custom made with a longer slider action, it works with or without o/d so it has plenty of backwards movement left...
Spent all evening sorting some carbs and fitting them properly....Aligning all the levers like a production car, tweak here, tweak there, off on about 5 times, end result, perfection, should stay balanced! They are late Dell'Orto DHLA40, with airbleeds. Setup the pumps, just need to add the linkage etc.
After finding the shortest trumpet the best on the carbs before I have got very trick trumpets this time, they are 20mm long with have an opening twice as wide as my others! Vacuum cleaners for high rpm power. CNC made, the best I have ever seen! Joy is they were free 8-)
Sold my pressure reg , bar that could fire it up for a quick 1min-or 90sec dry run tomorrow....get the headgaskets silicone surface to bite the head before adding water.
Very close now!
Thursday, April 27, 2006
Assembly
Moving on, tomorrow should have the rad on and all things under the bonnet fitted. Body is done bar front lights and such and such.
Will be painting the windscreen frame black like the hardtop, think it looks better.
Good tip for aligning the twin carb manifolds, add a bar or straight edge ontop of the studs, when all the studs are touching the bar the manifolds are level to eachothers centre....Gently do up the manifolds slowly and doing each nut up a bit, then going back over them again and again, apply pressure to the bar with your other hand, this keeps the manifolds aligned and saves ages arsing about....then when you fit your carbs the spindle shafts are pefectly aligned, so there is no twisting/moving and distortion of the lever arms during throttle use...so they never go out of balance!...when they are even a little out, the balance will change each time you use the throttle as the link pin moves on the tab lever....gawd every car i see with twin carbs has em fitted all wonky...details, details all add up to production car quality modifications.....except no less!
Made a sight pipe and drain for the catch tank...Dellorto carb vac takeoffs drilled out to 3.5mm and screwed into the tank, easy, used baby fibrewashers and wellseal on them....ideal! Sight pipe only goes halfway up to save weight!
Jobs just taking as long as they take at this stage, no bodges!!
Minimal car, nothing pointless anywhere really.
Monday, April 24, 2006
Shiney
Alas, tis now Triumph White, its original colour I think. Less Red than in the other. Pretty good job, gets what you pays for so not perfect, but who cares it looks ace !
Did everything on the outside bar the front lights today....
Should be just the engine bay to build up next!
I'm knackered did 14hrs on it today.
Need to get the windscreen frame and valanced painted next week.
My plastic pig fits together better than 90% of the steel cars running about...!
No flies on me!
Got the CV things just about done.

Saturday, April 22, 2006
Summer is here!
Hooray! No more winter for months! Went to Castle Combe today, sunburn 8-) Good fun, far too many bling boys and tosspots for my liking at an Action Day, best avoided! very shoddy driving by some folks and basically a free for all with cars passing left, right and anywhere when i was watching, glad I didnt have the beast there with 18year old prats in £500 Nova's trying to drive fast in the typical style of someone who has never left the local Tesco's supermarket....The kind of day you need to be fast enough to just blow them away 8-)
The Beast is ready for collection, I will see the results of its holiday when it arrives back at port tomorrow morning!! Watch the GP then start attacking it.
You know when you get a car back from painting its all rapidly downhill to the conclusion. Hope its dry tomorrow!!!
Bet its wet and mucky....
Sods law No1.
Friday, April 21, 2006
Thoughts
So few things rear suspension related.
I was pondering perfect square wheelbasing. Basically getting the centre point stub axles of the front wheels and rear wheels the same each side to within 1mm....I bet they are out I'm gonna measure my car...I can set the tracking to some extent on the uprights wishbone rod ends I think...so radius arm can be used to get the centres setup, then final toe tweak on the uprights...
Also i can set the castor angle by swinging the rear inner wishbone rod end forwards or backwards on the wide inner bracket combined with some radius arm adjustment i think.... but i could be wrong 8-) by adding more or less washers front or back, so changing the wheels angle of attack very slightly.... obviously with the radius arms being tweaked and toe set on uprights - ...basically moving the bottom of the upright left or right a tiny bit within the springs flex to get them both identical castor....i need to mull that over!
I'm gonna have some headache potential, but i'll get it dialed in ! change one thing you gotta redo everything really...hehe...im gonna need a big red book.
Thursday, April 20, 2006
Paint - Suspension
Car primed and waiting top coat.
Pressed in the bearing today, heated the uprights to 90C and they went in easy before it cooled.
Uprights need some dremel action on the back, about 1mm to clear the CV boot.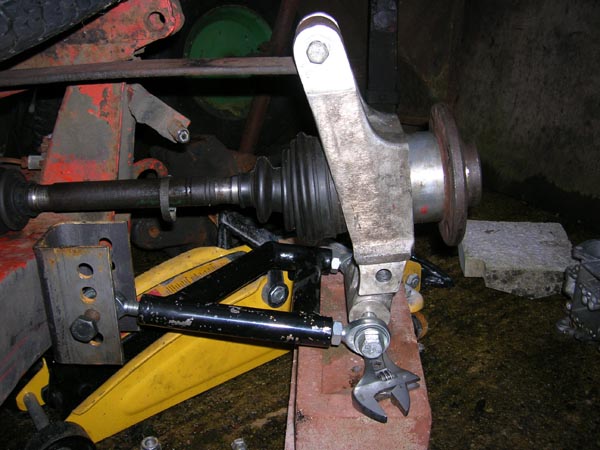 Above shows the wishbone bracket with many holes...this is about where it will all sit at static, the chassis is the same height as mine is normally and the upright chocked up where it sits with a 155/80/13 wheel i had fitted.
Here the main part of the driveshaft is midly inclined as it would be on the swing axle, of course, cause to get negative camber the swing shafts ends have to be higher than the inner end !! level you have no camber...
As its setup here, there is more static camber for a given ride height than the swing axle. As you can see. We have a dose of static neg.
As it bumps up further 1.5" from static with the wishbone in this inner location - as in a cornering / roll situation -there is a very small increase in camber over bumping on this hole then it tails off and levels out, doesnt grown anything after an 1inchover the first 1.5" bumping and not alot over the first 1.5", it stays quite stable, and doesnt grown anything much throughout its entire bump cycle... This one requires more static negative plumbed in I think, as it doesnt grow much....what you put in it, is what it stays at, bar a little neg addition.
If I move it up one hole and keep the wishbone the same length there is more positive at full droop, out of cycle- due to increased inclination and shortening of the wishbone on its movement arch, this moves about plunge wise quite aggressively at the bottom when the wishbones becomes MUCH shorter the further you droop.
By the time we reach static it obviously has less camber than the lower hole setting as the wishbone is shorter as its more inclined, so has lost length, but its waiting to grow later and give its best later, it gives its best, later, in the bump cycle it, the curve goes flat later than the lower hole, so the bump curve follows directly...
The driveshaft is flat with no articulation at static unlike the picture and lower hole setting, this means I will have the same camber at static as with the swing axles...But this hole makes it grow quite a bit of negative over the next 1.5" as the wishbone extends towards flat later, suiting lowered cars more, your recycling the suspension to work in a lower position (bump and useable suspension zone needs tuning from stock if you lower it alot your working outside its designed position, the pickups are all placed for stock ride height)....
This setting virtually matches the swing axles in the working area but without all the other mess at the extremes, so its gaining good camber, but down by 1/3rd possibly over the swing axles...the swing axles camber change becomes too negative over its main bump cycle, mostly during the last 1/3rd of its useable zone -if you could bump it down over 1.5-2" and keep the body flat, you have massive camber on swing axles.
This 2nd from top hole makes a setup a bit less aggressive than swing axles during the first 1.5" of bump, then the curve gains a bit more compared to the lower hole over the next 1", over that inch the first half has a small camber increase then a flat curve,
So put very basically lowering from the stock loaction puts the bottom wish to flat to early, if you move the inner pickup upwards by half the distance you lowered the car, you recycle the suspension somewhat delaying its best activity to match your new ride height.
....It makes good camber if thats needed during bump and roll but doesnt give the extremes of the swing axle...
The bearing is pressed into the upright as much into the main body as possible. I have about 2mm of plunge CV movement left at some silly droop level - before it bottoms out on the lower hole.
I have 0mm left on the upper hole but the shaft still rotates smoothly...But by reducing the droop slightly and removing and 3/4" of total droop jacked up, useless droop, I have 2mm to play with and the joint turns just fine....I wanted to cut out excessive droop anyway for the Ring saves wobbly light moment landings....
The plunge basically just goes mad at the droop extremity, the move you move the inner link point upwards the more it plunges towards the diff, basic stuff, at static there is 7-8mm of CV movement left before bottoming out on both settings using same wishbone length ...I could push the bearing further in but I am only interested in it being as far back in the upright as possible! 2mm is 2mm and that 2mm is in a zone rarely used, thats perfectly ok to me?!
I'd didnt get round to measuring the hub to drum spacer required here with my bearing in its current location, but long wheel nuts with extra flange to location both spacer and drum and wheel - concentrically, are no problem.
It goes round and round woooo!
Tuesday, April 18, 2006
Pivotal moment
Towed the old beast to Mr Paintman today. I guess thats a pivotal moment. Hopefully back friday...Was good to be back behind the wheel albiet at 40mph! felt STIFF and oversprung for its meager empty frame! compared to my Alfa hehe, wallowing thing....
I have an uneasy feeling, maybe its thinking about my poor lonely car. More the likely the prospect of having to spend a few months fun money on something that doesn't make it go faster, handle better or loose weight! painfull. Have to raise some fun money!
I generally hate bodywork with a passion.
I would think if circumstances allow the weekend should have the body fittings in, roof on and it externally finished leaving just the engine to be fitted.
Some jobs to do before its road worthy.
I need to service some carbs. Have some brand new DHLA40C's but the extra progression holes would be a waste as I had them on virtually no progression anyways....and also the holes are bigger and closer so they may outrun the idle jet very early...So probably use exactly what i had on before...I have some basically new ones of those too...
Propshaft needs some new flanges and rebalancing etc. Used, used flanges last time, bad idea front cup was spinning and wobbling.
Need a new alternator or get my case welded as it cracked, alot.
I need to sort an exhaust out or take a reading from mine and check its ok for this trackday or I could sent hime 8-(
Could repack it! There's an idea is was ok (ish)!....Don't think making this trackday will be any problem, provided the motors all joy. Car will be a bit overgeared on 3.63, I doubt I will get round to making a 4.11 with later type big flange output shafts...Like Josh. But you never know...3months....Change the diff for the day, what 1hr or so?
I need to space my spring up a bit more or drill more holes in the uprights and really dump it. Ride height was a bit high before and spring will take 12months to sag a bit?
Also needs the adjustable top wish's fitting and camber doing.
Could use a decent seat, but I can live with the old one for now! Just means hanging on for dear life/leg bracing in the corners!
Final swing axle setup finished then. I guess having never had a failure and having given spitfires more than my fair share of abuse they shouldnt worry me....But they do! They were re-jointed only a few months ago, thats all you can do....I don't run a LSD or race tyres, should be all good.
Be odd breaking its track virginity, be good to stretch its legs in "safety", whatever that is.
A shiney car, great prospect, the only way is downhill now....The other one had character when it was 1 colour, lots of wounds from constant tickering and breaking.
I'd like to start spending less dosh on it and more time driving it, its the final push! Having compremised total hp for torque and reliability running costs are peanuts.... I know I have saved about 7kilos off the nose with alloy engine plates, some bonnet tube mods, making some brackets from alloy - doesnt sound much, but I'd notice that I think. Try swinging 7kilos round on the end of an extended arm, then change its direction...!
Last obvious big saves, alloy hubs and calipers....for a rainy day that one.
Plastic lamp bowls...
Enough!
Tuesday, April 11, 2006
A trip through the beasts life!
As I got the car, only mod, Sports exhaust. This poor unsuspecting victim was purchased for a quite a bit of cash, but has proved its worth in terms of buying the best tub and chassis you can find, 5-6years ago I think!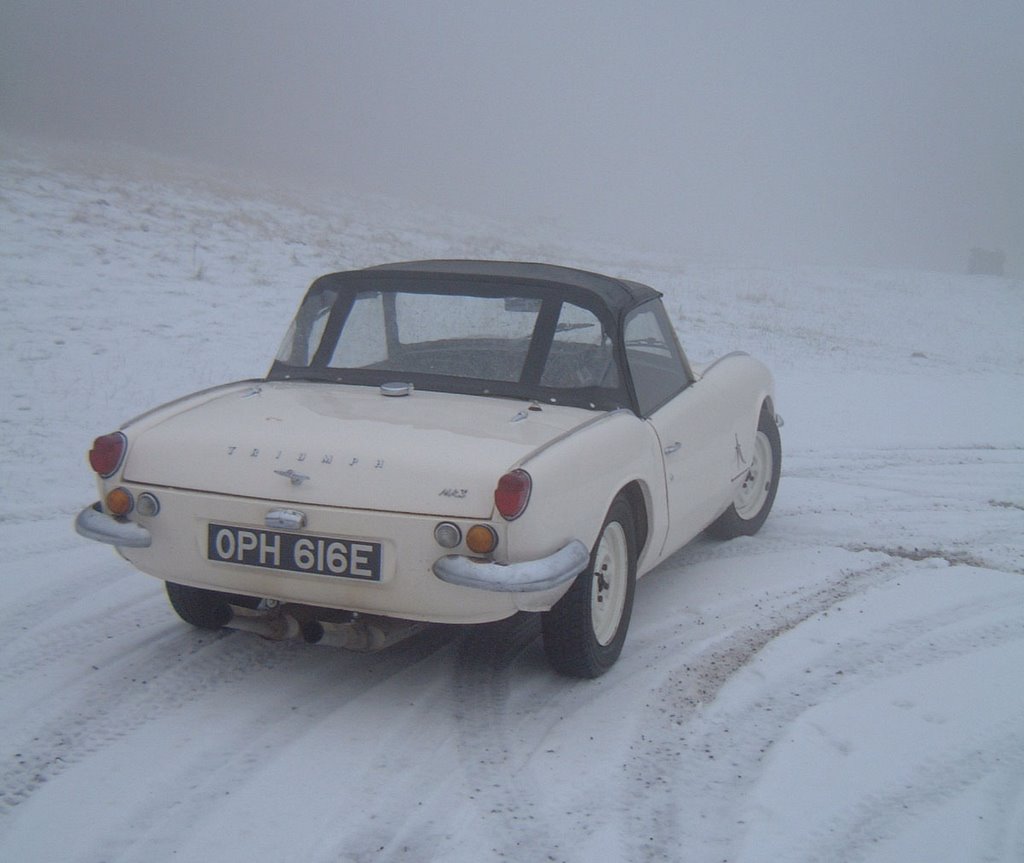 155 tyres, TT lowered fixed spring, safe predictable handling with no grip at all!
 I used to drift the 155's everywhere, they usually looked a complete mess.
 First aero improvement, actually this grille made loads of difference at speed...biggest single effect of anything possibly. No more lift, drag etc, 4-5mph more top end over an open grille.
 Sometime in the distance past! 185's on, hated them as the car was very much setup for thin tyres! 155's back on after a few days.
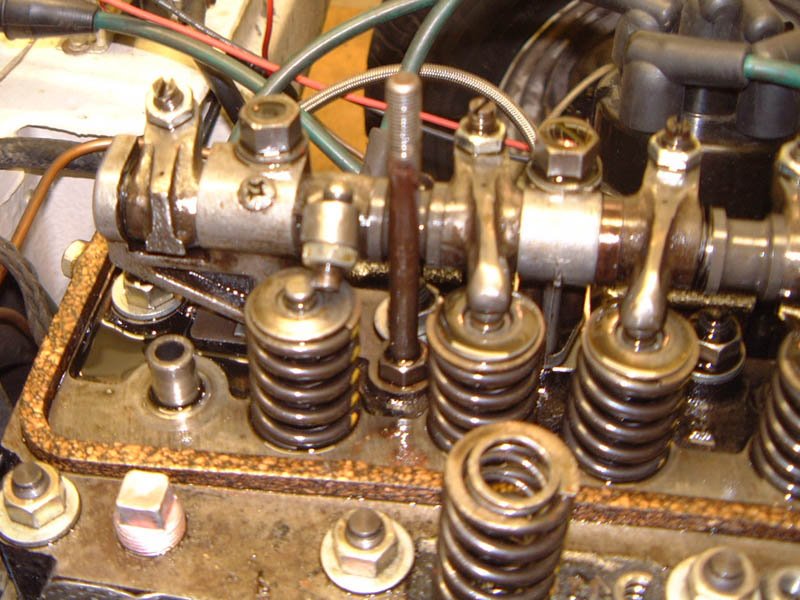 Where did the valve go? 6500 rpm. Bit noisey.
 Ahhh.
Ahhh.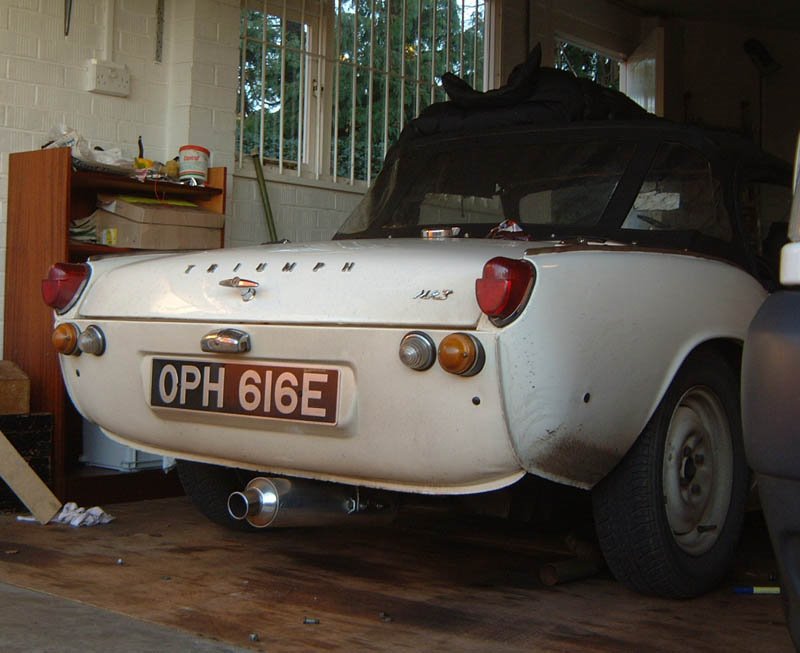 Micron Power. Race can from a 750XS Ducati, maybe there was meant to be two, cause its bloody loud! I thought there was a noticeable improvement in upper range pickup over the heavy and silly twin system, more free? lighter - LOTS.
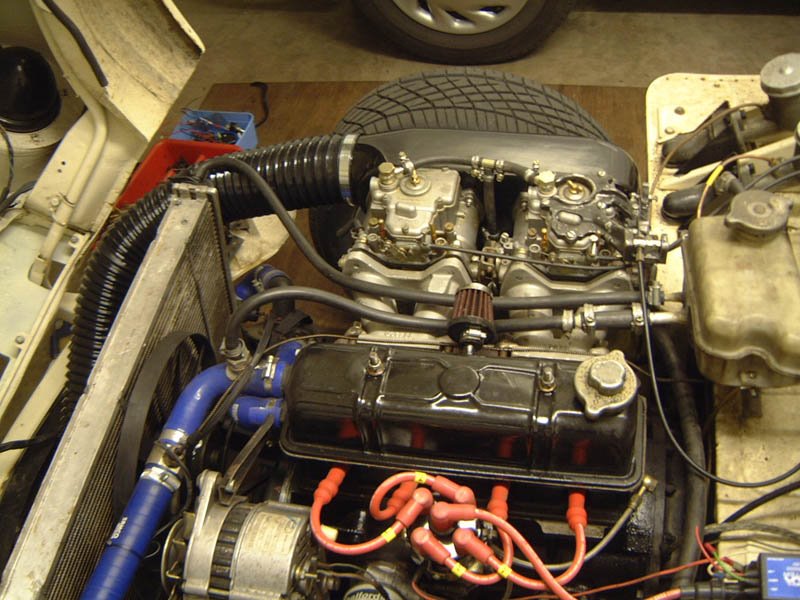 This was about 2years ago. Huge citreon rad enabling the use of that tiny holed grille plate...Not perfect, todays water system is far superior. There is a 1750cc Holbay Hunter airbox on the Twin DCOM carbs I didn't like it, ran for all of a few days, could get anywhere with it, muted my engine.
 All steel tub and perfect fit, roll cage just fitted, this was another turning point in the current direction!
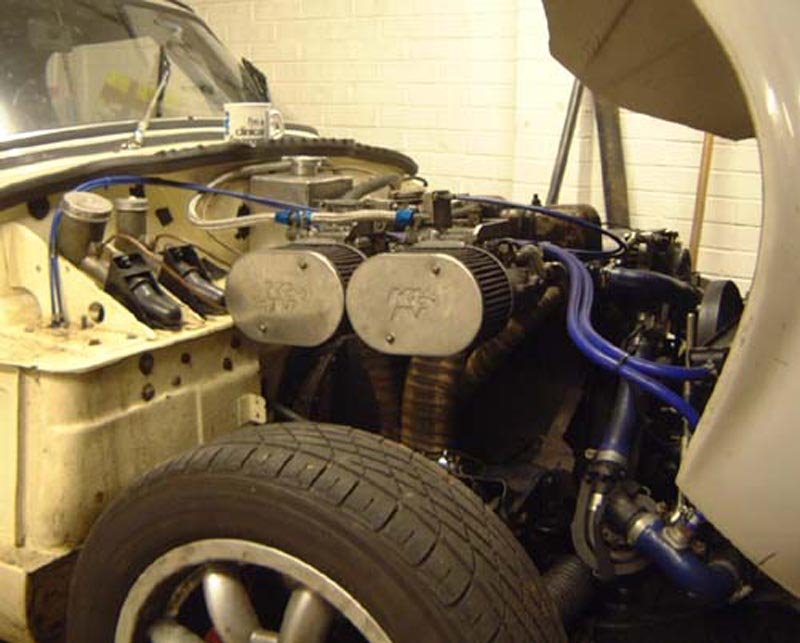 About 18months after the last pick! Engine bay in "final" guise - just before it was pulled apart for its current work.
Upright machining etc.
Stage 1 was being done today, milling the uprights out so I can press in the bearing and decide on the best place for it, before the circlip grooves are cut.
I think he was using the rebore machine 1minute job, but a while setting it up!
Saturday, April 08, 2006
This and that
Just messing about before taking the uprights for machining.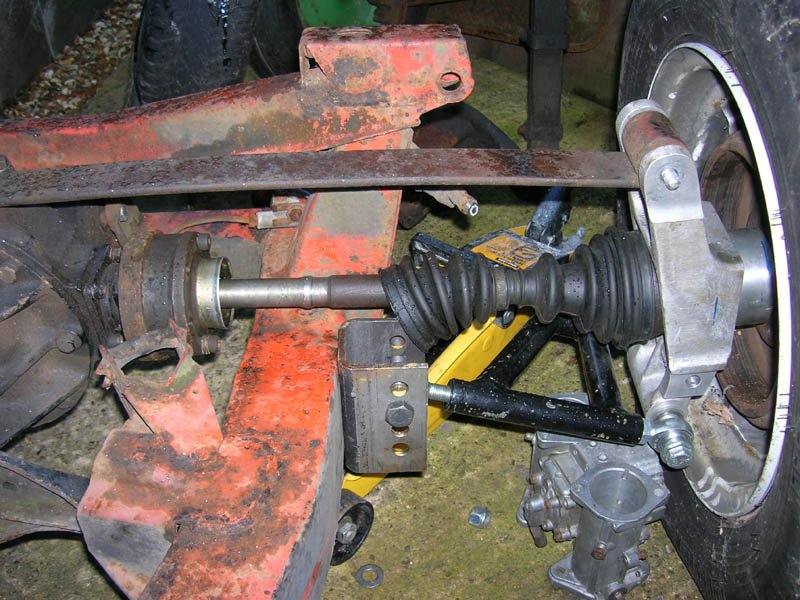 I don't think I will fit the suspension for a while even if its all ready...I only just rebuilt a set of rear shafts! The car had a complete suspension overhaul about 500miles ago and felt lovely and tight, no slack anywhere! Move the wheel 2mm the road wheel moves...
Knackered Dell'Orto's have all sorts of uses.
 The wiper motor is inside the cockpit and over the passenger side, moves a bit of weight over there huh? Easy job, just take it apart and refit it the other way round...The wheel boxes work either way, bolt the tube onto the other wheel box ,rotate the motor to it its natural home on the bulhead - which it will dicate itself as its pivoting from the wheelbox. Mark the holes drill the them, bolt it on, job done.
Also there's a washer bottle in this side, may go in the boot but that means more pipe and longer wires = heavy....need to ditch the brass tube, that was a midnight before MOT addition!
 Must ponder a different tank eventually...can't remember how heavy they are?! I will need atleast 6-7 gallons on occasions me thinks cause its not a pure race car is it. Battery may then have to go in the tank area, pain as i made a nice alloy box for it..., I'd like the fuel as far over the back as possible and as low as possible and slightly to the passenger side, could be a good time to hack out the bootfloor and sink a tank underneath a bi, maybe bit dangerous if you get rear ended!...away from the exhaust a bit too! to add balance via ballast...?
In the dry atleast I always prefer my cars to have a good sharp nose, ie hunting apex after turn in, a bit LOWER polar momentum that we have in the normal spitfire I think....Spitfire has a very high polar moment due to its 40/60 weight spilt and frontal C of G , so it dives and understeers a bit, low PM is great and case in point is developement as seen in the 60's mid engined F1 cars - just as much use in a spitfire!... raw chassis balance maybe better with a full tank of juice and a tank further back, and to the passenger side ....but it'll increase the polar mass at the rear...not sure it thats good?! so giving the rear some more mass to rotate with, limting understeer yet further?...but not lowering polar momentum....think of the car having two ends, front and back.
The car will always turn (change direction) about its center of gravity when in a corner so the further away the centers of weight concentration are located from the center of gravity -which is their common center-, the bigger the "moment". Longer it takes to turn the mass, slower you corner and change line, direction everything.
Maybe chassis development and "balance" were what ruined motorsport!
The Lotus 49 F1 car was an amazing car in its day with a very low polar moment, in an era of mid engined F1 cars with V12's in the back and heavy complex engineering, large rear weight bias very backwards centre of gravity, hard to turn and all understeer, driven best on the power, slow in fast out!! large polar moment.
Great to reduce this polar momentum if the car is mid or anything engined, the spitfire needs all the help it can get to LOWER its moment around the front wheels and into less nosey C/G - to reduce understeer after turn in and quicken the speed at which it will change line during turn in, and then hop onto and stay onto its best traction circle.
Basically weight distribution, when its nearest to 50/50 its probably best but thats C of G not polar mass...Those mid engined beasts were 60/40 Rear biased and C/G well back.
Chapman got the first real light V8, the DFV made it part of the chassis and body stuck it right on the drivers backbone and moved him forwards a bit to the norm, hung the rear end from the engine, suspension everything - saved loads of weight at the back and improved the weight dist/polar moment to the best ever seen in the 3litre period up to 1967 by some margin.
The car was very quick and a little "unstable" ie on the nose and the back, real balance, controlled unstability...You could just tickle it into a line change as it used less slip angle... the slip angle wasnt dictating your line as with Ferrari and AAR via a constantly sliding traction circle....Lotus car used less constant slip so was always ready to react.... in an era of big unbalances and progressive understeer and oversteer depending on fuel level and weight movements, this new perfect squirrely balance led the way, ultimately making more use of the overall traction circle with less slip angle....
Tyres developed due to this, your classic CR65 Dunlop for 1967 was made to yeild max grip at 10degrees of slip angle cause the cars were that way the year before...Only in 1968 did the 49 really show its cards when it got less slippy tyres (firestones)....chassis balance increased and tyre technology changed as an intermingled equation, the ammount of slip built into the tyres was reduced year on year. Flamboyance was a dying art.
Cars for drivers like Button to shine in were the future, a that chassis that will work for you, not against you...Of course if you stuck a driver like Peterson or Rindt in one, drivers who drove purely with flamboyant talent a gift from god, they'd just hang it out anyway...Probably struggle with tyres later in a race.
Put Stewart or Lauda in one it was never seen out of shape as the super low polar moment cars like the 1973- Short wheel base Tyrells were at their best being guided rather than "driven", this is what balance is all about, often the smoother driver in this period was seen mustering faster laps than the drifters of old (who used to be MUCH faster to about 1961) these intelligent precise drivers could now do laps of great speed without looking fast! The cars began to outsmart pure talent / car control ...The chassis's no longer needed a test pilot but airline pilot with supreme racecraft.
Look at Schumacher when its all right, he barely moves the wheel, he's guiding, sensing feeling but never exceeding the limit, he has the talent to to be aggressive but he has no need cause the car needs a loving gentle tease, not a rockapes grasps...
Chassis balance, Aero balance the modern F1 is godlike.
Cars that the 1940-1950's racers like Nuvolari, Fangio would have been able to drive perfectly well and good, but they'd not be half as far ahead as when the laptimes were purely dictated by how much angle you can drift through the corners at to get past MASSIVE understeer, running plenty of rear brake bias on fast tracks and trailbraking you could do your best to rotate the car during turnin and slap the power down and ride it out...trailbraking divided the good from the god, how much you can make a terrible handling beast, with no brakes go fast....
These guys would have been lost talent in later years....They were regularly redefining the laws of psyhics in a 400hp car on 165 tyres, or atleast what the others in the paddock though was the limit.... Now the limit is your machine, Nuvoluri would regularly kick the German Auto Unions's, Ferrari works teams bums with talent alone, driving privately entered cars that were often last years machinary! Junk to the Germans silver machines.
Great times I think.
So the more you sort the car out the less fun you have drifting and battling it about, being flamboyant, but the better it is, the less work it is, and the faster you can go?! Funny old world.
I hope my car is quite boringly effective.

Took a while to cut these out! Gelcoat chipped with the Jigsaw, filler and rubbing down, musta been 4hrs work!

Bye Bye Big crank 1300.
 Last piccy of a multicoloured thing!
Thursday, April 06, 2006
Paint your wagon
Hopefully have a painted car on the 21st of this month if all goes well, have a built car by the 1st May?! It took me about 4-5hrs to strip it down to nothing so maybe less, hehe.
Note No4...When I brought the car the guy pulled the choke, fired it up to about 2K and the oil light went out a bit after...I cringed...No4 was purely down to poor starting. I have always worked up 15psi pressure on the high torque start motor before firing up any of the next rebuilt engines No4 has been as good or better than the average of the other 3 in the last two...So case in point, crank till you loose the oil light atleast then fire!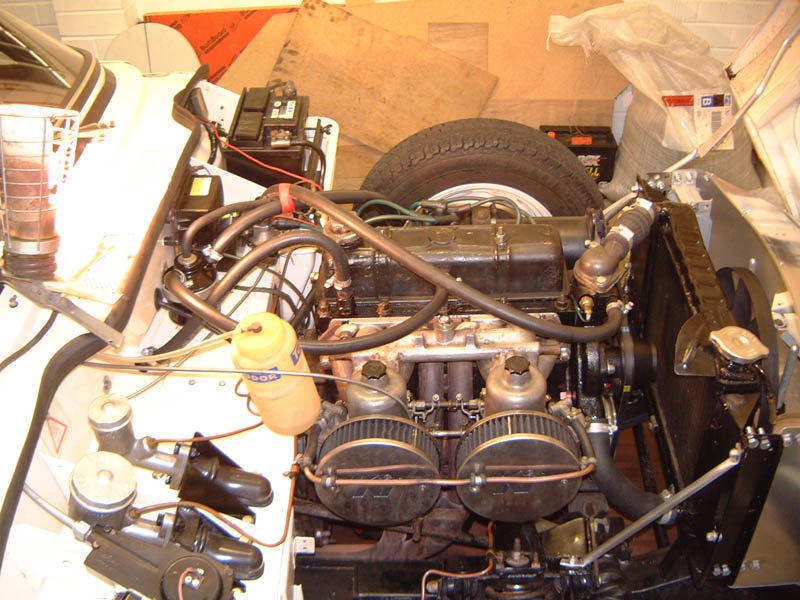 This was the car virtually as I brought it. It was always a revy bugger, I don't think I'd blown the first gasket at this stage and was yet to discover that my engine was a firm base for the beast! The car was mint and worth the dosh I flogged everything from it cause it was all perfect gear, it paid for the first year of fiddling...before I discovered Alloy.
Motor was stage 3- whatever that means, with a standard herald cam, bit flat. I still remember the day I fitted the Fast Road 89 cam and Webers and the HP raise was incredible! I had engine out for a reshell and re-ring a few days later as it was a touch tired on the bottom end somewhere I though (see above)...I thought the motor had found so much power it was gonna grenade itself quickly!!
Note alloy radiator braces. I was on the right track, but had no bloody idea that a set of webers and cam would lead to the creation of today. I intended to leave it as a nice road car, but the performance and weight thing got addictive, has run and run! and run some more...Its a war of attrition.
Wednesday, April 05, 2006
Windburn and Bodywork
Fun day at Mallory! Good one CT.
Good to see so many old cars ripping round. Chin wag a bit and nearly freeze to death.
I always liked Josh's number plate. Well composed at this stage of the corner.
Here's me in about 1997 this car is not composed!!

The Police recalled all their Metros to have safety wheels installed, as the tyres used to come off the rims, can't see why? 8-) Mine had them installed, luckily.
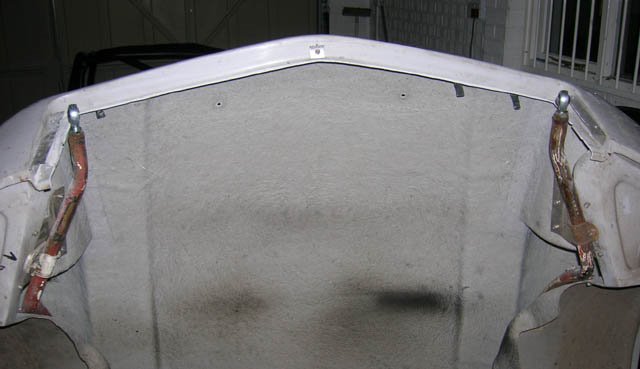
BEASTLY BODYWORK!

Hacked out the remains of the inner grill section on the bonnet...215grams saved!
Nice clean opening...I think I can cut the bonnet tubes down further in the alloy verions I'll make...Basically loose the bit that goes over the arch, everything after the bottom front arch single hole mount point will be cut off...It does nothing on my setup... the 2.5mm alloy panels I am using to mount the main tube point are incredibly stiff and strong, they tie the D-Plate into the structure of the lamp recess and arch area with great strength ...I bent the flat sheet in 5 different planes, the first were easy as the sheet is thin - after 3 planes were added, I had to drive the alloy very hard with a 5kilo lump hammer so make it full 3Dimensional but not squished, but kinked, with kinks forming a rock solid structure.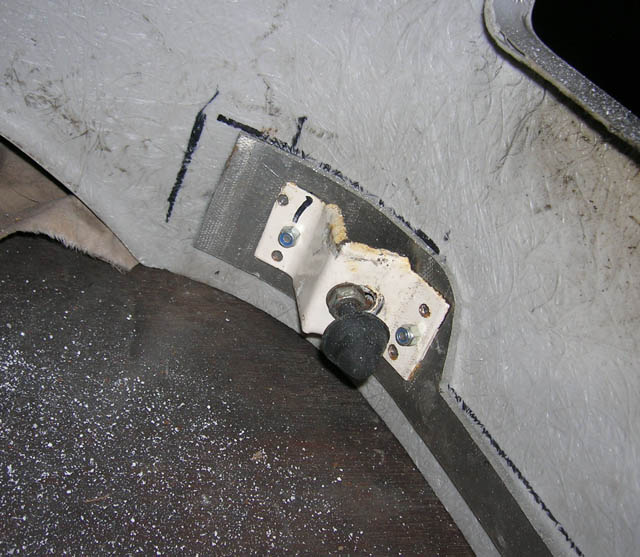
I mounted my bonnet cones on the stock brackets, bolted to some alloy and adhesealed to the bonnet, the leg you can see runs down to the bottom of the wing, I curved this alloy to it gives the wing a nice fit and also it shapes the wing from the inside...Its serves a number of functions, it also adds pressure to the bonnet catches - it holds the wing outwards slightly when they are undone, and you have to push the wing in a touch to lock it down...This pushes against the catch latch, I never had the catches coming undone or any rattling etc...It works!