Sunday, May 07, 2006

Details

Just finishing off things. Near done. Satisfied the engine is good at this stage, no leaks or weaps at all, yet.
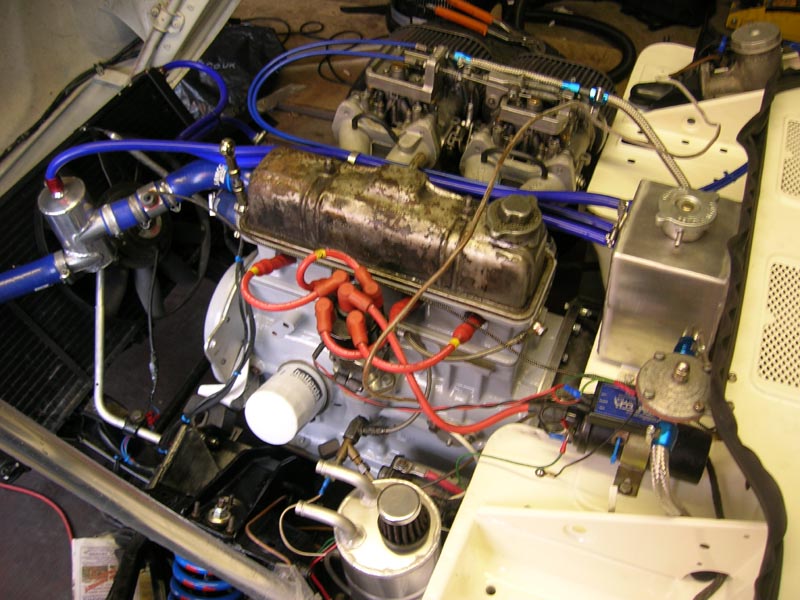
Fitted the regulator properly and plumbed up the fuel line.


Sorted out the header tank by adding another pipe pickup at the top, so the swirl pot dumps its water/air into the waterless part of the header tank, so purging bubbles. Neatened up the water piping.

You may have noticed a longer stud in a funny location on the motor, well all becomes clear. It was drilled and tapped and an alloy ring bolted to onto the top which holds the throttle cables, water pipes free of the head and this only thing needed to locate them firmly bar two tiewraps, the ring edges were buffed so not to cut the pipes over time...No need for anymore fixing points, the pipes etc all hold eachother in place from the tank at the other end...Neat and simply...about 10grams! Ring just pressures the pipes slightly so they stay in place...a scrap from my alloy ewp manifold pipes came in handy!
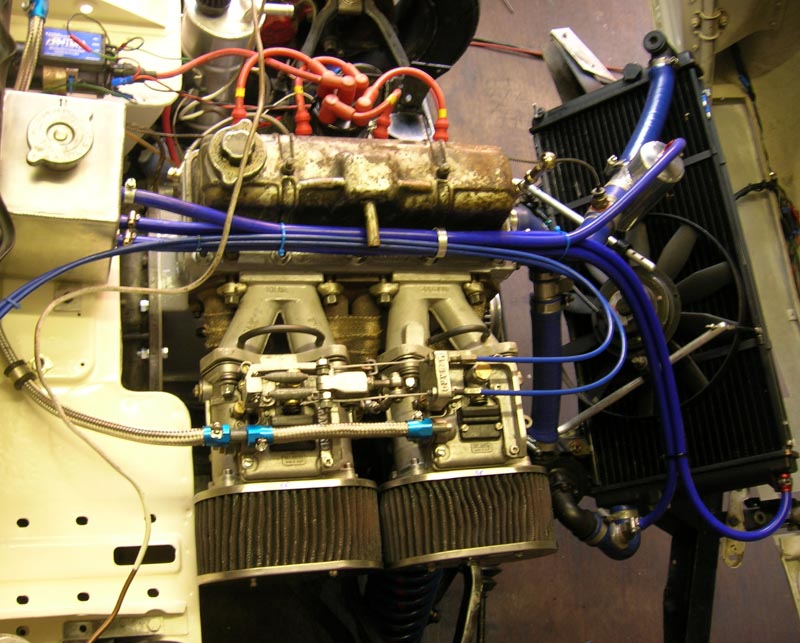
From above. No bullshit engine bay, everything serves a function, some items serve multiple functions, like brackets and alike...I can't really simplify the thing anymore, this is bare minimum! This system has been honed for a longwhile! The water system takes 7.4litres, which is quite a bit and heavy! But durable and good for cooling.

I made the header tanks extra top pipe inlet fixing from a broken Dellorto fuel union, cut off the pipe bit with a retainer ring and tapped one end to 5/16th, drilled a hole in the header tank cut it to 5/16, smoothered some JB Weld on the thread and screwed it in till it bit the uncut flange, being a fan of bonding it saves welding it and will be just as good me thinks....

Also I deemed the swirl pot pipe/outlet to big and as it flows hot water from the engine back to the header tan, which then goes back to between the rad and water pump it doesnt go to the rad directly, the swirl pots water never gets cooled, so I restricted the flow down to 3mm I/D to encourage more water through the rad and less going round the header tank and bubble purging system....

Saturday, May 06, 2006

Brrrroooooooom

A growling beast hast been released from its winter sleep.

All good. Compression within about 2% (ta josh 8-) and average 193psi ...Josh says theoretic best is 195 on my compression so not half bad. I have over 100% on one 8-) dunno how that works.

I use my own start up proceedcure which is just what i do for some reason...it changes every time.

I finally torque the head down after 5-6minutes of running while hot to 58 flbs torque, this is my prefered setting for some reason.

Firstly I go to 55lbs on the head on build up.

Checked fuel pressure, float levels and base balanced the carbs by the pulling on one lever technique+ set timing, built up oil pressure etc. I run it for 1minute at 2K without any water, in two 30sec stages with a check on things between each and timing roughly set on a strobe- I dry run to get the head gasket glue to soften up without any water getting involved due to noticing some negative effects of just flopping on a gasket and adding water before you have atleast heated the gasket up, I then let it cool and add water.

I also drilled out the copper washers from the head gasket as they are not needed on mine, I thought they might not compress as well as the gasket and seems stupid to leave them in place with the oil riser blocked.

Then run for 2mins at 2000rpm (always 2K) to help lighten the loads on the new cam, then stop check oil, water, leaks etc. I can get hectic here as it will bake itself fast if anything is a amiss, so a constant check on the dials needed...

If all is well I then go again for 3mins and get to 95C at the end, let it cool a touch then re-torque to the final 58lbs. You can feel the gasket compress at this stage and 55 lbs build torque has definately lost some grip cause the gasket glue spreads with heat and you loose some thickness with more torque.

I then drop the rpm 1500rpm as the cam has had 6minutes and its past danger point me thinks and 1500 is still ok for cam bedding---I then set the carbs balance up and make the first attempt at adjusting idle mixture screws and get a smooth high tickover going. Thats about a minute so after 7minutes over a few hours its ready for the road, I'd ignore the idle speed, leave it at that and do another 15minutes on the road then lower the idle, finally balance the carbs and airbleeds then set the idle mixture...job done.

I want to keep running under low ring pressure to the min so 7minutes is about minimum I think before road testing and getting in 4th at low rpm and getting some mean cylinder pressure up.

Think oil pressure will be very very good going on first signs.

The oil feed to the rockers restrictor is too big still at 1.4mm, I will downsize to 1.2 next, still too much oil in the top of the engine, the roller rockers have a much tighter clearance on the shaft with flat bushes so they will let less out and so the flow on those will be less anyways.

Wednesday, May 03, 2006

Musings

Finished the bonnet wiring, fitted the lights and neated everything up.

Built up and fitted the stock rockers, I cleaned them in the sonic bath with some dishwasher cleaner, it really cleans well! they were black and came out like new ! credit to finish dishwasher cleaner the blue stuff. It cleans alloy of a type like the pedestals superbly!

Set the tappets to 16".

Rocker covers vent pipe has been moved to the other side, its away being welded up.

Nearly there, still need to prep my valance and get it top coated...hmm, I must say the car looks amazing fitted up, like a spitfire on steriods.

Jobs to do before it moves again : propshaft, fit pressure regulator and plumb fuel line, get header tank welded and fitted, test run the motor at 2000 rpms for a few minutes, couple of small jobs left...Windscreen frame needs painting black....Not alot...

Tuesday, May 02, 2006

Todays bits

Not much done today, did 12hrs real work to enable some more slacking time and 2hrs on the car.

Made the first bit of the rad shroud with my last bit of very thin alloy. Finally fitted the dissy, used some welseal on the gasket for a change as I could never 100% de-leak this area...I found the best dissy drive gear I could find, result is that there is no play at all between the rotar arm and camshaft gear, also the cam is 100% new, not a grinder to the gear hasnt been atleast 50,000 already! no play on the dissy drive etc at all, sweet never had it so good....found a poofy breather filter for my catch tank under a pile of stuff.

Went over everything I have attached to just check its all done up ! it was.

Statically timed it. Bit more wiring work.

Might sort the valance tomorrow...ergh bodywork....

Monday, May 01, 2006

Starter Motor

Dunno if i mentioned it - I got my high torque starter for £10, two and half years ago....its been used loads and loads ramping up oil pressure before starting.

Its from an Isuzu Trooper 2.6 injection....you just need to skim 3-4mm from the starter motors alloy moutning ring.

Its the same item sold for about £170! I was scoffed at by some bloke selling them at a show when I told a bunch of people near by to just buy them from a scrapyard for £10...The bloke mumbled something about worth buying new cause they last at this rate I can buy 17 2nd hand units to one new one...thats already 34years and counting...Must be used to Lucas cause Nippon - Denso stuff is just run in after 200,000 miles on a Trooper 8-)