Few old vids from 04.
The car was fully steel panelled, full concours interior, no alloy bits, but with a half decent engine. Since then the real business began - I have extracted alot more power from the ignition curve and switched to DHLA carbs plus lost a shit load of weight!.
Video's were filmed on extended progression Weber DCOM (not E) carbs as used on 205 rallye.
These gave great throttle response, the DHLA worked as well out the box power wise but I couldn't match the response. After testing around 100 main, tube, pump, corrector combos on the road in proper situation I found about 5 working setups ranging in style -on DHLA its so easy to setup 5 different types of power delivery via the tubes and idle tube settings, on the same engine, lazy road, economical, punchy, less punchy and retain the same WOT power....I went round the block completely testing mains from 100-145, tubes 1-6-8-5-7 and correctors from 130 to 230. I finally found the DHLA setting which gave it all (50idle, 1 holder, 112-114main (temp dependant), 7 tube, 150 corrector, 30 choke, 35pump)This is not actually how I see most DHLA setup that I buy in, usually non emission are using bigger mains and correctors, I found these worked well but my settings give you such active response, fantastic!
-------------------------
http://home.clara.net/oph616e/churchbends2.AVI
old school! short while after buying the beast(ette) edit date is wrong must be 2001, a lovely standard car on 155's and fixed rear spring, excuse the dodgy camera position and my hair....
http://home.clara.net/oph616e/waitwaitpower.AVI
wait, wait power.
http://home.clara.net/ppowell/VERYsteephill.AVI
a very steep hill, as a fit cyclist this one hurts alot, can now goes up here much better as you can run 2nd all the way up 8-) I broke a rocker going up here on the 3.63 diff due to a dodgy pushrod and trying sustained 7000+ in 2nd (what was motorway limit?)
http://home.clara.net/david.powell4/justenoughgrip.AVI
wet, squirrly rear end grip on exit, just yawing about and a bit of wheel wiggling -depending on which wheel was gripping...
http://home.clara.net/david.powell4/raining.AVI
just having a laugh provoking it in the wet
http://home.clara.net/david.powell4/bark.AVI
how to reach 6K in 4th very quickly, note the quick change, no moan from the box, gotta luv the 1850box!
http://home.clara.net/oph616e/justforfun.AVI opps didn't really enter fast enough for a slide, oh well lets create one! or two. The box engages first at speed without any moaning.
RING VIDS! a few Opel Estate Diesel clips, very slow car, had fun basting it
http://home.clara.net/ppowell/hatzen.avi
http://home.clara.net/ppowell/wipperman.avi
Copy and paste the links to your brownser.
Sunday, December 25, 2005
Entertainment
Engine assembly
A view inside the block.
I had been thinking about trying to get some oil out of the tappets while running. I decided to drill a small hole through them as you can see. It protrudes out into the block while the tappet is not in lift, so should possibly let some oil out all over the cam and reduce the weight of the follower and also the ammount of oil flying around the top of the engine at full revs...also oil the walls of the tappet holes while in lift as they spin (until they go bad!).
It will also possibly hold some oil in the followers after shut down, on the followers in lift then dump it on the cam as you start the engine. I don't think the little holes will cause any problems with strength , they go upwards slightly through a thicker part of the base than the thin upper walls. I noticed Jigsaws have holes so why not copy them!
Incidently on the fast road 89 with guite aggressive ramps the followers had been 25,000miles guess, they had not a mark on them, could have reused them after a planish.
Dialled the cam into the stated 103deg figure, I will try the TH5 and hopefully be able to get more top end from it on the 1.75 roller rockers, I'd be hoping the engine gives a "REAL" 110HP not a bullshit figure 8-) of the "I added a cam and dremeled my head which of course gives every engine spitfire 100HP" bollucks.
If it can pull 127mph and still going and it must have over 100HP anyway, its got a few CC now and CR is raised a bit.
I can't wait to drive it again - orgasmic in 2nd when you can overtake lines of cars from 40mph with shed loads of performance, can do tractors in first!
Anwyays, I am confident to say its dead on 103, joys of vernier and dial gauge. The timing cover marker is 2deg out from the old mark of TDC. I punched another mark to account for this, if I use this mark at TDC on the timing gun I wont be 2degrees out now thinking the old mark was right, if I just bolted it all up and didn't make a new marker then I'll be thinking 8deg BTDC is 10deg. Now I have a marker to suit the timing plate, just need to find a protractor and punch a mark for 10-20-30-40 deg BTDC.
Used just a smear of sealant here and there, not a bit came out in squish. Too much sealand = bad...the spray on hylomar could be good...
Shame I am lacking a couple of things...Could have it finished tomorrow. Back to rubbing down then, boo.
Below is my current gearing, with 7500 reliably useable would seem and possibly attainable in 4th gear with the wind behind it.
RPM 1st 2nd 3rd 4th
750 5.1 7.6 10.7 13.5
1000 6.8 10.1 14.3 18
1250 8.5 12.7 17.9 22.5
1500 10.2 15.2 21.5 27.1
1750 11.9 17.7 25.1 31.6
2000 13.6 20.3 28.6 36.1
2250 15.3 22.8 32.2 40.6
2500 17 25.3 35.8 45.1
2750 18.7 27.9 39.4 49.6
3000 20.3 30.4 43 54.1
3250 22 32.9 46.5 58.6
3500 23.7 35.5 50.1 63.1
3750 25.4 38 53.7 67.6
4000 27.1 40.5 57.3 72.2
4250 28.8 43.1 60.8 76.7
4500 30.5 45.6 64.4 81.2
4750 32.2 48.1 68 85.7
5000 33.9 50.7 71.6 90.2
5250 35.6 53.2 75.2 94.7
5500 37.3 55.7 78.7 99.2
5750 39 58.3 82.3 103.7
6000 40.7 60.8 85.9 108.2
6250 42.4 63.3 89.5 112.7
6500 44.1 65.9 93.1 117.3
6750 45.8 68.4 96.6 121.8
7000 47.5 70.9 100.2 126.3
7250 49.2 73.5 103.8 130.8
7500 50.9 76 107.4 135.3
7750 52.6 78.5 111 139.8
8000 54.3 81.1 114.5 144.3
RPM 1st 2nd 3rd 4th

Wednesday, December 21, 2005
Adjustable Wishbones
Finally got them welded. Its just 24mm solid box section of steel cut to 1.25" lengths and pressed into the wishbone section, then welded all round. There is a 3/8th tapped hole to take a 3/8th by 3/8th rod end. Should be strong enough, I may drill the suspension tower holes to 7/16 and re-drill the holes bigger in the blocks, to 7/16th and use bigger rod ends., but the car is light and 3/8th would be fine.
I had to set the blocks to match each fitted position to get a roughly centred rod end in the mounting section on the towers. So each wish has a place. I just need to pop down to the engineering shop and get the lock nut faces recut as they are smoothered with weld, probably a quick job the valve seat cutting machine...
I suppose they will have cost about £100 with the rod-ends, but who cares, there is no SWMBO here whining, the car will cost as much as it costs!!
I have the urge to buy up some alloy hubs and hi-spec princess alloy pattern calipers next. I don't care how much it costs I must have that huge saving in weight and most important, unsprung mass. I imagine the suspensions residual velocity will be much improved by effectively halfing the mass unsprung without the wheel...
Talking of wheels I'd like some mag minilites really these Minilites are quite heavy (cheap) a noticable increase in residual suspension velocity when I fitted them, not good - the suspension wanting to carry on in the direction it has been wacked by a bump..The bane of the rotoflex thing or any lead suspension setup...
On the alloy hubs you best watch the bearing track reciever issue, I think Jigsaw's are more expensive as they are made from higher quality alloy and worth the cash I suspect, they look very different to Canley's (I don't think they are up to the job of racing, road different matter however, talked this over with another opinionated person, a past TSSC champion a while back). Either way you can expect them to be scrap after 3-4 changes of bearing tracks as the alloy track reciever will be prone to unlarging and also takes the heat/hammering from fitting the tracks, its softer than the tracks of course so will be the first thing to be damaged, so if the tracks enlarge the reciever grooves when removing and fitting eventually they grow to the point the track's spin and wreck the hub as they rely solely on friction to stay in place, if you change tracks regulary beware.
I am sure the guys selling them would rather you didn't know that, but its a fact. Alloy items are much more fragile than steel...Also wonder how much testing was done on the units, probably fark all.
Looks like HE15 type copper bearing alloy Jigsaw uses is far higher quality than the cheap canley units.
Marks units look like the ones Merlin Motorsport sell for Fords much shiner denser material different animal, these they have had many years of testing on race cars, unlike the cheaper units, I wouldn't risk my car to save £100.
I can endorse the front alloy engine plates as good, bar the weld was a bit pigeon shitty in one place so I got it redone and beefed up.

Tuesday, December 20, 2005
Few bits
Ended up stripping it, looks like respray time! as it needs nothing more than the seams repainting and bits cleaning up will prep it myself and send it off for a topcoat.
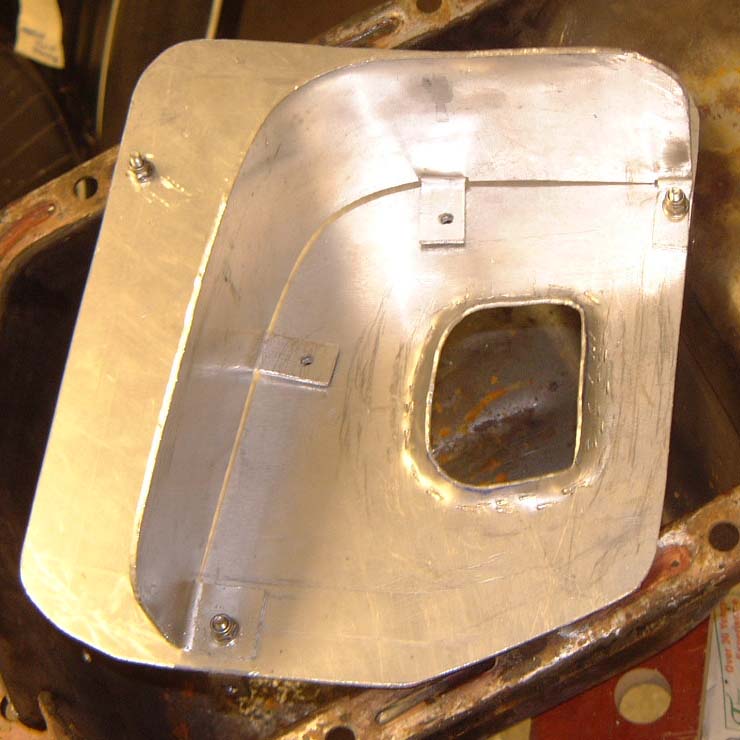
Engine coming on, made another better plate to blank the fuel pump hole, added an extra bolt, a baby M4 just to pressure the base of it as the bolts are at the top and will pull it in more here and be prone to leaks atthe base.
Notice the nice black relief valve cap and plug? Just wire brush them up and heat them with a blow torch till before your very eyes they go black, leave them to cool you have now effectively anodised the fitting, this gives some protection without having to paint them, it just oxidises the surface so it can't rust, like all those black bolts?! Nice tip, isn't not hot enough to change properties of metal.
Test built the front of the engine up to check everything fits, its all perfect it would seem can't get a 0.0015" feeler in anywhere on the gasket, I don't want a leaker!!
Cam endfloat set @ 5thou, probably 6 once I torque up the nuts and squeeze the gasket down 100%. Book it 4-8thou, it had only grown 1 thou in the previous engine over its mileage, probably running the plate in as it was new, I am reusing the old plate as its perfecto.
I lapped in the relief valve with a tiny bit of paste.
Before I added the blackened blanking plug below the oil filter I taped up the oil pump opening and plugged a few holes and attached the vacuum cleaner to the blank hole and sucked the buggery out of it. Nice to make sure there is nothing stuck anywhere- even after being jet washed and pipe cleanered about 5x! You could see it gathering up traces of assembly oil at the end of the main gallery i put there for a test - so the force was quite powerful and worth doing?!?
Sump is painted and baffle finished.
County brand rear main oil seals are a tighter fit on the crank than the red ones, I am trying a black repo one this time as there is a slight line on the crank from the seal and the black ones feels like it should be decent.
Rear oil seal housing and front alloy plate were cleaned with boiling water in the sonic cleaner, came up like new!
I will run a trace of gasket sealant along the tappet side edge of the head and round the rear corner, just a whiff, as this sealed that leak last time!! miracle. Even with the oil way blocked in the head there was a leak most its life. As they all do...I seemed to have fixed it anyway, its the tappets forcing oil out here or something.
I would think it'll be done soon. Head is ready to go on.
Hopefully I can get it painted in late Feb...Get the engine in and running by end march...Another year ?!
Time flies...I think our society makes life go far too quick, not suprising for most folks who are at work wishing their lives away, living for the weekend....
I was in Western Samoa living a local life, mucking in and time stood still in an ever increasing pattern, the rush just evaporated from me, I lost all stress and just blissed out. I got a dose of polynesian paralysis.... 3months here was like 12 here!
I came back from my travels with a bad attitude to our ways, especially after Samoa, maybe the best of all pacific islands for culture and unchanged life, not ruined by our consumer bullshit - a bad attitude to our society that never went away...I think it changed me alot, maybe not for the better, I don't aspire to that many of the things the great masses do thesedays.
Perfect life change for me at this time, moving to Germany and buying a pad near Nurburgring, renovating the house and setting up a seasonal B&B for Ringers, big garage with facilities for suspension setup and fiddling, tyre swaps fo bikes etc for guests. Do tours and possible tution for noobies. Earn enough to live and drive my Spitty at the ring in a house I own, come back to UK in winter or stay there and clean carbs, oh and find a proper women of continental value keep my guests happy 8-)

Wednesday, December 07, 2005
Small engine jobs
Top image is a new improved woodruff key, made from a 6cylinder one...I had some problem with the alloy pulley settling down years ago, or being crushed over time by the nut and loosening torque, resulting gear and pulley not being locked super tight - the key wriggled out forwards and the timing gear spun on the crank by a few deg....My key fits the slot in the pulley and gear perfectly so it cannot move in the extremely unlikely event of the similar issue.
Its never happened again, luckily...I added a 2nd key after event -that slotted in the end of the key groove on the pulley and runs forward down to the thread of the nut stub...its was 0.5mm longer than needed, so it is was pressed into torque on the key by the nut when fully loaded, held the key in place, it couldnt really move anyway but it had wriggling for a while and was manged a bit.
This gave me fear, so I wanted to remedy it with a special key...
Timing chain cover was a spare I used a mirror to level it and adjust it to be perfectly flat, finished off on a massive flat belt sander. Perfect!
Tar stuff in the bottle? Wellseal, odd stinky, sticky and waterproof stuff, super tacky an horrid to work with. Beats the pants off silicone on core plugs, this stuff is cool! Goes hard and seals like, Well.


Sunday, December 04, 2005
Baffled

Should work, need to get some pop rivets! It's bolted through the sump on 3 bolts to mount the brackets that hold the plate in location...I made some tiny wennie copper washers to on the outside under the hex bolts.
Just need to clean the sump up by blasting it and then paint it! Another job done.
Baffle is a pretty tight fit on the sump sides, its surge I am trying to get rid off. As you can see I added a 2nd baffle which sits about 3-5mm from the bottom of the sump and should stop slosh and control the movement of the oil in the sump directly around the pickup, reducing surge yet again.
Making an alloy engine back plate also. Dead easy with a jigsaw and some drills, using the old one as a template. The front is taken care of. 4kilo total saving.
These weight reductions are becoming hard to find now. 4kilos is alot, the car is bare! I was going to make an alloy alternator bracket, just a block of alloy cut to rough shape and drilled as per normal one, theres a 300-400 gram saving.
Since stripping the car its really shown how much weight just cains performance and road holding.
Only obvious items for weight saving are alloy hubs and calipers what 12kilos?, could save a good 3kilos switching to fuel injection with some nicely hacked Dellorto bodies.
Saturday, December 03, 2005
Sorting oil surge for good! Not so baffling...ho-ho!

 So the standard 1500 pump pickup goes out at 45degrees to the back left corner of the sump (if viewed from the back), this gives simply massive oil surge under braking, even light braking gives a big drop in pressure, if followed by a right hander you can be without pressure for many seconds, much worse than the straight down pickup of the smaller capacity original oil pump for early models.
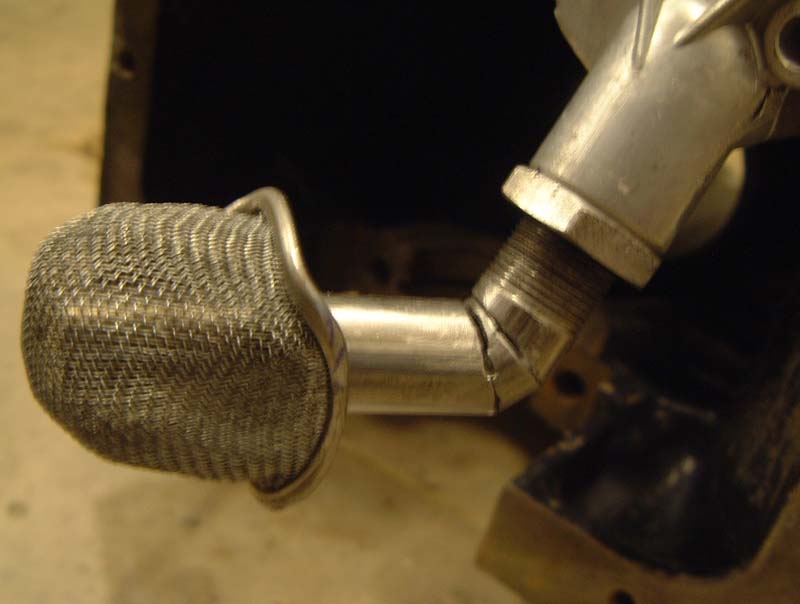
Its really really bad. So I have cut two slots in the straight pickup tube (as per pics) taking out two wedges so it will form a bend, will then weld it up. This means you can use the 45degree starting angle to your advantage in the fact you can get the gauze on the oil pickup on the bottom of the sump and move it up and down a bit on the thread. My image shows its near the centreline of the sump now and also it sits near the centre from the side axis, so should give the best all round performance, most modern pickups go to the pan centre....
I was thinking about making some trumpet affair to go on the end of the pickup pipe, with a 50mm diameter base, with gauze in this end, this sits on the bottom of the sump with about 7.5mm clearance and gives big area for oil pickup...but i think its not needed, also the hole in the baffle plate would to be excessively sized to clear this thing and allow you to get the sump off with the motor in the car, so i forgot that idea.
That brings me to the gauze filter, i bent this into a different shape, still got 6mm between the pickup pipe and gauze. I just bent the two sides up and down to reduce its size. The reason for this is that i wanted the hole in the baffle as small as possible really, I found with it at normal size i needed a big opening to enable the sump to go on with the back plate in place...as on car...also need to account for the front cross member, to get this holes position took about 7 dummy card templates!
I will dish the baffle towards this hole from all directions and also radius the edge of it downwards by about 5mm.
With the distick in, minimum oil level is 15mm over the level of the baffle plate 40mm or so under max level...So there should be no issues with it refilling unless you are completely out of oil....
So I think definately worth making that hole as small as possible as modifying the gauze shape....
I will add a few another baffle or two underneath the baffle plate itself...I have a few ideas I'll try tomorrow...basically like a central well around the pickup. I'd think the plates will be probably enough as it is...as the oil cant get out can it unless your upside down!
Not sure how to mount it, will be making it all from alloy, so may weld 4 blocks in the sump, drill and tap the blocks, then bolt it down with 4x M4 bolts + loctite.
I mean having oil pressure helps !
Thursday, December 01, 2005
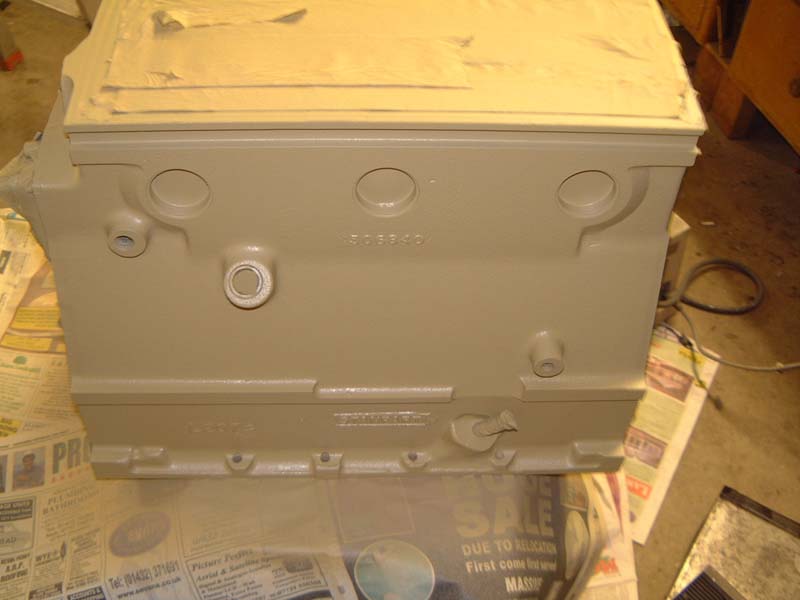
The very grey block!


One freshly painted block...happy with it, got good adhesion, when you cut the excess paint off surfaces with a blade it grates through leaving a firm deposit needing a few scrapes to get the stuff off...so hopefully it'll stay grey! Need a few days to go fully hard its bit cold, had to heat paint and block/head with a fan heater and spray warm. The little gun I was using is a little underpowered for two pack and needed extra thinners but got the job done. Bit more interesting than black, Lotus Twinks were Grey. Have to sort a decent rocker cover! want a SAH one.
Few runs on the manifold side! bar that i sprayed it good 8-)
Got my head back, got the exhausts seats triple cut on the serdi. Blasted out the exhaust ports and chambers so its nice and clean! There was next to no carbon on it before, don't think my engines have time to suffer from that 8-)
Need to get on with some proper work, might paint the engine plates and timing cover tomorrow, just need to get some paint stripper then blast em.
Need to get another dissy pedestal and convert it to a crank case breather and make an alloy plate for the fuel pump hole, will tap an M5 sized hole about 5mm deep into the bottom of the fuel pump opening gasket surface so I can give a bit more tension on blanking plate andgasket as it weeped here before, the two nuts are high up.....close to main gallery but theres 10mm atleast...
Block Painting, Crank Balancing, Head Work
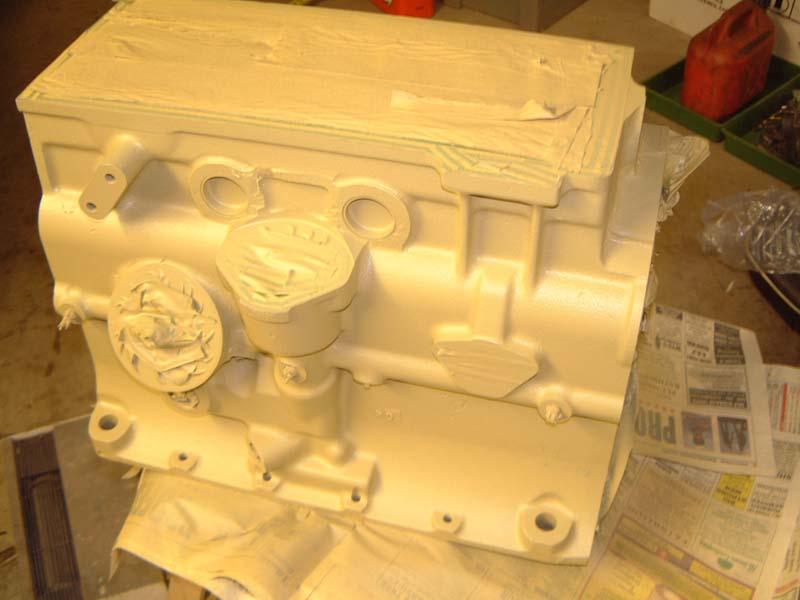
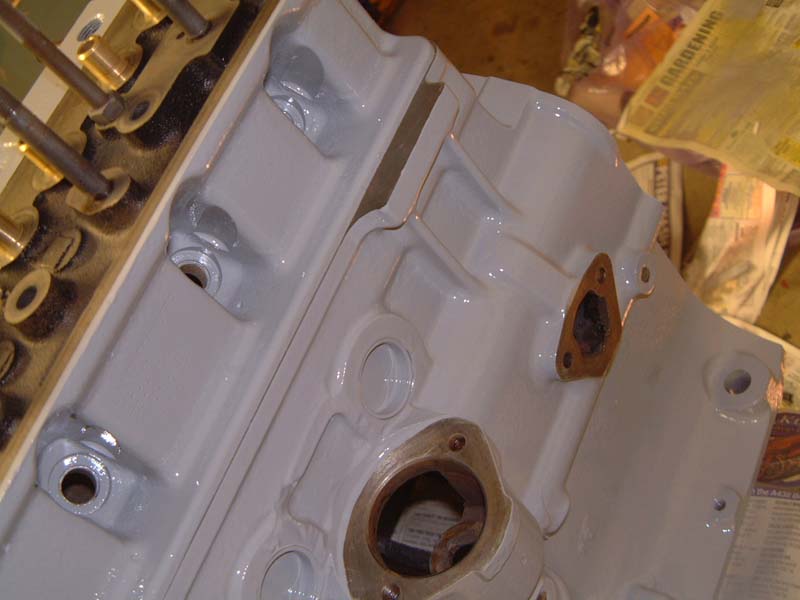
Block work done, new core plugs fitted.
After various previous experiments this is a 2pack Acid primed block, ready for 2pack top coat. I think this will be as good as anything, high temp is a waste of time, as if over 110C the water would be boiling constantly...As 2pack can take far more temp than that should be just the job, took ages to clean it and prepare it, mask it.
Should be stuck like shit to a blanket.
Will be painting any other bits like timing cover, sump same way.....I like things to look nice 8-)
Crank and bottomend was balanced yesterday, dynamically, rods end-end weights and matched. Midland Balancing highly recommended quick while I waited service and got to watch and smoke fags, chances your paying twice over for his services at quite a few Triumph specialists so give him a call 07768577222 save your pennies.
Just need to paint the block, chase all the threads, clean any gasket surfaces back up etc etc - clean the buggery out of it again including all the oil ways, power wash it, and start assembling something.
My favoured masking tape for these things is insulation tape for the edges, as it doesnt leave a mass of manky glue and crap behind like masking tape, comes off real clean and does a lovely job. stick it on overlapping the edges, trim with a blade to size.
Need to get an engine stand my back aches.
Finalised my wiring behind the dash took about 4hrs, as it was just a load of spaghetti having rewired the car but not wanting to commit to final cuts, as building a loom was a staged process for me, I tied up the fuse box, rear end and dash, leaving only the bonnet end, which I will add a modern 6 way cable splitter block to, so making easy removal of bonnet and wiring, on a simple clip junction screwed on the chassis. My custom loom is now basically 1 piece and easily removeable if needed as a single unit. It retains hardly any of the original wiring...I wouldn't want to be the next owner (unlikely) as most of the wire is just red/green and black 8-) but I know whats what so WGAF.
Oh and my head is ready for assembly/paint once I consider some new valve springs... I blasted the head yesterday, had the ex guides fitted and seats recut. After some pondering of ex guide clearances we ended up polishing each valve stem to fit each guide to get a perfect fit on all, worth the effort. A downside of these funny valves!
Too much to do, 3months till March!!!
Friday, November 25, 2005
Oh and.
I am really enjoying being able to strip my car of things and not have to rush anything as its no longer a daily car! very enjoyable 8-)) Hasn't turned a wheel for a month! doubt it will turn another till new year.
Getting Head
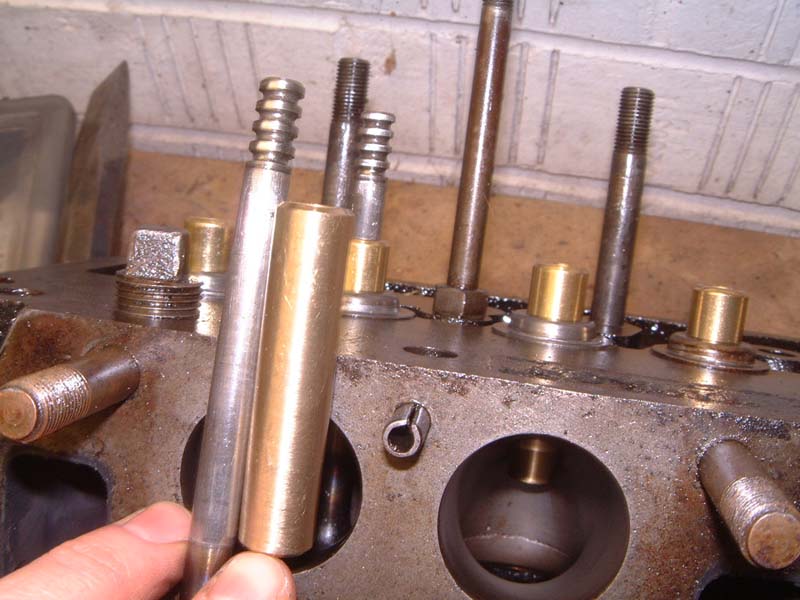


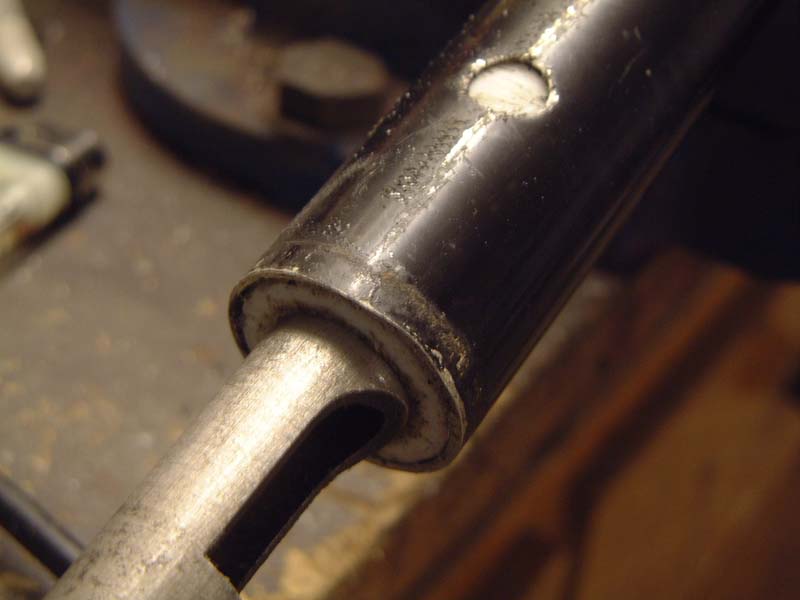
Few pics of how to use Ford Valves in the Triumph Head. 34322 Ex Valve, Ford Capri 1.6. As shown the guides need shortening by 6mm. One image show the standard versus one of the old ones, you can see the need to cut an extra collet slot lower down to house the Fiesta collets and caps.
These 34322 valves fit the triumph guides perfectly without reaming the guides etc, I mean perfect.
Still a bit lost on springs, will take one to my guy and hunt for ford ones the same and maybe replace the springs with doubles and different Ford caps...
Bit of pain working out what all this stuff is...as Oder did it.
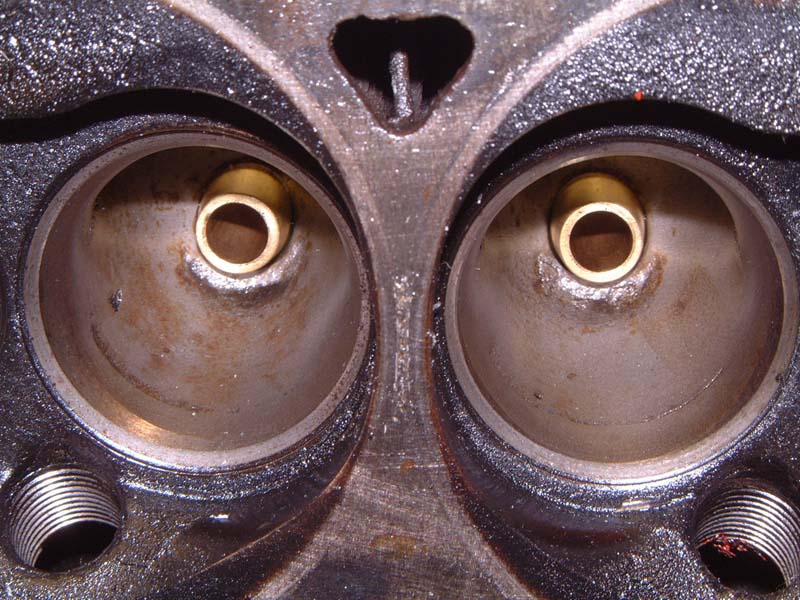
Just a few random images of my ports, I didn't do the work some bloke called Jan Oder did. Think he did a good job! The head is about to be cleaned and refitted, the seats are 3 angle but hard to see, basically there is no material on the inside of the port after the seat area, flows well.
I noticed some Triumph head in for guides and seat cut at my local engineers, someone had raped it with a dremel yet missed all the important porting and detailing just by the seats, therefor it looked like a lot of effort and money for nothing! Details Details! Also some horrible tin bearings sat by the crank.
Had I not stripped my engine down to do headgasket shortly after buying it (owner fitted std cam, tiny Su's and normal needles...) and found a gem, the car would probably be bog standard still or something!! It made me buy a cam and Webers and it all started!
I got some nice bronze coated thrusts today or OE ones the crank is STD here, but takes a STD Thrust at the front and a shaved +0.005" on the rear. Always best to fit the oversize at the rear me thinks. There was 0.008" with two standards (max book) and 0.003" with the oversized one....As minimum book is 4thou I glass plate and emeried the thrust backing, so we have 0.004" now.
Got another sump that I will baffle properly this time!
Wednesday, November 23, 2005
Modified Steering Column


Well I mentioned the PTFE bushes for the steering column.
Finally got them drilled out, they are an interference fit on the shaft, and needed some running in (sitting in the car working the wheel! keeps you warm at night), the bushes to the outer column were also a tight fit...these are tight enough not to need bolting or screwing in place.
PFTE is funny to work with. The lathe wasn't set too tight, and the pilot drill just grabbed in the PTFE and raced thought! SHIT, but was ok!
The feel is so nice, man, its so smooth, silk and feels really quality! Its like Rolls Royce steering, not flapping about on the play those bushes give. Once fully run in it'll be lovely!
Incidently found my column had 4 bushes in it as the previous person failed to get the old ones out and just rammed more in!
TIP! To remove these bushes needs no effort - you cannot budge them with a drift without buggering the soft alloy outer. So set fire to them and they fall out no effort at all, a little tap! Just watch the smoke that comes off its super toxic, best do it outside and be upwind of it.
Anyway, everything I wanted it feels superb. Just need to make the body mounts less flexy now.
Milled 4thou off my 2 tall pistons, all 0.006" under deck now, give or take a thou.
Saturday, November 19, 2005
Pistons Cock Up
So someone added standard sized or 20+ rings to my +60 piston set....pretty obvious as there's a 2.5mm ring gap on all the rings.....
Can't anyone get anything right? Everything I order from everywhere seems to come wrong thesedays...or simply just a pile of poo....Proper new old stock is the only way I think.
I may just use this excuse to investigate "total seal" rings.....be nice to reduce pressure weaps on the crankcase.
I was going to paint this engine lotus grey, quite like grey engines 8-) I was gonna acid prime the block first...as the lacquery thick paint never seems to stay on otherwise....and breaks off in chunks after a while....Might see if i can find a SAH rocker cover like Bowlers, nice item...Tall and wide.
I can't moan my pistons were £78 delivered with pins and rings, they were County, they are well made I think and even weight etc... about £50 cheaper than Canleys, Rimmers etc....
Nice to be able to get all parts at trade price, and of course next day, oddly no delays or backorders when you cut out the middle man!
Cam Cock Up
Well got my so called "specially made" Fast Road 89 cam from ToiletTune. No suprise its not what it is meant to be. Do people think you specifically ask for something for no reason? Do they think they can fob you off with any old thing in the knowledge that most are to ignorant to ask or know better?
Turns out all toilettune cams are just Kent TH5-TH6-TH7 and an unknown race cam with the same timing on the inlet as the SAH 578....The 89 is good as the inlet is longer than TH5 and its kind of an inbetween cam, not a TH5 or a TH6, but something in between, about the most pokey and daily useable cam...
Hense I was keen to have what i specifically asked for and have waited 4weeks for. Idoits...I could have gone to Kent and had them make me the right cam.....its in the right zone and probably just as good but I don't like being taken for a jerk. It was a new grind from a blank...obvious differencies to my reprofiled 89 from before, such as a larger shaft diameter, less aggressive ramp angles - seems as a consquence of the diameter being bigger on the main shaft...dunno they go round and round and stuff...they look different!
Was thinking about drilling some oil dumping holes in the lower end of the cam followers, just one hole about 3mm....saves all that oil sitting in them if it gets dumped each time they bottom out, as they do protrude out of their slots....this dumps oil in the cam lobe area....lightens the weight of the follower, hopefully stop the often present and hard to stop oil leak on the side of the head/block by where the followers go up and down....
Assembled my new bottomend and checked the deck heights...must be a small variation on the crank as 1-4 are 0.005" under and 2-3 are 0.0005" under...Not much but I will get the two higher pistons machined down, then I can drop the deck by 0.005" and end up flat topped. I just worked out my CR was 9.53 on +40 pistons, its would now be 9.65...decked to 0.000"....with +60's.
My chambers are only 33.2cc stamped this is quite big, I have yet to recheck them...The inlet valves are dished and the chambers been opened out round the 1.5inch inlets, so its probably more than made up for the skim of 0.065" on the head in terms of the chamber work lowering CR.
I will measure the chamber then make a decision on finding 10:1 CR it likes high grade fuel as it was before, so why not use 10:1 and make the most of it I say! Will be able to tune the ignition on the ECU.
Hate having to build up a few times with lovely VP and VP2 bearings....but everything was laboritory clean nothing more than a speck of dust anywhere!
Most engines I take apart to nick stuff from have clearly had the contents of the workshop floor crushed into the bearings on assembly and 50% of the engines wear and scoring came from this shit in the engine from the start---- from some dirty urchin.
I am banking on this motor giving me a few years reliable service with trackdays and few weekends in Germany...fingers crossed! It wont be worn out driving daily this time.
I was also thinking of making a Kastner crank feed thing...instead of the oil going from the cooler back into the block after cooling and filtering or back into the main oil gallery, you have this oil going back from the cooler straight into
an alloy cylinder that runs the length of the block...off this cylinder you take 4 high pressure lines and screw them into the main gallery plug holes...This way you get 4 pipes feeding the main gallery from 4 locations so theres even feeding throughout....i.e not being feed from 1 location.
Sure looks cool 8-)
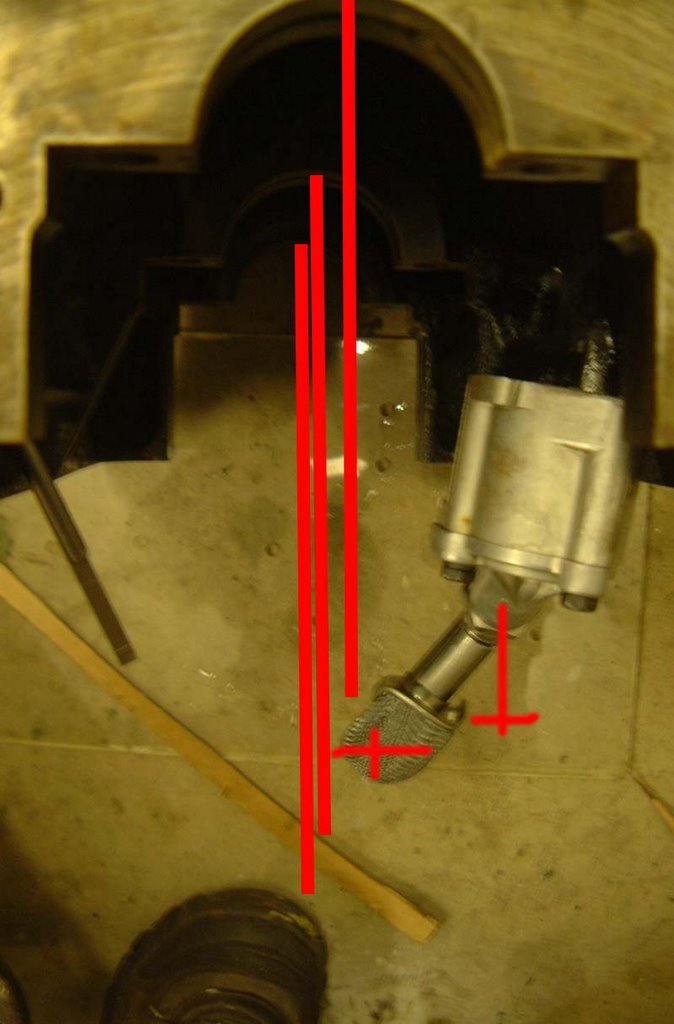
I need to get my oil pump pickup welded as I hacked it up to make it feed from the middle of the sump and forward from the stupid angled position in the back corner...this awful design gives HUGE braking oil surge which will haunt you all through a downhill left hander, I once counted about 6 seconds with no pressure at all, *gently* cornering, I backed off 8-) scarey. Need baffles also!
Tuesday, November 15, 2005
Automotive Anorexia
Few more pics...
The wiring loom goes to a lunchbox, everything relay wise, fuse box wise and also EWP controller is in here, warm and dry and dust free.
The battery sits in the best location, over the rear axle and far lower than the original position! I am sure I could feel an improvement in balance mid corner when I went out to my favoured testing corners....The standard spit when fitted with fat tyres is very on the nose anyway, a bit too much... theres a cut off switch with cable to the dash as on the pics...
-----------------------------------------------------------------------------------
If you have ever driven a decent mid engined car, or driven simulators such as Grand Prix Legends you will be steering the car with a combination of 3 things, steering, polar mass movement of the engine and rear end, throttle...... Also rapidly aware how well balanced they are - these cars have 50/50 weight or a front/rear bias such as 45/55 the car is so awesome mid corner and you can use the rearward bias to steer you round with correct throttle angle, driving that true 4wheel drift ---once turned in and settled you rotate the car past the apex using only the mid engined cars lower polar moment of interia.....
Spits never gonna be a mid engined car but we can certainly improve matters!
The spitifres too nosey -great responce at the nose to turn in but the ass is too light to follow often and floats about....leaving you countersteering at the point of greatest loading, usually mid corner.... to be great here needs a fundemental chance in weight dist......my reduction of mass at the nose (from windscreen frame forwards) must easily into 75kilos mark without even straining to remember what was removed!... Bonnet 27kilos, water pump and housing 6kilos, radiator and surround 2.5kilos, bellhousing 7kilos, engine side screens 3kilos, battery moved to boot 15kilo saving, bumpers 6kilos.....pipework, heater & valve 5kilos theres 65kilos...
I have removed from the boot end, bumpers + internal bracing 7kilos, bootlid 7kilo saving, perspex hardtop window 6kilos.....trim and boot carpet 2kilos, boot prop and frame 1.5kilos, + small savings, spare wheel must add up to 35kilos....
These sums are just quick jottings but you will see a change in my weight dist....
So I have placed the battery in the boot adding 15kilos....so say we are now only looking at a 20kilo saving over the stock rear end.... with the battery moved front to rear....
Standard car say 725kilos Dry
So if the car is 630kilos now....
We started with 60/40 Front - Rear Split and 725kilos.
...I'll not add anthing or worry about the mass removed the central floor pan area (carpets, seat, frames, dash, clocks, sound deadening, doors alone 25kilos!!! I havent accounted for....)
So assuming I have a 95 kilo loss in total mass from only the front and rear of the car (75 front, 20rear) remember the 15kilo shift in mass (the battery)....
So, 435kilos were on the front wheels and 290 on the back! @ 725kilos.
Remove the 75 kilos and we have 360 on the nose now....the back was 290 we add 15kilos for the battery, so 305...and subtract 35kilos for the savings in weight...rear is now 270....add the two together we have 630kilos....
The old split was F:435 R:290 60/40 145kilo difference
The estimated change is now F:360 R: 270 57/43 90kilo difference.....
But I don't account for any inner cockpit weight reduction and also I would think my roll cage is about 35kilos....which is mostly sat at the back half of the car....2/3rds of it atleast as a mass.... lets work it out!
Lets keep the weight at 635 as once my super light doors are taken into account the weight of the rollcage is barely anything additional...and there were atleast 20kilos of carpet and dash etc.
Lets call the cage 33kilos....of the overall mass....If we split it up into 11 kilos for the front and 22 for the back....
So it was 16.5 kilos on each end, now changed to -5.5kilos at the front now 353.5, rear is now 275.5 having gained 6.5kilos. 56/44 78 kilo difference.
Lets add 20litres of fuel the new mass is 650kilos the front is 353.5 the rear is 295.5 54.5/45.5 58kilo difference.....
Of course this very unscientific! but it gives an idea.......thats a big predicted shift. I'd need to move 58kilos rearward to get even weight on each axle...don't think thats gonna happen! maybe another 10! without adding ballast....
I was thinking of moving the engine back 6inches!


Hurray!
It posted and better than ever!
Be picking up my crank and block tomorrow...Need to drop the crank, rods and my prop off near bir*ming*ham....
New engine not far away now!
I got a new daily driver...An Alfa 33 1.5 I.E....quite quick for 1500cc...warm and dry, 1 owner for all but 1 year of its life...on H plate, genuine 27,000miles....its minter! £500! nice! typical italian gearbox, with a weakish 2nd from an old bloke grating the gears, but no issue with double clutching and a blip. Bar that minor fault its faultless!
I do miss the spitfire having not driven it for two weeks - miss the 4th gear pickup and the torque or lack weight, the Alfa's all over the road, torquesteer, remind me to never pay more than £500 for any FWD car, I really dislike them thesedays....yuck and wallow...Its may do 60 in 10s and 112mph...but its no match for the Spitty!
Makes me think about making and refitting a heater for the spit 8-)....I was thinking oil radiator or something with two beefy PC cooling fans on the back and two pipes coming off the radiator to the screen....just enough to warm the screen a bit...
Bah these pooftastic thoughts!
Friday, November 11, 2005
For the 3rd time!
I am typing this for the 3rd time! Damn PC crashes when i attach images and blogger is no good on Opera browser!! Damn blogspot is asking for my password everytime I click something!
Few pics if this ever works...
Some rods.
Megajolt ignition ready pulley...Alloy and has been modified with a stainless steel band on the stub, so it doesnt wear a ring every 8-10K miles and start leaking as with all alloy pullies...The trigger disc fits on with two bolts, the pulley was cut on the back so the trigger wheel has a concentric and interference fit onto the pulley.
My latest area of improvement is going to be the steering column and bushes. Ditching those god awful rubber bushes in the column - they that are great for 10minutes or so when new...I have some 30mm diameter PTFE rod, I will use 80mm lengths or this, 1 at the top and one at the bottom of the column outer - I will drill a hole through these bushes, just under 3/4inch to match the column...I will bolt them to the column outer, by drilling through this into the bolt in 4 placed and tapping the holes to take some M4 hex bolts.
I will then have a virtually wearproof bush, which gives ZERO play and can be fitted tight on the column as PTFE is one of the most slippy and self lubricating materials on this earth!
If this crashes again now I am gonna go outside and beat something with a lump hammer.
*click*


Tuesday, November 08, 2005
Engine
Well, thought it best to make a start.
So ordered a new cam FastRoad89 again as its quite revy and torquey, fitted cam bearings in my old block, to save the block as No4 had bored some rings in the block on the bearingless cam...anyway the cam bearing is solid fit and would be just fine.
Found some lighter con-rods, my old ones were late small crank Herald 13/60...turns out the early Spitfire and Herald small crank motors had a lighter rod, having now checked this on a few engines its true. The later rod is slightly wider in the beam and more excess material on the cap. The late type are 595 stock with little end bush and my lightened versions of these that came in the engine were 576 with a little end bush.
The earlier type are 568 with a little end bush fitted! over an ounce lighter item for item!...After polishing the main and ends, removing 30% of the cap beams, and equalising the caps they ended up at 533 each with a little end bush or 517 without. Thats pretty damn light...I could take the rods further but the fact they are 43grams lighter than my old ones will do me i think.
They say remove the little end oiling conical when lightening, but I don't see how a flat surface with a hole is going to feed anything into them....so I left these alone....its about 2grams you save....I understand that the windage will blow oily air into the little end on the upstroke via hole and X feed recesses inside the bush, but it has to be better with a conical V giving greater surface area, rather like adding a trumpet to a carburetor, suddenely you have an ability to get more air into the same size hole via increasing the potential surface area that feeds the hole...anyway...
I have actually done two sets of rods, both the same.
The rods i will be using had only done a few miles since being reconditioned, I checked the bearing distances on an opring machine and these were the best rods the others werent as good, the best set were just fine under thou variation in throw, so no piston milling should be needed to get a near perfect deck height. I was going to replace the little end bushes but its pointless as when heated to 80C with the pins inserted they are interferance fit and tight, showing only a tiny clearance cold...so thats a few quid saved! and my OE little bushes remain spares for another day.
I check the big end openings for ovalality on a machine, this showed about half a thou which is mircoscopic, but I reamed then out anyway as they were very slightly undersized by around 1/3rd of a thou.
Incidently whoever did the rods before was handicapped I think...as the caps were all off centre and no cap seemed to be perfect on any rod, even the right ones! probably why it was it tight when I built it, but not tight enough to worry about, and as the big ends were so nice clearly no ill effects!
This set of rods should prove much improved for running in and build up and longevity or bearings as there were a number of issues on the others, all within "book" figures, but that means nothing in the world of doing it properly.
Incidently they were of course sonic cleaned before any of this, nice when you can screw in the bolts and there is no resistance at all, no gritty bits etc, again amazing where all this crap comes from that ends up on the bottom of the sonic bath.
I tried rigging up and end-to-end balancer but couldn't get reliable results....so they go to Midland Balancing with the crank etc, dropped the crank off for grinding also....which to be fair is a waste of time...the big ends were really good having only done maybe 9000-11000miles. The mains have been maybe 50000miles on their 3rd set of bearings, the surfaced bar mild tramlines on the middle bearing were hardly marked! thats not hardeneded either! Amazing really....hense I hope with everything right this next engine should truck on for ages, especially not doing 300miles a week in it as a daily driver, as bar a few annoying problems it was in great shape, for a used and abused trashed from cold motor...used as a base for many experiments and subjected to all manner of horrors!
They will get ground anyway as I cannot get any VP-VP2 in either size of current grind for less than the combined price of other sized shells and a grind! .....bearings were steal @ £12.95 a set and grinding costs me about £35 for 4 journals...up to + 30 mains and + 40 big ends so the life of this crank is limited! be swapping bearings next time before they munch the crank up.
So thats about all you can do to the rods......I was going to mill out a bit of material from the ends of the gudgeon pins, maybe 10grams per pin and investigate any material inside the piston skirts that looks excessive...I'd like to save an extra 50grams over the old setup....
Also the old rods were only balanced in weight, not end to end...as that motor was pretty smooth up over 7K this once can only be better!
The flywheel I had lightened was never balanced with the crank so I would imagine that was a bit out as well....
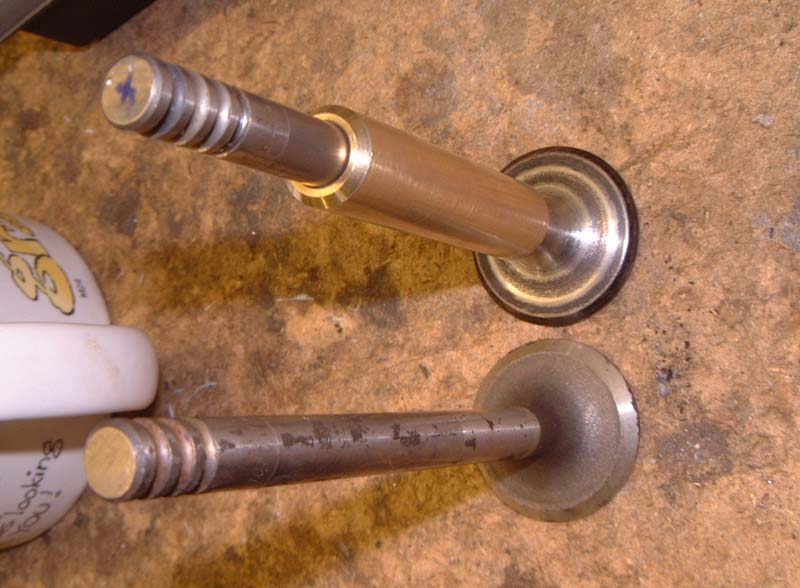
I will be replacing the 4 exhaust guides and valves with new ones....same as before Ford Capri, Cortina 1600 valves....Part Number 34322. cheap and quality 1.25" valves.....to use these ford valves the guides for triumphs need shortening by 5mm or so...
The old exhaust valves had been 50000-60000miles and are rather good still! but ebay turns up valves at £4 OE spec you can't turn em down! The backs of course will be reshaped, by grinding them in them removing any material on the valve back that hasnt got a silver mark on it showing it is seating on the head...here is were most of the extra torque and power is made I think, especially at low rpm (my modified engine has shit loads more idle power and 1000-2500 power than a standard motor... to match my flow at 2mm of lift the standard valve with a 4mm! seat has to be twice as open....that cains flowat small lift so badly...once the cut valve is off seat it can flow immediately and out over the raduis of the entire valve back...standard valve it has to creep out over the valve back, do a quick 45degree turn and come through the gap for the first few mm....
She will be 0.060" overbored also.
Sunday, October 23, 2005
Roller Rockers
Fitted them. Had to polish the head a bit as the pushrods rubbed it.
Spent all afternoon trying to get it to run under 2000rpm, fluffy misfire, having tried 46-47-48-50-52-53 idle jets and a range of idle holders it was present on all, so I gave up.
Its mechanical happening, I think gas speed is non existance due to the increased lift, during lower rpm, it comes on cam @ 2500 properly when if feels life the intake gets into cycle. Anyway, the timing on this standard engines cam is 18-58 58-18, way to early for use on sidedraughts anyway, they like 33-45 or so to get some suck in the chamber me thinks, hense modified engines have far more pronouced pulse in the intake...This cams suits constant draw I think, 1 carb into 4 cylinders, so the other cylinders keep some gas speed in the inlet, with sidedraughts each cylinder becomes a lone operative...Hense needs a different cam type without air box use.... Without the use of atleast a Mk3 cam or something with 275degrees the sidedraughts are just mute.
I'd think on the proper engine the rockers would work well all over...
Anyway, a bit more mid range kind of 3500 up feels like...Also the idle is clocklike! Loads better, smooth, no noise or ticking if the exhaust was quiet and carbs not so barky you'd be hard pressed to know it was running....Roller Rockers are worth the dollars for that alone, also the idle mixture seems easier to set with a wider band of adjustment...odd...idle is a pleasure! it purrs. Shame from there to 2K is untuneable...every jet stumbled, lean and rich and the correct one, plus all holder combo's and ones that I know work perfectly on both engines ,so you what can you do!! nothing with fuelling, will play with ignition curve and few things tomorrow.
So wont be using them anymore on this spare motor after this, think it needs more advance and recurving and most important a suitable cam to get anywhere....its also lost all torque off idle and at idle, you could just let the clutch out slowly in reverse without revs before on both engines and get rolling ok...it'll be going back to mini lift to suit the mini power cam!
You can see the extra lift visually, its all of the 2mm odd, that it should be.
The rollers should really come into their own in the high rev band 5000 up says Bowlers software, which is ideal...as 7K is useable in a daily sense. My proper engine is smootherand more balanced at 7250-7500 than this one is at 5000....
Anyway hoping for big things with Megajolt 3D ignition, RRockers, new engine...I think based on the old engine which I happy with at the end, that production car driveability and flexibilty can be maintained, with a shed load more power and 1500rpm more revs, like two engines in one without ANY downsides at all.....rather like a preppy standard engine with wicked torque to 5000 then a rocketship afterwards.
Friday, October 21, 2005
Roller Rockers, Weight Saving, Suspension.

Few images. Top is my new polycarbonate hardtop window. Pretty easy to make, apart from buying acrylic and breaking the first one as its brittle even when heated...I though it would be more glass like, anyway polycarb was super flexy and did the job perfectly..Incidently the side windows are acrylic as its stiffer. The window is rock solid and under tension all over no bows or warps bar a little by the hex bolts holding it on, fits perfect and was siliconed into place. I sprayed the a 1cm black rim round the edge of the entire window from the inside. This means the silicone cant be seen squishing about behind the window in an ugly fashion. Took 22 bolts to fix it, tapped into the hardtop no nuts needed...Seal, trim, and glass was 7.6kilos...I thought it was more, but the new setup is 1.5kilos complete using 3mm polycarb sheeting.
Next down was bargain roller rockers, how successful or durable will be found out on my crap engine. They are 1.75 ratio, ie loads'a'lift. You can see how much further the pin is towards rockers main axis on the shaft. You couldnt run tubular pushrods on these, atleast not without removing 3-5mm from the chamber in the head that the rods pass down through and into the followers, as they rub the head on a standard skinny pushrod, so minor dremeling needed or a wad removed for tubular pushrods.
Incidently I had one of those fall apart and cause a rockers to blow as it increased the tappet gap when the base that sits in the follower became loose in the main rod, so it span and jumped up and down the distance of the tappet clearance, no bother till it got more worn. This causes the gap to increase at the valve end which I didnt notice and then of course the rocker arm hammers down on the valve tip (as evident via minor squishing of it compared to the other tips) and overloads the rocker, it broke at 7K rpm in 2nd taking 3 more with it.
Anyway, modification was needed to the end main pedestals, as the rocker fouled them, 5 second job with a bench grinder.
I will add them to the standard engine and test them, they would give an extra 0.090" valve lift over 1.45, in theory, on the 89 cam, which is an extra 2.2mm of lift.
Valve Lift =0.424"@ 1.45 @ 0.293" (camlift)
0.454"@ 1.55 @ 0.293"
0.484"@ 1.65 @ 0.293"
0.514" @ 1.75 @ 0.293"
Or something like that over the rest of the ratios. Anyway I have access to a rolling road I could rent, so may back to back them on the new engine and see when retuned if they do anything worthwhile...
Bottom pic, wishbones. Just need some slowbies to send my rod-ends and then weld em up.
Got two new flanges for a new prop as the flanges on the others have spun caps now -even though appearing good and being built professionally onto a new prop of smaller diameter and weight. Protech in Hartlebury Trd Est, Kiddiminster do me a good job normally and fit decent joints for OE spec modern cars for me as an option. I have no complaints about these on the driveshafts, mated to new flanges every time they will last ages. So hopefully the prop will hold together now it has nice new flanges and decent on the joint caps.
MOT time, added a washer bottle in the space to the left of the passengers feet in the footwell, speaker hole?, speedo and few other legal items.
Have some nice new Bridgestone RE720's in 185/55/14 for the back going on next week, perfect winter tyre and summer tyre, scores the best rating of any road tyre on the market in German tests, wet and dry grip are meant to be superb as they are very soft! A wolf in sheeps clothing I read, so why not..I may leave 175/60/14 on the front, as understeer is something the chassis rarely does usually straight to oversteer, which slows you down and means getting out the power, a tiny bit of understeer is ALWAYS quicker if using wide tyres, cambered suspension and modern setup where long duration oversteer isnt really the shit. But will leave a decision on that till further revisions to the suspension are complete, and the car gets aligned, cambered, corner weighted etc.
Thats about it! Phew!
Tuesday, October 11, 2005
Latest Developments
Hmm. Moved the cut off switch to the boot, now cable operated on the dash. Rewired a few bits, you see I rewired the car a while back and hadn't finalised it. The main fuses, relays, EWP controller are housed in a box behind the passenger seat. Neat job.
Added an adjustable clevis to the brake master cylinder, so I could adjust the brake pedal up to get a decent heel and toe position...adjusted the layout of the pedals with a lump hammer.
Next job is new rear shocks I hate spax - get the pooped prop sorted out, UJ's have spun in the caps..new flange time.
Retuned the DHLA for this standard engine:
48idle
7850.1 holder
7 tube
110main
170 corrector
28chokes (needs 26 really its that shite, 30 baggy, 28 still a bit flat)
33pumps
1 vent
Engine has no merits over the old one, twas better at every rpm....odd having 2K revs less to play with! doesnt like my gearing either.....
Added a new indicator flasher....added an electric motor to run the washers and replumbed the system with boy racer blue vacuum hose.
Got some rod ends coming to make my adjustable top wishbones..
The AVO have yet to hit the bump stops, amazing how awful the Gaz were. They have 1inch of travel before the stop, ample...rides nicely, but needs more camber, went from 1 deg or so to virtually positive camber after raising the nose 15mm...! Hense the modified wishbones...As I would need 1inch of packers on the bottom wishbone brackets to find 2.5degrees! Also this would make the front track wider than the rear again...
Saturday, October 08, 2005
Few more pics.


Best ignore the engine, its a spare I ripped from a rusting Dolomite last week. The rest is the same as it was before, I found this water system robust and reliable without tendancy to blow out water or do anything untoward at any time. It can be made out by the blue pipes!
I had the header tank welded up, basically theres the Davis Pump thing and water going out the head to the rad, to the pump and round again, no heater or anything other water things. The header tank pipes run from the top of the rad and just before the Pump. So the pump pipe is under suction and scavages from the header tank, which in term sucks water from the top of the rad into the tank....so its a self feeding system quite like the heater system. As any air bubbles end up in the rad at the top, this system self bleeds air into the header tank, where it stays....I tried a few systems and this has been faultless the 1.9 GTi Pug rad isnt the biggest in the world but with my tiny grill hole gives super cooling.
Kept breaking alternator brackets etc....Solution was to drill out the heavy steel alternator mount to 1/2inch, then instead of using a few bolts and lots of complex stuff to hang the alternator like standard, you can simply hang it on one bolt and pack the alternator on with a few washers...anyway much better, also my car is built to come apart easy, this saves pissing about. Also the adjusting arm is rod'end'ed.
The interior, basic, the dash was removed as it served no purpose. A small alloy plate was made and added behind the wheel this gives perfect vision to the dials at all time, rev counter thanks to Bowler sits on the wheel. Need to get a decent seat.
The only seat that fits from measurements is the skinny version of FIA spec Corbeau Sprint Pro, all the rest are hopelessly wide, and those classic bucket things mean you are sitting in the car with your head pressed against the roof. I like the my bottom to be on the floorpan, the bucket gives facility for the lowest position possible, so thats all good. When I got the car the seat was jacked up on homemade mounts, it was way to high, the whole car felt horrid, like I was sat ontop of it!
The current seat is standard but I added some extensions to the front seat frame mount points, so raising the front by 1.5inches and cut off the rear of the frames a bit, so the seat falls lower, this gives a pretty effective bucket seat, with half the wadding removed from the seat base...Also I use a passenger side seat as the drivers seat, the rear is bent in such a way it is more supportive than the drivers?!?!
Friday, October 07, 2005

Well, its been a while.
Here are a few photos of the car, I was told there are none on my blog! doh!
You can see bigger image here http://home.clara.net/ppowell/sptty.jpg
Recent mods...Well, engine out for a +60 rebuild. Running a 70HP (at best) 1300 Dolomite motor atm...still goes ok!
Fitted the 1500 kipping (billet?) stronger shafts but have yet to dial in the suspension, hopefully UPS are bringing me some front AVO shocks today. Will test the 330lb springs at a slightly higher ride height with them being height adjustable...also get the corners weighted.
Its got great exit traction using 20psi in the rears but there is too much roll during turn in and the front is too low at static and drops too much. My Gaz shocks are both too long and constantly on the bump stops and also non adjustable without spacer things...
This roll means the rear goes light on fast entry and there is profound lack of rear grip during initial turn in, to slow tight bends mainly, as the whole chassis's aspect is wrong, it drops forwards or dives hense it needs raising/stiffening at the nose, as the front dropping really takes all the weight off the back inside which causes wheelspin and oversteer during initial exit, apex, power on, and also it doesn't make effective use of the loaded outside rear tyre so it kind of squirrels in on a wave of changing camber.... although grip is still better than any spit I have had before.
I will ditch the 330 springs and use 480 next, as I don't think even when raised up the dive will be cured. Also the new rear spring is very stiff and I will make another set of drilled uprights with the holes yet further down...(which means flat banjo style brake line fittings on the rear brake cylinders or the spring fouls them! be warned, I had to remove half the spring eye thing off a swing spring to clear the lines with a hole 1inch further down) hopefully another 1/2 inch here in the uprights and raising the nose 1/2 should give the car a very slightly raised nose in respect to the rear, aiming for 15mm higher. So should pull flat when you brake hard with harder springs and make use of the first part of the suspension as suspension, not wallow. I would think then that bar geometry and camber - tracking there will be little more I can do on the solid shafts, and the car should work well...At this time is corners well once settled is supple, a bit too supple, has great exit grip from slow corners but its a bit fussy on the way in.
You can tie the car up by making the dampers very stiff, which makes it plainly obvious your spring rates are too low.
Got rod'end'ed radius arms also I need to weld up!
It was ok before I lightened the rearend up and fitted a new spring! The bonnet weight saving of 30kilos certainly helped regain some balance.
Oh and a side mission, exhaust is currently straight through a micron motorbike race can, its VERY loud...so I will visit Jetex.co.uk who sell loads of 2" pipe sections and boxes.
I worked out if you use 2x 245mm 2" 30degree bend sections you can extend the main 2" pipe which passes under the prop, so dumping the classis Triumph Twin pipe system and Y piece, you add the 2x 30 bends in opposite ways so thus kinking around the diff and ending on the left of right of centre..about 100mm short of the bootfloor section, use 100mm 2" section to extend and meet a bigger silencer than sits under the boot floor and pokes out the back a bit, rather like my current setup but with a much bigger backbox, I was going to use a BIG51 silencer which is the biggest and should shut the car up and also sticks down the same dist as the smaller versions as they are all 100mm tall...you can select and add on a tailpipe which sticks out 25cm, all very boy racer! Hopefully a boy racer extension to my manhood will stop the back of my car getting black from soot.
Friday, July 29, 2005
Wish it was easier to load pictures 8-) as i'd load more, must actually look at it.
Current DHLA jetting on shorter progression setup is.
50idle
7850.1 holder
112main
7 tube
150 corrector
35 pump
150 valve
fuel pressure 2.5psi
been like it for a while so must be ok....
about to rebuild the bottom end of it...
Hit 6750 in 4th on my new 3.63 diff....thats 122mph (123.8 without tyre wear), not bad! there was definate 7000 potential even on this shagged engine it was pulling still...car felt 100% stable would be ok at 150 i recon....I did notice at this higher speed the damping would need stiffening, or the springs rates, as planned, also the front with the new airdam felt great but the rear was a little light on a corner...Thats where the new spoiler/wing which is tasteful and small and sits on the end of the bootlid will come into its own....
Blowing up the road to 70 mph @ 7K in 2nd is good fun, now forced into taking roundabout type hairpins in 1st if going all the way round wanting a fast exit, 2nd is too long, but first gives awesome pickup as a useable gear.
Thursday, July 21, 2005
If you want some lightweight doors

I see a guy Brian was interested but there is no way to contact me!! Sorry.
Sunday, June 12, 2005
Been a while, I suck at these things.
Few changes to the car really making progress now! bodywork is taking alot of time.
Battery in boot - better weight dist, and lower in the chassis leaves a hole for oil catch and breather system.
Rewired - now fuses go not the loom, relayed headlights.
Dash removed and relocated behind wheel - wheel and steering tubes to be braced to improve its stiffness as it wobbles a bit.
Lemans type bonnet added - weights 13kilos, metal one was 38kilos
Airdamn being built - lighter than steel unit provides evacution of air to the sides of the car rather than underneath, limiting lift and drag, also provides stability and minor downforce, due to shelved base.
Dellorto DHLA fitted - tested many jets. Best overall performance is defintely on the 30choke with this engine, 32 gives best power from 6500-7000 but at a large expensive in the mid range, 33 is gutless - 30 provides much higher levels of torque below 5000 + pickup is great in all gears, crisp and will spin out to 7000 easy on a flat power curve from 5000, this gets me going well, the 4th gear pickup is great!, this car will be geared long with no concern for off line the perfomance -110mph @ 6100 in 4th and 118 @ 6500 or 123mph @ 6750. So I think this will give best performance for my needs and I can have peak power for longer period in light and aerodynamic car and see 123mph I think it will do it, using 3.63 diff as the power running out at potential maximum speed is reached, perfect. At this time I be up to 6500-7000in 4th in no time and you run out of gears, so 4.11 is telling me 3.63 is needed. More weight reduced quicker it gets to 6500 in 4th...the gears are wasting speed...also its so fast in 2nd your doing 60mph in the blink of an eye with no lag if your over 3500 in the gear when you press so, so gear it up!
Jets best are:
30chokes
132main
7 tube
190 correctors
35pumps
47-48idle not 100% yet
7850.3/2 holder
1 venting using 3 hole non emission carbs.
Economy is good and driving is crisp and willing, lively.
There was a very pronouced effect moving from 40mm trumpets to 10mm ones. Really different, a lack of off idle smoothness, noticable rougher, once over 2000though the car is much more eager and crisp...The inlet is long tract on the spitty. I notice the effect instantly, sounds different and drives smoother once out of town...I am very happy with them, I noticed this on my first test with the dellortos running no trumpets.....I find on 40mm at high rpm there is more delay after lifting off and going back on the power, smoothed right out on 10mm's. Like there is much less drag on the tract to the valve.
Fuel line runs in cockpit - safer
Thats it! images to follow.
Monday, February 28, 2005
More doors stuff
Almost done! Both sides are together and seal perfectly well. Got a pop out window which gives great extraction from the cockpit, like a vacuum cleaner (now has seal)! The doors have a non standard way of fixing the inner weather strip, an inverted flap. After the pics I found some hardtop front seam finishing seal, like doorseal without the seal, just the fixing part that slots over panel seams, this seals thousand times better used a a window weather strip, also holds the window in shape along the base as the 4mm polycarbonate sheet is flexy.
The entire passenger door complete weights 5.9kilos now. Drivers is 250grams heavier. These are light doors, remembering the fact they seal perfectly and are ok road use and daily driving this has to be the best system surely? I could find another 50grams I think but thats it.
I am relieved its worked - as usual with my creations I never plan anything on paper before I do it, I just think then act. When I have pumped in over £550 in raw materials and fixings + up to 100hrs on these doors they simply had to work 100%. Also I now uninterested in backtracking on anything in this project, it has be the end solution and work right first time. Its so easy to throw masses of cash at these things and not do quite what you wanted etc.
Also the doors now fit really really well, the gaps put the fit of the old panels to shame from every angle. I have a few mm's to find in one door at the front bottom corner but its there to sort out. I like things to be right!
The doors are rather flexible without the inner skin, but this caused no issues and the doors close and hold station fine once shut.
Just need to bond the braces in now and paint them. Then I can move onto this bonnet. I will be glad I have put alot of time into these doors and my motivation for them is limited and almost out. I have had the buzz from the extra performance/handling saving over 30kilos gives now I need more.
I think I will firewall the boot soon and stick the battery in there, thats a good shift in weight dist and gives me some bulkhead space.
It pained me to add the door bar as this weighed a bit (3kilos) and hadn't been fitted before, but thats life...I couldn't see 2kilos anywhere to compensate, its bare.
Been so cold the refitted DCOM's seem to want 140mains and 180 correctors, I think its a bit rich at the top though, smells a bit, honks on though its not lean here. Added some octane booster to a tank full of 95 pap the other day saw 6900 in top today, thats calculated @ 111mph...The rev limiter came on.
Since taking so much weight off the rear and so little from the front its really in need of the whole suspension setting up again, its great it handles ok - just crap over rough ground due to the awful suspension - i can't wait for suspension adjustable at all points, rack height change and setup as little bump steer as possible - on the nose. The bonnet is needed to return a balance weight wise, with an 180HP 83 kilo (17lighter than the 1300four pot) K-Series mounted as far back as possible 7" or so (maybe a CDS cage around the flywheel? I want to be walking in old age not hobbing) - the balance will be really sweet, it will be insanely fast. Its pretty quick atm, with much more torque and another 70HP it will be very effective.
Interesting to go back the DCOM after the DCOE, DCOE use shit loads of fuel twice as much, never really that good in traffic. The DCOM has less punch in early acceleration/mid range but the outright WOT power seems the same. The DCOM drives so sweetly in town and on progression, much less work and far more refined. It is however evident that at cruise it runs much leaner on DCOM and has occasions of very minor surging that I cannot seem to cure. This doesn't bother me much, its more the exhaust note goes lumpy with a quiet one you'd barely feel it.
Overall the DCOM is vastly superior in my eyes for road use.
Few pics of the doors. Enough waffling for now!


Friday, February 18, 2005
Today - Success
Well Well, as usual it worked out well 8-)
Fixed up the window system on the pass side. Yet to be glued in but its solid. I did 100mph today and the window didn't so much as move. Moved my hand around the window and felt no draft, bar the one from the range of holes in the seals...
I now need about 6metres of doorseal to redo the entire lot. As it the seals are setup for softtop and have gaps and joins, needs to be a complete seal all around the door, hardtop and window. This will stop the annoying leak when you do 80mph in the rain, the water pools on the window held by the wind, runs backwards and down and pisses in by the B-Post cap. Also need new hardtop to windscreen seal, and the inner one on the hardtop. Need Need Need.
Heres a piccy.
Yet to make the pop out windows, few things to change this was first fitment.
I note the door closes with firm clunk, feels like it weights nothing, pops open nicely. There is a lack of rattling etc over bumps, feels solid - cause it is!
Refitted DCOM carbs, I love the 5 holes, just couldn't help myself...fitted 32 chokes and reverse firing jets to them. Noticed also I have been without full throttle for a week 8-) can't say I'd noticed actually.
Just better remember to balance them as it was about 11.30 when I finished and my neighbour might get pissed off, must change my exhaust, its a micron motorbike race can, stamped "NOT FOR ROAD USE" its bloody loud, low and boomy...Was ok buts oiled up now and got superloud.


